

So far we have seen, how to create a slice, how they work, how to promote and divide them, and the types of slices. Now we'll put all those to use...well, not everything but most of it.
You'll get a much better understanding at the end of this essential to what exactly the slice tool is and how important it is when designing a website mockup.
If you haven't seen the other parts, please start from here >> Essential for Slice Select Tool 1 . If you just want to understand the HTML stuffs then continue with me.

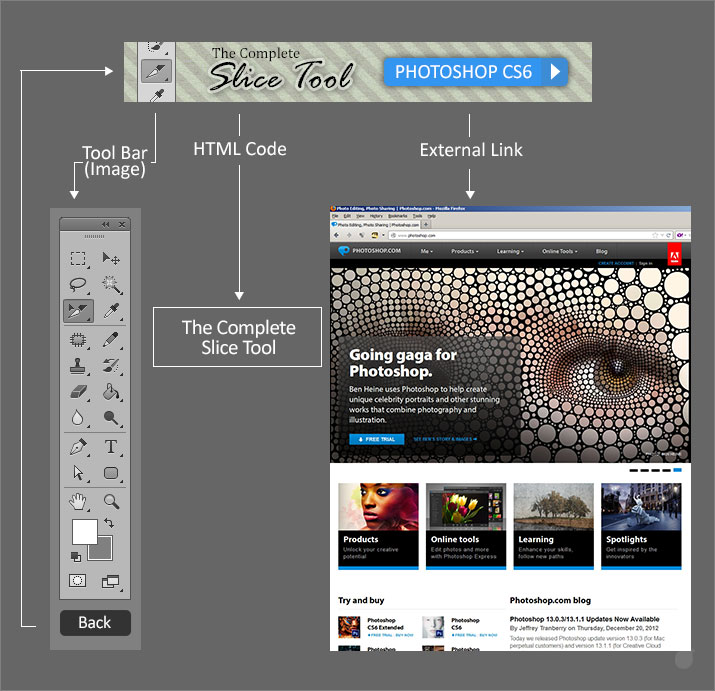
We are going to use this simple (fig 1.0) banner to slice our content and add options. These will reflect in a browser.
Please note that, Slice Options does not replace the full HTML coding, but you can make a simple navigation for website mockup.
// Download the Exercise files to follow along with me >> the complete slice tool.zip toolbar.zip
I'll just explain what we are going to do with these two PSD designs
(the complete slice tool.psd)
1. small toolbar image - Click the toolbar small image will open a full size toolbar with back button.
2. 'The Complete Slice Tool' - we are going to replace this with our own HTML text.
3. Photoshop CS6 - which display as a button in a browser when we mouse-over, and click on the button will take us to the photoshop website (you can give any site you want).
(toolbar.psd)
1. Full size toolbar with Back button - we want to return to our banner once we click the 'Back' button, so we are going to assign a URL which will send us back to the main banner.
Remember everything we are going to do inside photoshop and no extra plugin needed or filters. And i'll explain you step by step.
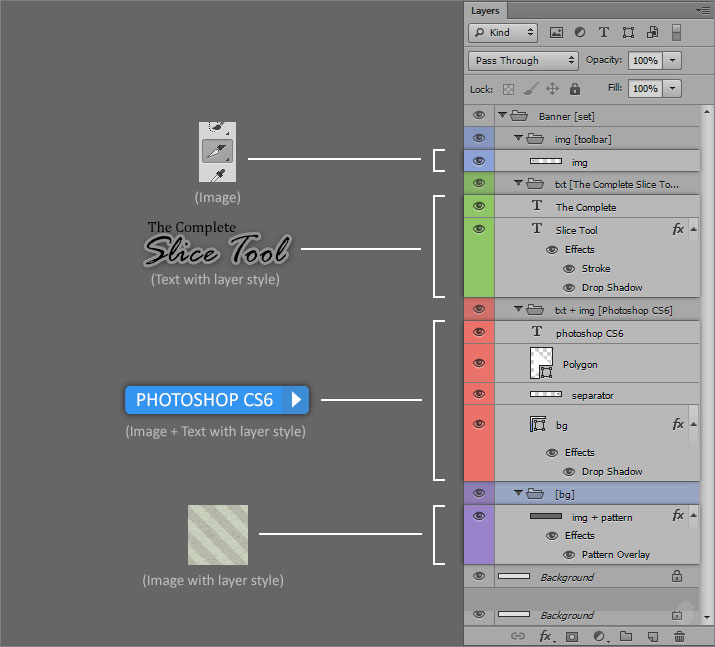
Before we start, lets look at how the layers are arranged (fig 2.0) and what sort of slice style we can use. It's a good practice to understand the layer contents before you begin the slice.
In the layer palette, the first is this small toolbar image. Lets make this a layer based slice, because we are not going to change its position and it is going to stay in one place.
The second is our main text ('The Complete Slice Tool'), remember we are going to replace this with our own HTML code (fig 1.0). Since we have two text and each one in a different layer and if you remember in our previous essential, if you select multiple layers and assigning layer based slice will make a slice for each of the individual layers. So the best option would be to user based slice.
The last is our 'Photoshop CS6' (the blue button), since we are going to assign an external link, lets make this a layer based slice. Because of the layer style, we'll leave this to photoshop to guess how far the slice has to go.
We don't need to slice the BG with pattern because, we are not going to separate the content from the BG. Photoshop is going to make an auto slice after we created our main slices. So we don't need to worry.
I assume you are following with me from the 1st essential in this series, Essential for Slice Select Tool 1
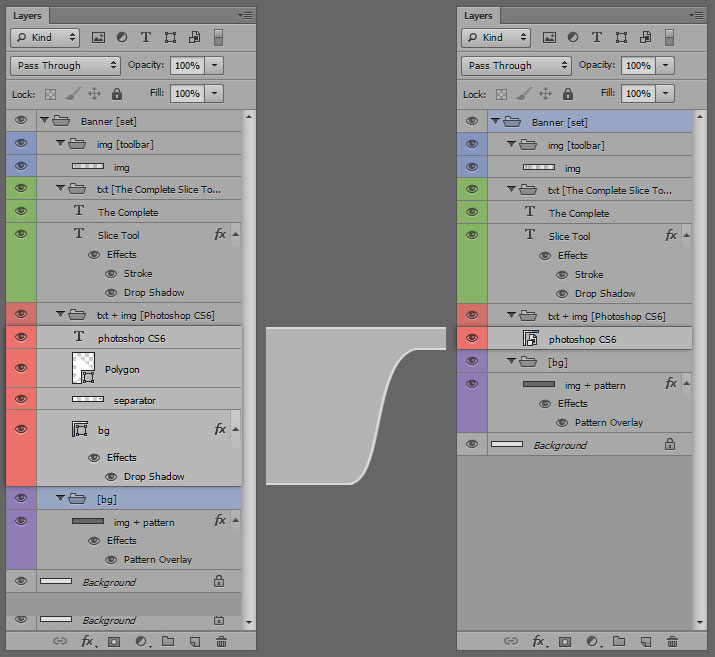
If you notice (fig 3.0), Photoshop CS6 layer group has so many layers in the layer palette (left image). Just to keep things tidy, we are going to convert this to a 'Smart Objects'. Because layer based slice will also work on smart objects.
Remember the pros and cons for layer based slice we learned from >> Essential for Slice Select Tool 2
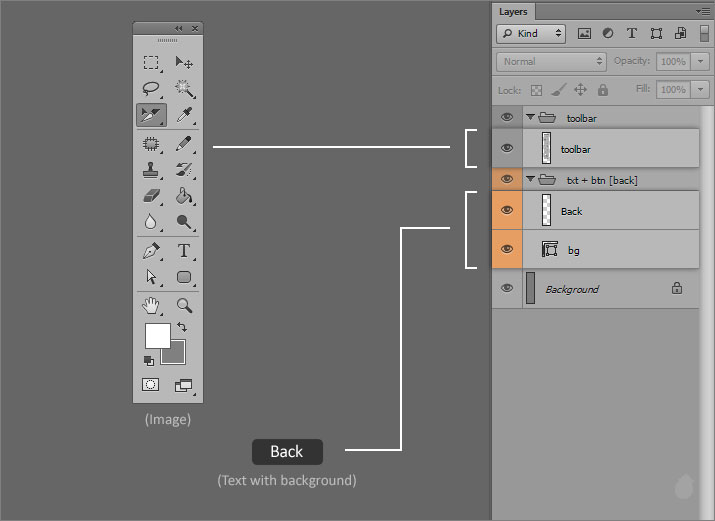
Lets look at the full size toolbar with back button (fig 4.0). We are only going to assign the URL to the 'Back' button and apart from that we don't need to slice anything, the rest will be taken care by auto slice.
Since we are going to use only the back button with a simple rounded rectangle, and it has no layer style. We can use layer based slice. Select the BG and assign the layer based slice, do not select the text layer.
So here's all the slices (fig 5.0).
Now lets see our slice options, because this is where we are going to give all the information to each and individual slices. Photoshop is going to take these information and generate a HTML code for us, which we can view in a normal browser.
Slice Options
Changing the Slice Type to 'No Image' (fig 6.1) will display the HTML text cell.
You can open this 'Slice Options' window in three different ways
Now that we have seen all the slice options and we have also sliced our contents. Lets add the text in the slice options.
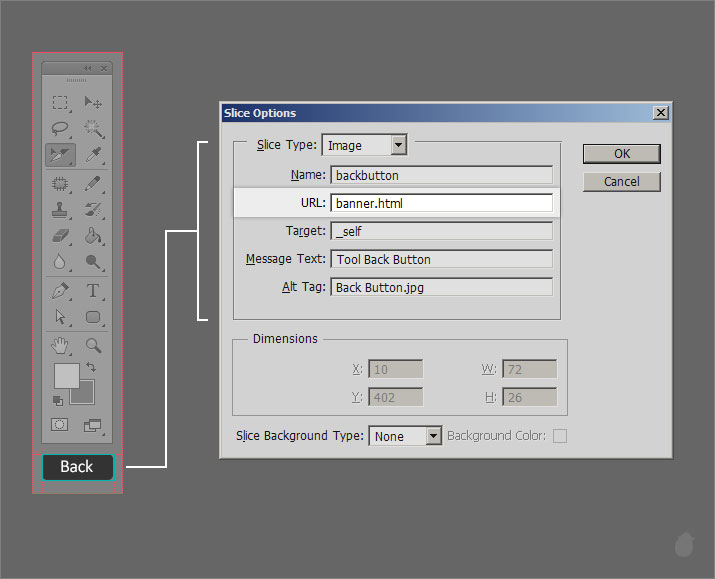
Starting with the Full Size toolbar 'back' button, because this is easy to understand and we have only one slice to focus on. Select the 'Back' button with the slice select tool and use one of the method (fig 7.0) to open the slice options.
You can give any slice name you want (no spaces). Leave the URL empty because we need to link this to our main banner (the complete slice tool) and since its not ready, we'll come back to this again.
Set the target to '_self' because we need to open in the same window, you'll know what i mean once we finish everything and test it in a browser. You can fill the other details to match the content.
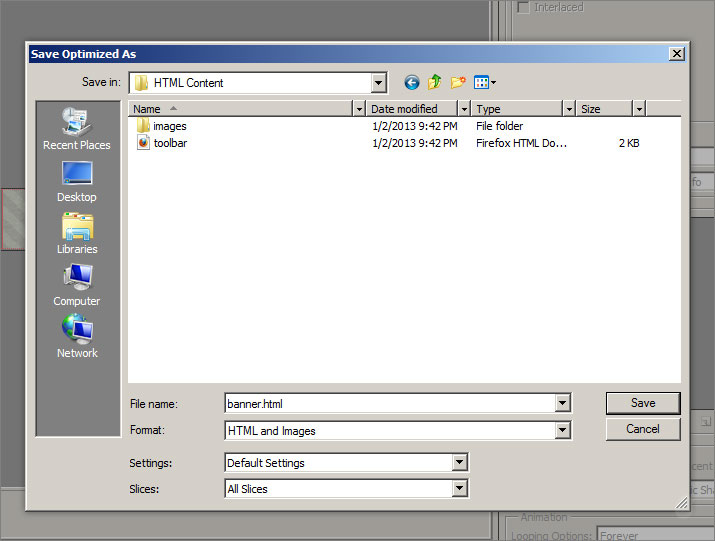
Select 'HTML and Images' as a format and for slices choose 'All Slices' (if not selected) and click 'Save' (fig 8.1)
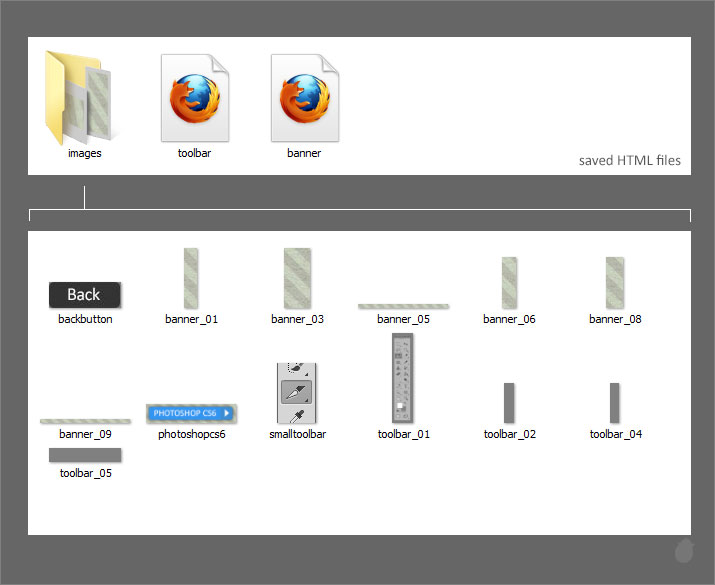
Your saved content will have two files. One is a toolbar.html (fig 8.2) and another is a image folder which contain all the sliced images.
Open the toolbar.html in your browser, you should see a full toolbar with 'Back' button, just like the PSD file. If you mouse-over on the back button, your cursor should change into a 'hand' symbol, indicating that this is a link. of-course there is no URL so nothing happens when you click the button.
Now lets do the same for the main banner. Open the the complete slice tool.psd and select small toolbar image slice and give the same text i've assigned here.
Note, for URL we can give 'toolbar.html' because when we click this image it should open that full size toolbar with back button and since we have already completed that, we know the name of the file.
Click 'OK'
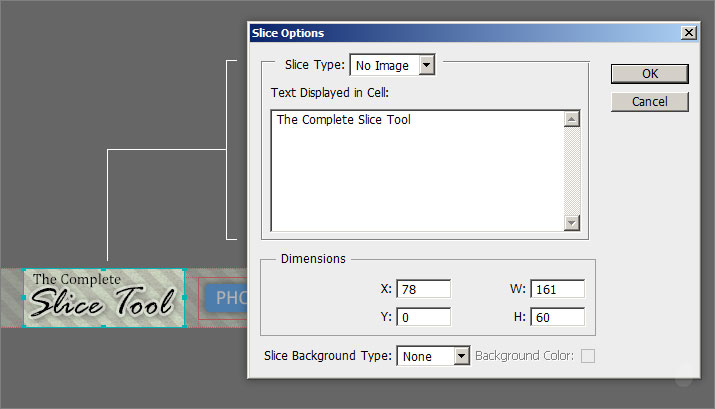
For 'The Complete Slice Tool', select the Slice Type to 'No Image' as a slice options and just type the same letters in the HTML code box. It's going to display the same text as output, but we'll fix it layer.
Click 'OK'
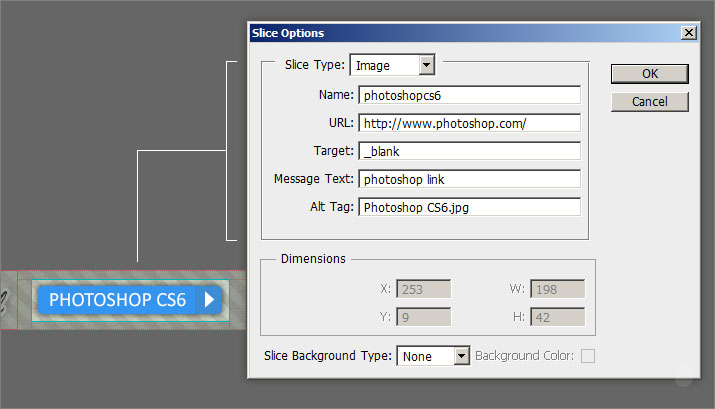
The last in a row is our 'Photoshop CS6' button, give the URL photoshop.com. So when we click this, it will take us to the photoshop website.
Set your Target to blank (_blank) because we need to open the webpage in a separate window.
Click 'OK' to accept.
Now lets save our slices, follow the same 'Save for web' options and in the 'Save Optimizes As' dialog box, make sure the location is the same.
Because in our URL we have given just the 'toolbar.html' (fig 9.0) which is the root, if you want to change the location then we need to mention the folder name. So for now just save it in the same location.
We should see three files now. toolbar.html, banner.html and images. The images folder will contain all the slices.
Open the banner.html and you will see something like this (fig 9.5). Notice the missing image of 'The Complete Slice Tool', what you see here is the HTML text we placed in the text cell.
Lets open the 'Toolbar.psd' file and give the URL as the banner.html (remember we left this blank). Press 'OK' to accept changes. Now save the file as 'Save for web' (follow the same method, fig 8.1). when you save, it'll ask you whether you want to replace the images.
Click yes.
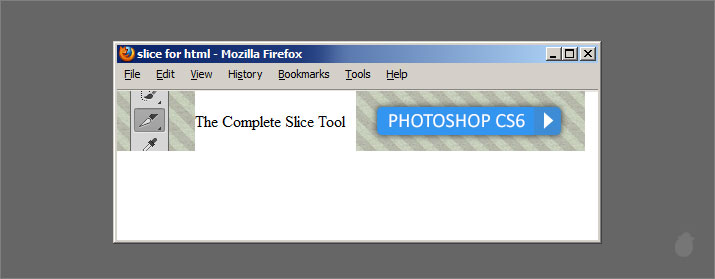
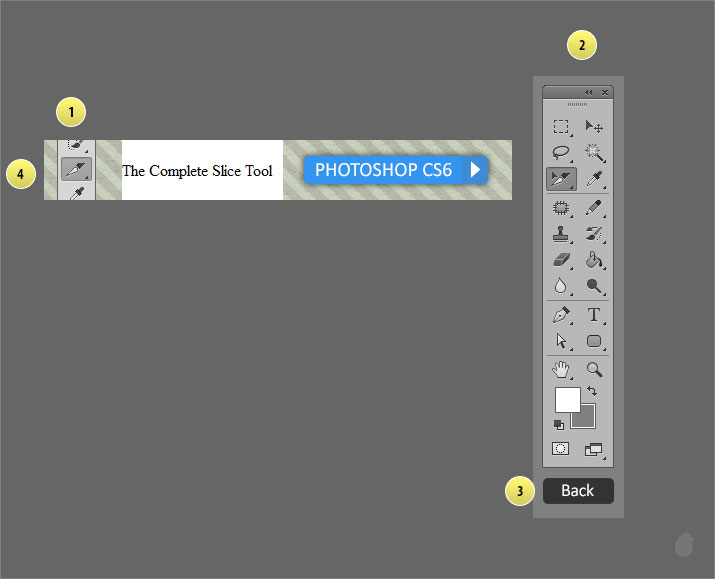
Now everything is ready. Open our banner.html. (fig 11.0) Click the small toolbar image (1), it should open the full size toolbar (2) and click the 'back' button at the bottom (3) and it will take you back to the banner again (4).
That's it, you have made your first HTML banner without any coding.
Now lets fix our simple HTML text, 'The Complete Slice Tool'
Lets add the background color for our HTML text. Go to the slice options for 'The Complete Slice Tool' slice, and select the 'Slice Background Type' to 'Other..'.
Slice Background Type:
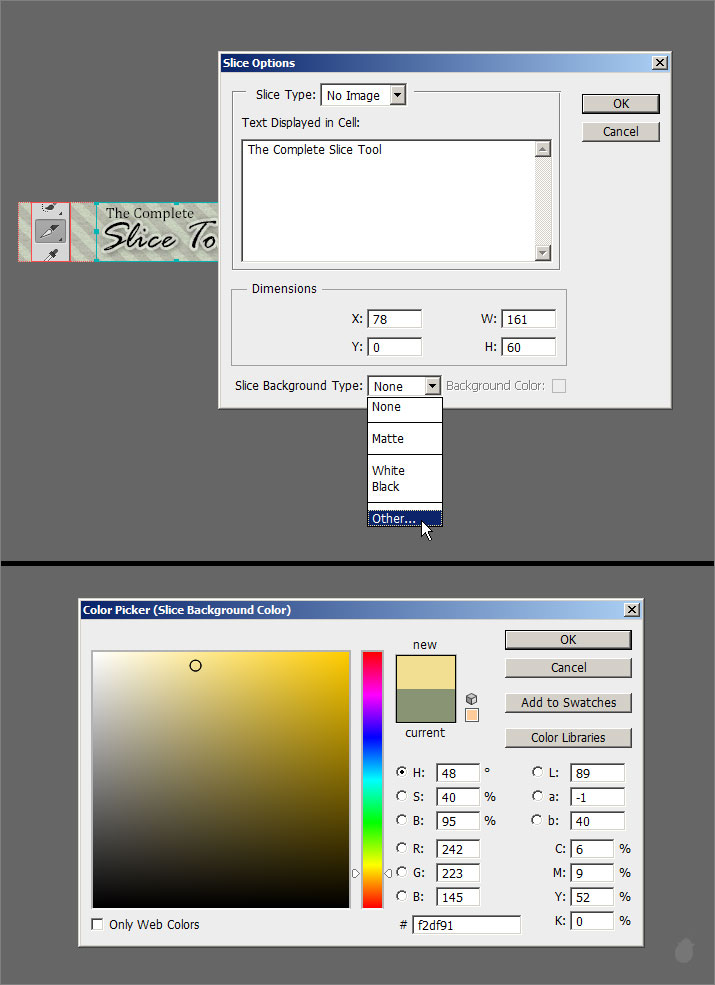
I've selected light yellow (fig 12.0), you can select any color you want, and once you've done click 'OK' and go to file and select Save for web .
In the Save for web dialog box, click the 'Preview' at the bottom left will open a browser. You can see the changes without saving the file. And once you are happy, you can save the complete file in a folder for web (fig 8.1).
Currently i've set to Firefox, but you can set to any browser you want. Just select the arrow next to the preview button and select 'Others'.
You should see a background color for the HTML text. Lets format this text.
Save for Web dialog box will still be there (if you have clicked the preview button). Now lets open the slice options.
Do not close this window. Just select the slice select tool from the left (it'll be selected by default). Mouse-over on the slice, this will display a normal cursor. Double-click on 'The Complete Slice Tool' to open the slice options.

Now we can add our html text. This option box might look different from the one we saw from the slice select tool options menu. Instead of closing the 'Save for web' and going to the options bar and clicking the Slice Options. we can access it from here.
Here's the two dialog box (fig 14.0). The extra option here is 'Cell Alignment'.
Cell Alignment will align the text inside the slice, else we need to insert manual HTML code.
'Text as HTML', if you do not check this option, then whatever code you type in the text cell will display the same in the browser with all the tags. It will treat all the code as simple text.
Just copy this code and paste it in the HTML cell.
In the drop-down for Cell Alignment select the horizontal to 'Center', this will align our text to center and vertical to middle.
Click 'OK' and press Preview at the bottom left to see the changes. Once you are happy with the result you can click save from the 'Save for Web' and save it in the same location (it'll warn your to replace the images, just select YES.)
If you know a little HTML and CSS, you can make this 'The Complete Slice Tool' as a button and you can even bring this text to as close to the real design with adjusting the font-family and size and even adding a drop shadow.
I hope now you have learned all about slice tool and slice select tool and how useful it is for webdesign. So next time when you doing any website mockup design inside photoshop you know how to do the slicing and save them and also to add a little navigation to spice it up.
Note:
You can take full advantage of the image optimization with 'Save for Web' dialog box. Even though Save for Web and Slice tool goes hand in hand, the save for web has lot of features to cover and it can also be used for normal image optimization other than web. And everything involves understand of color.
I'll cover this as a separate essential >> Essentials for Save for Web
You'll get a much better understanding at the end of this essential to what exactly the slice tool is and how important it is when designing a website mockup.
If you haven't seen the other parts, please start from here >> Essential for Slice Select Tool 1 . If you just want to understand the HTML stuffs then continue with me.
We are going to use this simple (fig 1.0) banner to slice our content and add options. These will reflect in a browser.
Please note that, Slice Options does not replace the full HTML coding, but you can make a simple navigation for website mockup.
// Download the Exercise files to follow along with me >> the complete slice tool.zip toolbar.zip
I'll just explain what we are going to do with these two PSD designs
(the complete slice tool.psd)
1. small toolbar image - Click the toolbar small image will open a full size toolbar with back button.
2. 'The Complete Slice Tool' - we are going to replace this with our own HTML text.
3. Photoshop CS6 - which display as a button in a browser when we mouse-over, and click on the button will take us to the photoshop website (you can give any site you want).
(toolbar.psd)
1. Full size toolbar with Back button - we want to return to our banner once we click the 'Back' button, so we are going to assign a URL which will send us back to the main banner.
Remember everything we are going to do inside photoshop and no extra plugin needed or filters. And i'll explain you step by step.
(fig 1.0)
Before we start, lets look at how the layers are arranged (fig 2.0) and what sort of slice style we can use. It's a good practice to understand the layer contents before you begin the slice.
In the layer palette, the first is this small toolbar image. Lets make this a layer based slice, because we are not going to change its position and it is going to stay in one place.
The second is our main text ('The Complete Slice Tool'), remember we are going to replace this with our own HTML code (fig 1.0). Since we have two text and each one in a different layer and if you remember in our previous essential, if you select multiple layers and assigning layer based slice will make a slice for each of the individual layers. So the best option would be to user based slice.
The last is our 'Photoshop CS6' (the blue button), since we are going to assign an external link, lets make this a layer based slice. Because of the layer style, we'll leave this to photoshop to guess how far the slice has to go.
We don't need to slice the BG with pattern because, we are not going to separate the content from the BG. Photoshop is going to make an auto slice after we created our main slices. So we don't need to worry.
I assume you are following with me from the 1st essential in this series, Essential for Slice Select Tool 1
(fig 2.0)
(I have rasterized all the fonts (fig 2.0), so you don't have to worry about font issues, the exercise file will contain the exact same layer order and colors. Only the text layer is converted to normal layer which carries the same name)If you notice (fig 3.0), Photoshop CS6 layer group has so many layers in the layer palette (left image). Just to keep things tidy, we are going to convert this to a 'Smart Objects'. Because layer based slice will also work on smart objects.
Remember the pros and cons for layer based slice we learned from >> Essential for Slice Select Tool 2
(fig 3.0)
Lets look at the full size toolbar with back button (fig 4.0). We are only going to assign the URL to the 'Back' button and apart from that we don't need to slice anything, the rest will be taken care by auto slice.
Since we are going to use only the back button with a simple rounded rectangle, and it has no layer style. We can use layer based slice. Select the BG and assign the layer based slice, do not select the text layer.
(fig 4.0)
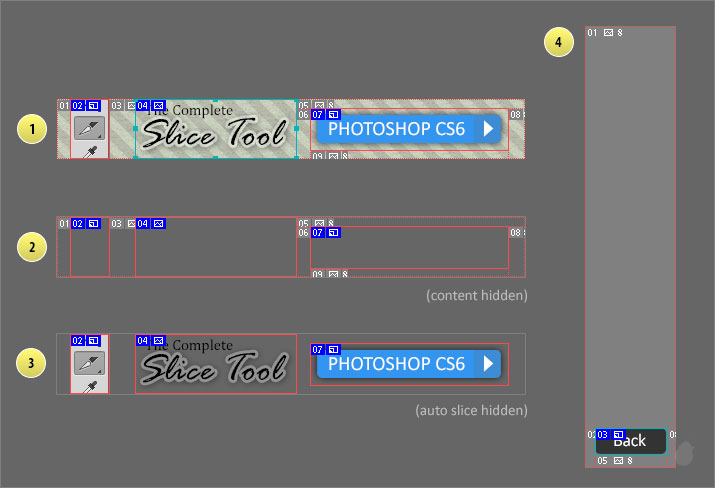
So here's all the slices (fig 5.0).
| 1. | Banner (02, 04, and 07 are slice numbers) |
| (02) is our small toolbar with Layer based slice. (notice the symbol) | |
| (04) is where we are going to place our own HTML, User based slice (notice the handles) | |
| (07) is layer based slice for our external webpage. | |
| 2. | Notice the extra spaces are filled with auto slices. |
| 3. | Without auto slices |
| 4. | Full size toolbar with only 'back' button as layer based slice |
(fig 5.0)
Now lets see our slice options, because this is where we are going to give all the information to each and individual slices. Photoshop is going to take these information and generate a HTML code for us, which we can view in a normal browser.
(fig 6.0)
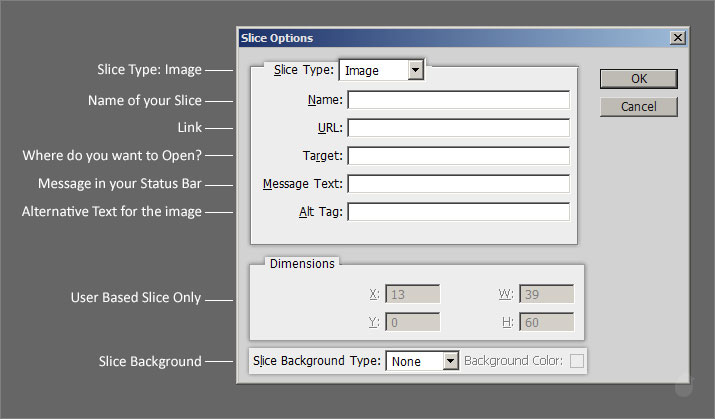
Slice Options
| Slice Type: | Image, if you want to display the image as it is, then choose this option |
| Name: | your slice name, keep it short and no space. HTML doesn't like spaces |
| Link: | this is where you are going to put your link (local address or web address), and this particular slice will be treated as a button when you mouse over |
| Target: | where you want the link to open? |
| _blank, which will open the link in a new tab/window | |
| _self, will open in the same window | |
| _parent, frameset element. where you have two or three frames and clicking the link will display the contents in the parent frame | |
| _top, assigning top as a target will bring the content to the top of the frame in the frameset | |
| Message Text: | which holds the message when you mouse over, else it will display the URL in the status bar |
| Alt Tag: | If the browser has any issue displaying your image, then this text will display instead |
| Dimensions: | Coordinates and Dimensions (Locked for Layer Based Slice) |
| Slice Background Type: | Background for the slice, you can see the background color if your image has alpha or if it is created with HTML code |
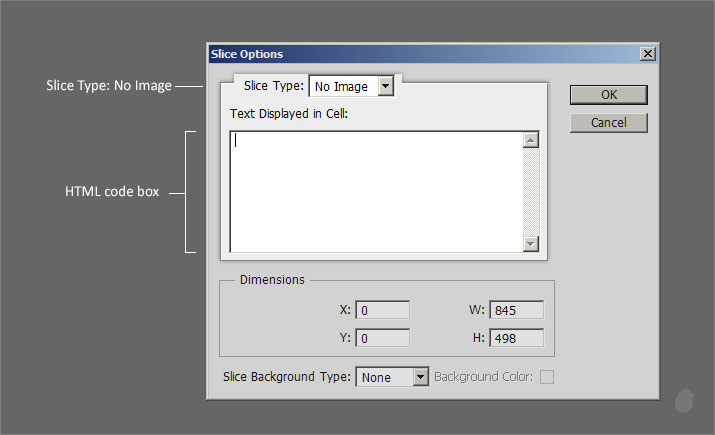
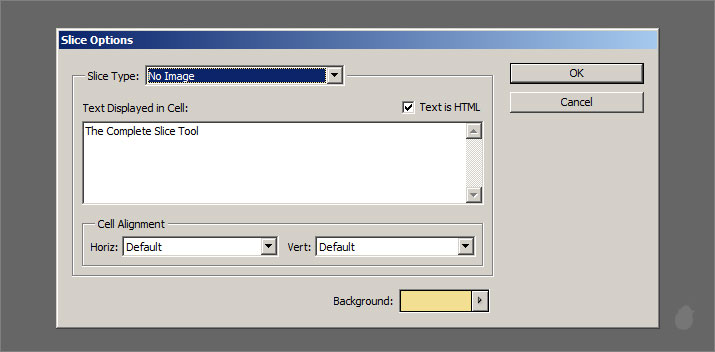
Changing the Slice Type to 'No Image' (fig 6.1) will display the HTML text cell.
(fig 6.1)
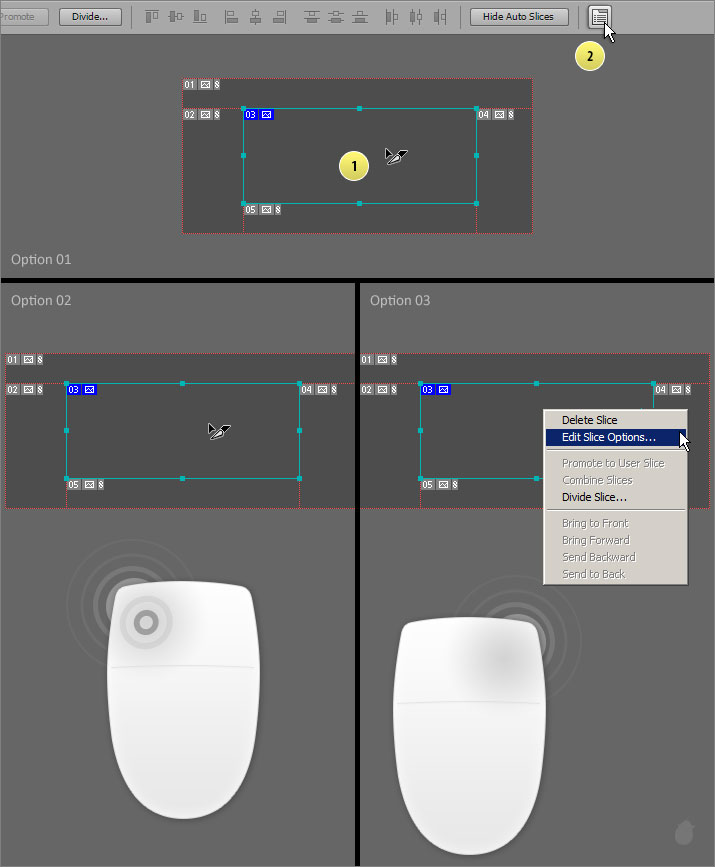
You can open this 'Slice Options' window in three different ways
- Select the slice and click the 'Slice Options' from the options bar.
- Double-click the slice.
- Right-click and choose 'Edit Slice Options' from the context menu.
(fig 7.0)
Now that we have seen all the slice options and we have also sliced our contents. Lets add the text in the slice options.
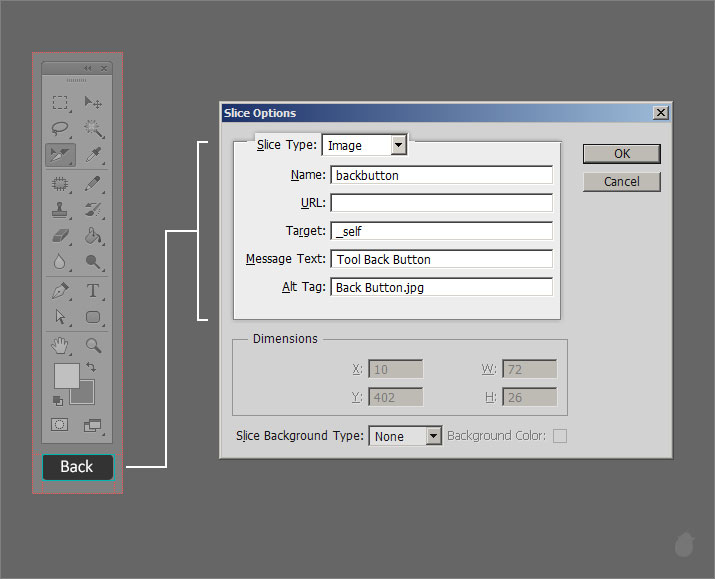
Starting with the Full Size toolbar 'back' button, because this is easy to understand and we have only one slice to focus on. Select the 'Back' button with the slice select tool and use one of the method (fig 7.0) to open the slice options.
You can give any slice name you want (no spaces). Leave the URL empty because we need to link this to our main banner (the complete slice tool) and since its not ready, we'll come back to this again.
Set the target to '_self' because we need to open in the same window, you'll know what i mean once we finish everything and test it in a browser. You can fill the other details to match the content.
(fig 8.0)
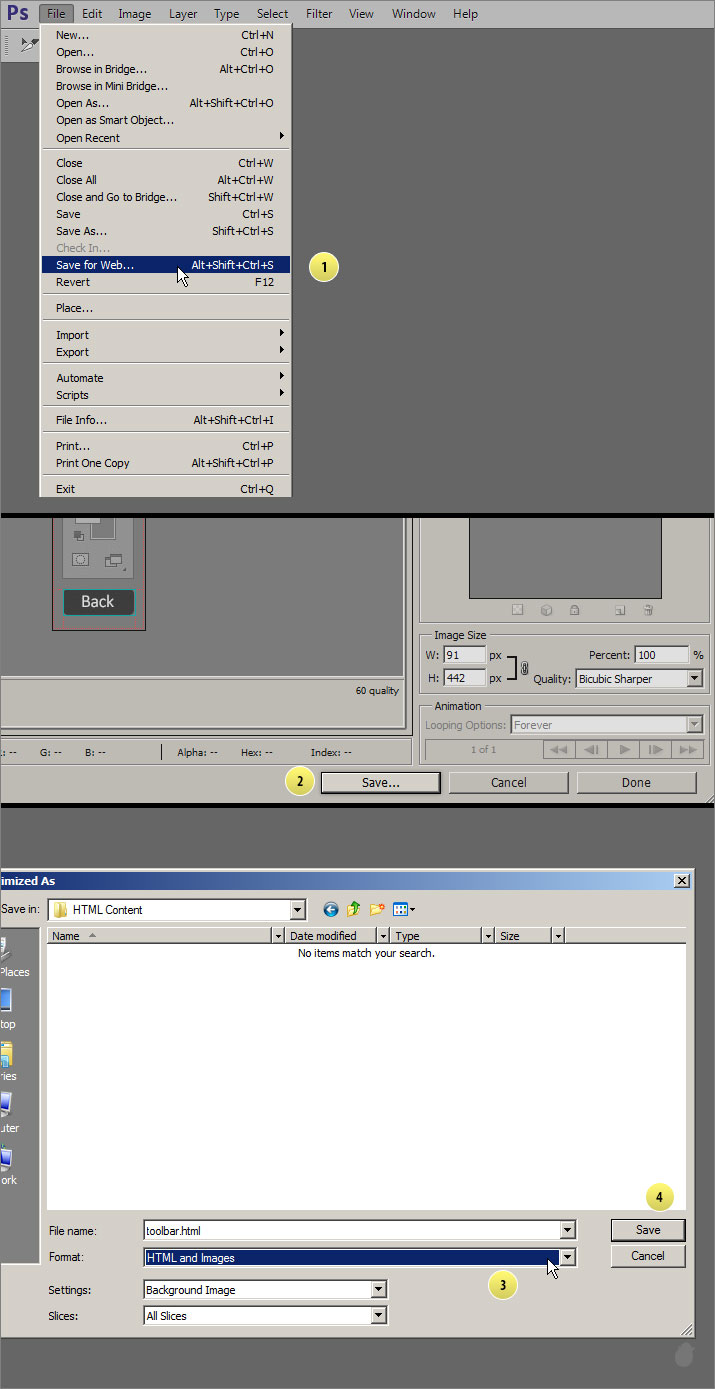
- Go to File and select 'Save for Web' (fig 8.1)
- Once the window opens just press 'Save' at the bottom
- It will bring another Save Optimized As window.
(fig 8.1)
Select 'HTML and Images' as a format and for slices choose 'All Slices' (if not selected) and click 'Save' (fig 8.1)
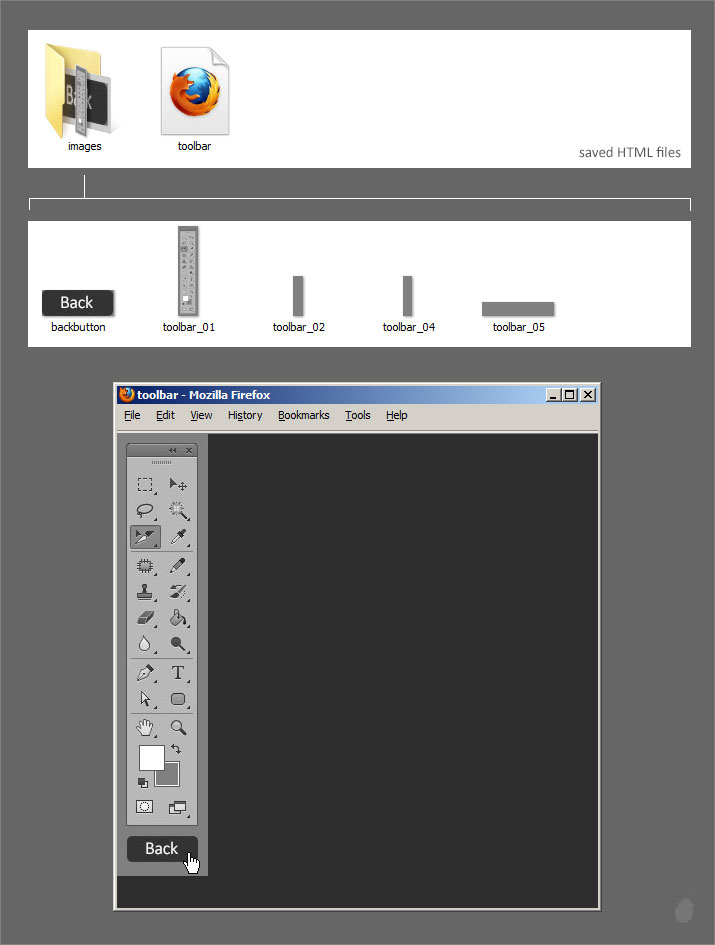
Your saved content will have two files. One is a toolbar.html (fig 8.2) and another is a image folder which contain all the sliced images.
Open the toolbar.html in your browser, you should see a full toolbar with 'Back' button, just like the PSD file. If you mouse-over on the back button, your cursor should change into a 'hand' symbol, indicating that this is a link. of-course there is no URL so nothing happens when you click the button.
(fig 8.2)
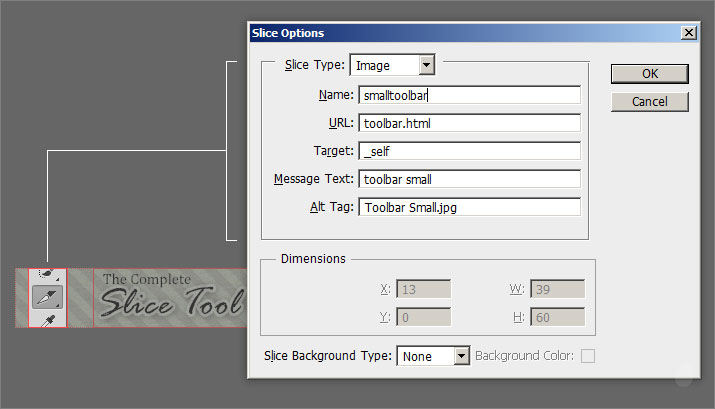
Now lets do the same for the main banner. Open the the complete slice tool.psd and select small toolbar image slice and give the same text i've assigned here.
Note, for URL we can give 'toolbar.html' because when we click this image it should open that full size toolbar with back button and since we have already completed that, we know the name of the file.
Click 'OK'
(fig 9.0)
For 'The Complete Slice Tool', select the Slice Type to 'No Image' as a slice options and just type the same letters in the HTML code box. It's going to display the same text as output, but we'll fix it layer.
Click 'OK'
(fig 9.1)
The last in a row is our 'Photoshop CS6' button, give the URL photoshop.com. So when we click this, it will take us to the photoshop website.
URL |
http://www.photoshop.com |
Click 'OK' to accept.
(fig 9.2)
Now lets save our slices, follow the same 'Save for web' options and in the 'Save Optimizes As' dialog box, make sure the location is the same.
Because in our URL we have given just the 'toolbar.html' (fig 9.0) which is the root, if you want to change the location then we need to mention the folder name. So for now just save it in the same location.
(fig 9.3)
We should see three files now. toolbar.html, banner.html and images. The images folder will contain all the slices.
(fig 9.4)
Open the banner.html and you will see something like this (fig 9.5). Notice the missing image of 'The Complete Slice Tool', what you see here is the HTML text we placed in the text cell.
(fig 9.5)
Lets open the 'Toolbar.psd' file and give the URL as the banner.html (remember we left this blank). Press 'OK' to accept changes. Now save the file as 'Save for web' (follow the same method, fig 8.1). when you save, it'll ask you whether you want to replace the images.
Click yes.
(fig 10.0)
Now everything is ready. Open our banner.html. (fig 11.0) Click the small toolbar image (1), it should open the full size toolbar (2) and click the 'back' button at the bottom (3) and it will take you back to the banner again (4).
That's it, you have made your first HTML banner without any coding.
Now lets fix our simple HTML text, 'The Complete Slice Tool'
(fig 11.0)
Lets add the background color for our HTML text. Go to the slice options for 'The Complete Slice Tool' slice, and select the 'Slice Background Type' to 'Other..'.
Slice Background Type:
| None: | No color |
| Matte: | Will assign the matt color. The color you can set from the Save for Web dialog box |
| White: | Will have a white color |
| Black: | Will have a black color |
| Other: | Custom color |
(fig 12.0)
I've selected light yellow (fig 12.0), you can select any color you want, and once you've done click 'OK' and go to file and select Save for web .
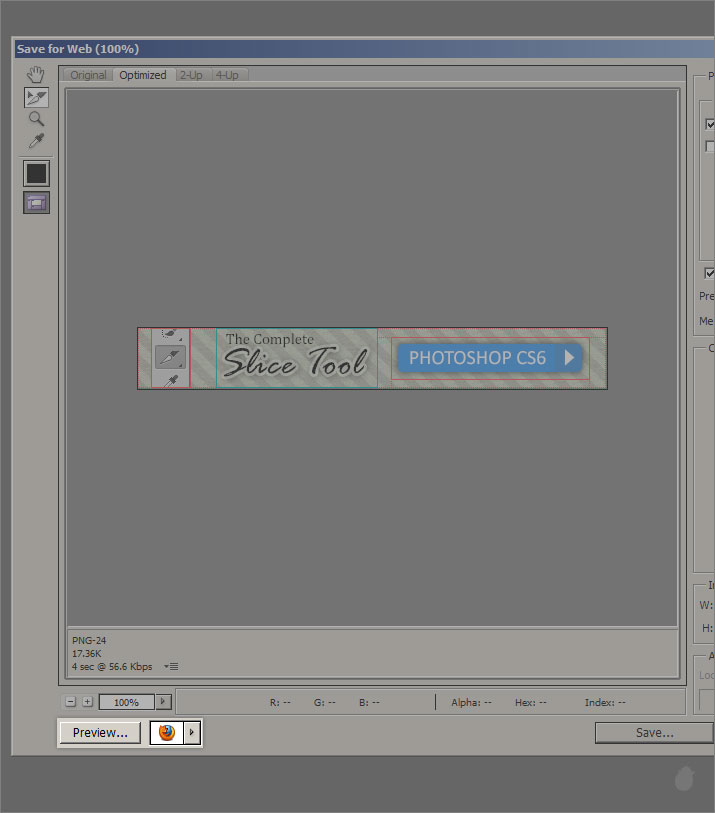
In the Save for web dialog box, click the 'Preview' at the bottom left will open a browser. You can see the changes without saving the file. And once you are happy, you can save the complete file in a folder for web (fig 8.1).
Currently i've set to Firefox, but you can set to any browser you want. Just select the arrow next to the preview button and select 'Others'.
(fig 12.1)
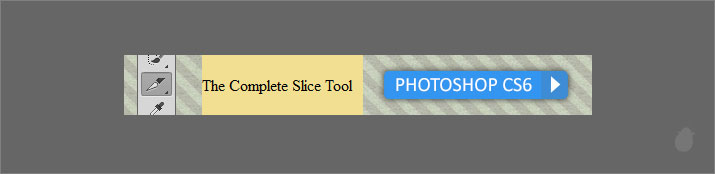
You should see a background color for the HTML text. Lets format this text.
(fig 12.2)
Save for Web dialog box will still be there (if you have clicked the preview button). Now lets open the slice options.
Do not close this window. Just select the slice select tool from the left (it'll be selected by default). Mouse-over on the slice, this will display a normal cursor. Double-click on 'The Complete Slice Tool' to open the slice options.
(fig 13.0)
Now we can add our html text. This option box might look different from the one we saw from the slice select tool options menu. Instead of closing the 'Save for web' and going to the options bar and clicking the Slice Options. we can access it from here.
(fig 13.1)
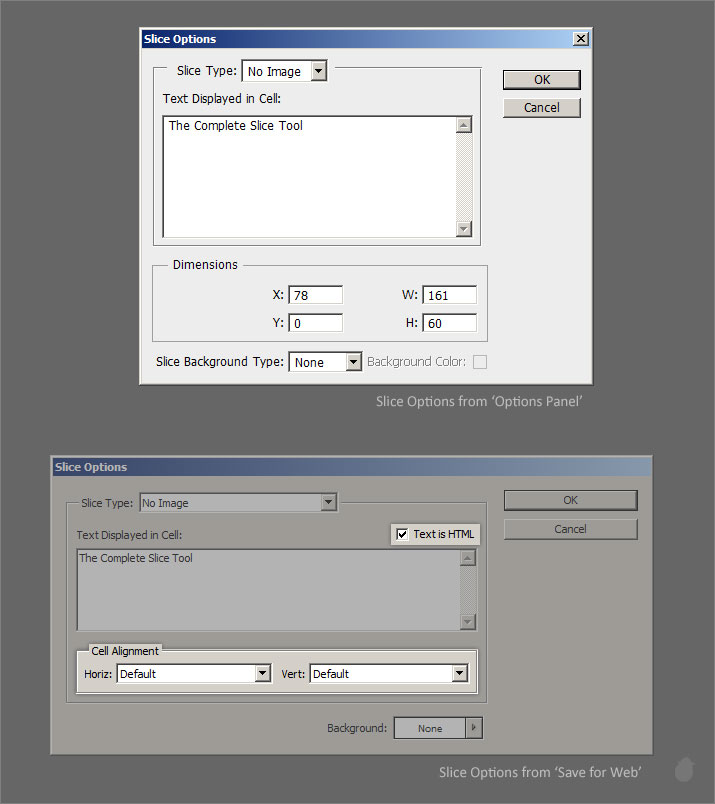
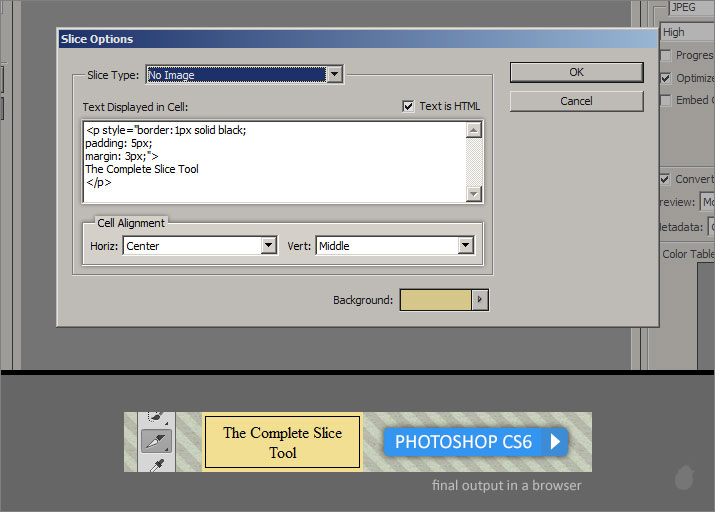
Here's the two dialog box (fig 14.0). The extra option here is 'Cell Alignment'.
Cell Alignment will align the text inside the slice, else we need to insert manual HTML code.
'Text as HTML', if you do not check this option, then whatever code you type in the text cell will display the same in the browser with all the tags. It will treat all the code as simple text.
(fig 14.0)
Just copy this code and paste it in the HTML cell.
In the drop-down for Cell Alignment select the horizontal to 'Center', this will align our text to center and vertical to middle.
Click 'OK' and press Preview at the bottom left to see the changes. Once you are happy with the result you can click save from the 'Save for Web' and save it in the same location (it'll warn your to replace the images, just select YES.)
(fig 15.0)
If you know a little HTML and CSS, you can make this 'The Complete Slice Tool' as a button and you can even bring this text to as close to the real design with adjusting the font-family and size and even adding a drop shadow.
I hope now you have learned all about slice tool and slice select tool and how useful it is for webdesign. So next time when you doing any website mockup design inside photoshop you know how to do the slicing and save them and also to add a little navigation to spice it up.
Note:
You can take full advantage of the image optimization with 'Save for Web' dialog box. Even though Save for Web and Slice tool goes hand in hand, the save for web has lot of features to cover and it can also be used for normal image optimization other than web. And everything involves understand of color.
I'll cover this as a separate essential >> Essentials for Save for Web
No comments:
Post a Comment