


|
|
|
|
|
|
|
|

|
|
|
01. What are the different types of medium i can prepare my images from photoshop?
02. How to have a good printing workflow for Commercial printing?
03. What mode do i need to set before i start the work?
04. Can i do the conversion myself before i send it to the printer?
05. Can i print directly from Photoshop?
06. Tips for printing your images in Commercial printing press.
07. Is there any guidelines for preparing image from photoshop to commercial printing press?
08. How can i see the these options in the print dialog box?
09. What is Calibration Bar?
10. What are Registration marks, corner crop marks and center crop marks?
11. What is a Label and Description options and where can i add the description?
12. What is Emulsion Down?
13. What is Negative?
14. What is Interpolation and Include Vector data in the Functions sections?
15. What is Background, Border and Bleed?
16. Why i cannot see some of the markups and other output options in the preview window?
17. How to preserve a spot color?
18. How do i separate my image for commercial printing press?
19. How do i prepare an image to Spot channel for printing from another applications?
20. What is a Color Trap?
21. Is there any particular guidelines to follow?
22. How to do the Trap in photoshop?
23. How to determine the scan resolution for printing?
24. How do i calculate the scan resolution?
25. How do i calculate the size before i scan an image?
01. What are the different types of medium i can prepare my images from photoshop?
You can prepare images from photoshop to Offset Lithography, Digital Printing, Gravure and Commercial printing process.
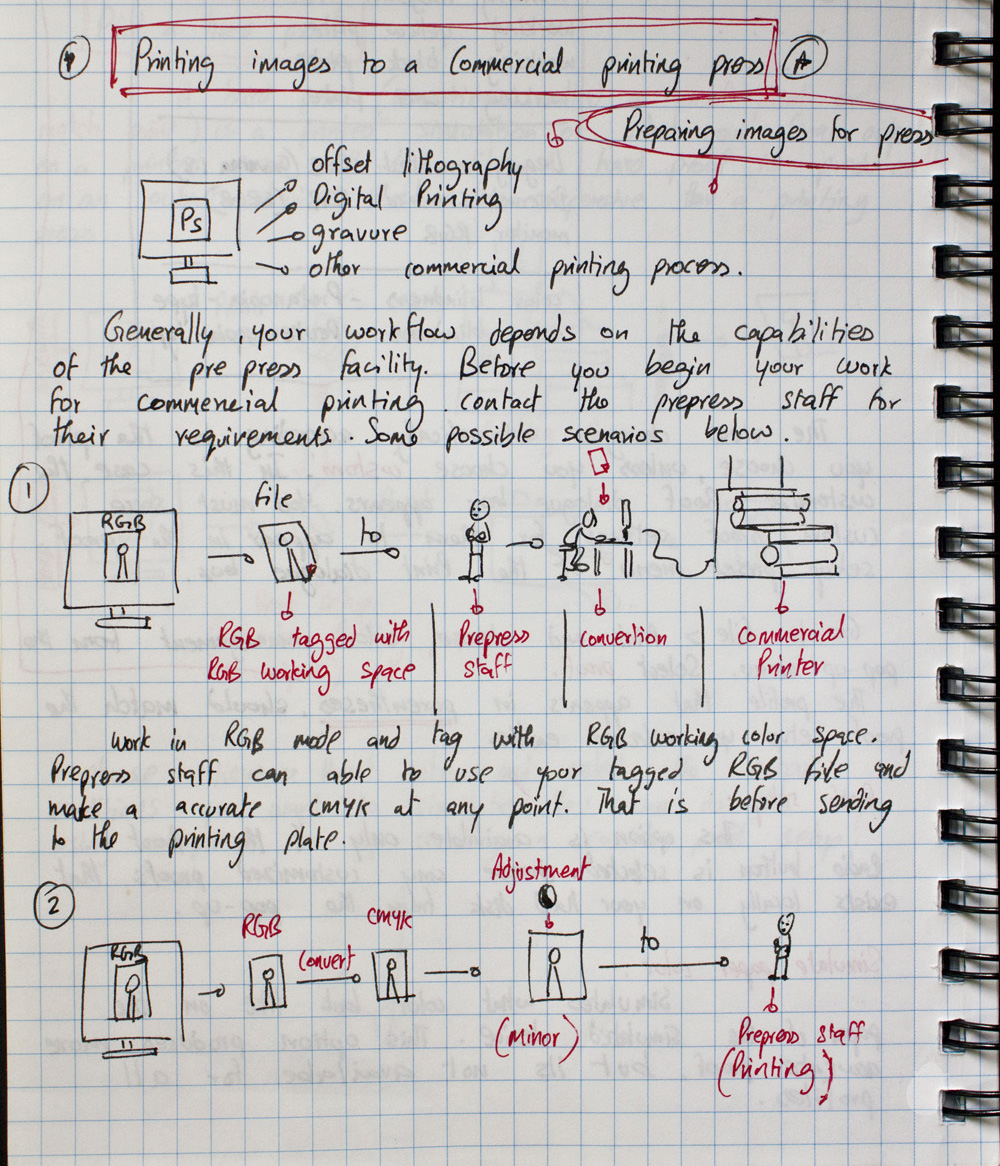
02. How to have a good printing workflow for Commercial printing?
It all depends on the pre-press facility. Its always good to contact your pre-press staff if you are going for a commercial printing press. They might not want you to convert the image to a regular format before you give it to them, because they have some specific settings which they want the image to be.
03. What mode do i need to set before i start the work?
Working in RGB mode is a wise choice and its a default mode in photoshop. Before you get your image out always tag it with RGB working space profile, because that helps your prepress staff or your printer to make an accurate conversion with the help of color management to convert from RGB to CMYK before printing.
04. Can i do the conversion myself before i send it to the printer?
Yes you can. After you finish your work in RGB mode, convert to CMYK (Image > Mode > CMYK Color). You might see some color shift happens on your image because of the mode change, CMYK cannot produce the same color as RGB. If necessary you can do some minor adjustments with the helps of levels, hue and saturation. Once you finalize the image with all the corrections, flatten the image (Layer > Flatten Image) to avoid any future adjustments accidentally and send the CMYK file to the professional printer.
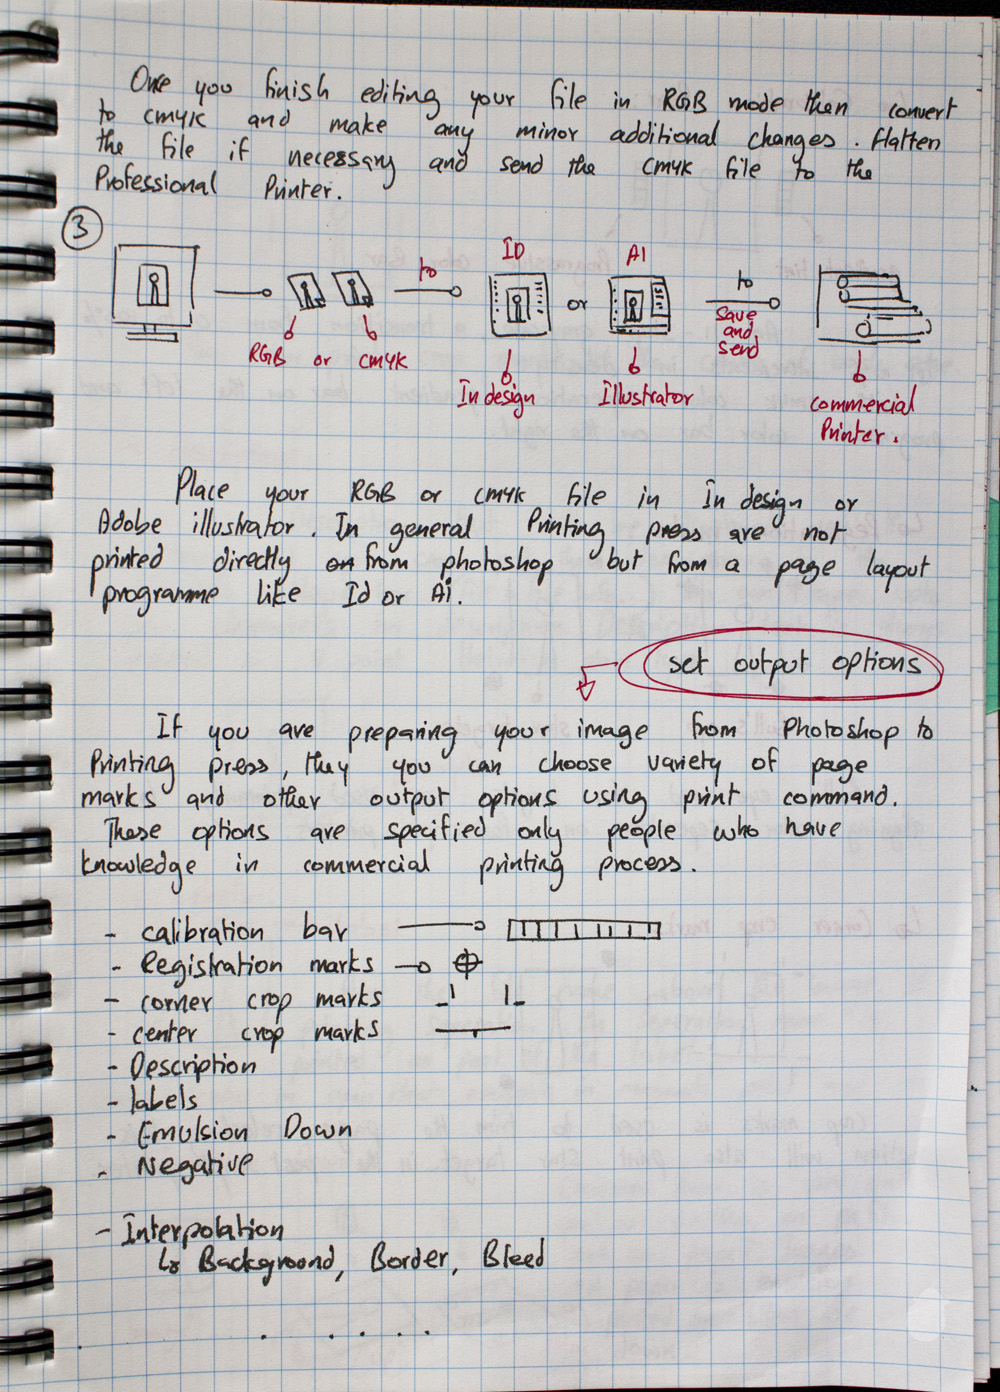
05. Can i print directly from Photoshop?
It is not advisable to print directly from photoshop, if you are looking for a precise alignment of text or the right colors in an image, it is good to send your files/images to page layout programme like Adobe Indesign or Adobe Illustrator, to check everything before you print your document or images. In the professional commercial printing press they won’t print directly from photoshop they send the file to a page layout programme and print it from there.
06. Tips for printing your images in Commercial printing press.
- If you have the characteristic of the printing press, you can use that to preserve the details on your image.
- It is good to have a professional color proof of your image before you finalize the print. Printing in your desktop printer won’t give you an accurate result you need.
- You can see a preview of the final printed image on your monitor if you have an profile from the commercial printing press, you can use the profile to soft proof using the proof color command inside photoshop (View > Proof Setup > Custom).
07. Is there any guidelines for preparing image from photoshop to commercial printing press?
Photoshop has some set of mark ups and other set of output options in the print option dialog box. These options will give you a proper alignment and other color information details, and these output options should be specified by the people who has knowledge about commercial printing press.
08. How can i see the these options in the print dialog box?
Go to File > Print... (Ctrl P) in photoshop. In the print dialog box to the right top, under the Color Management drop-down menu choose ‘Output’.
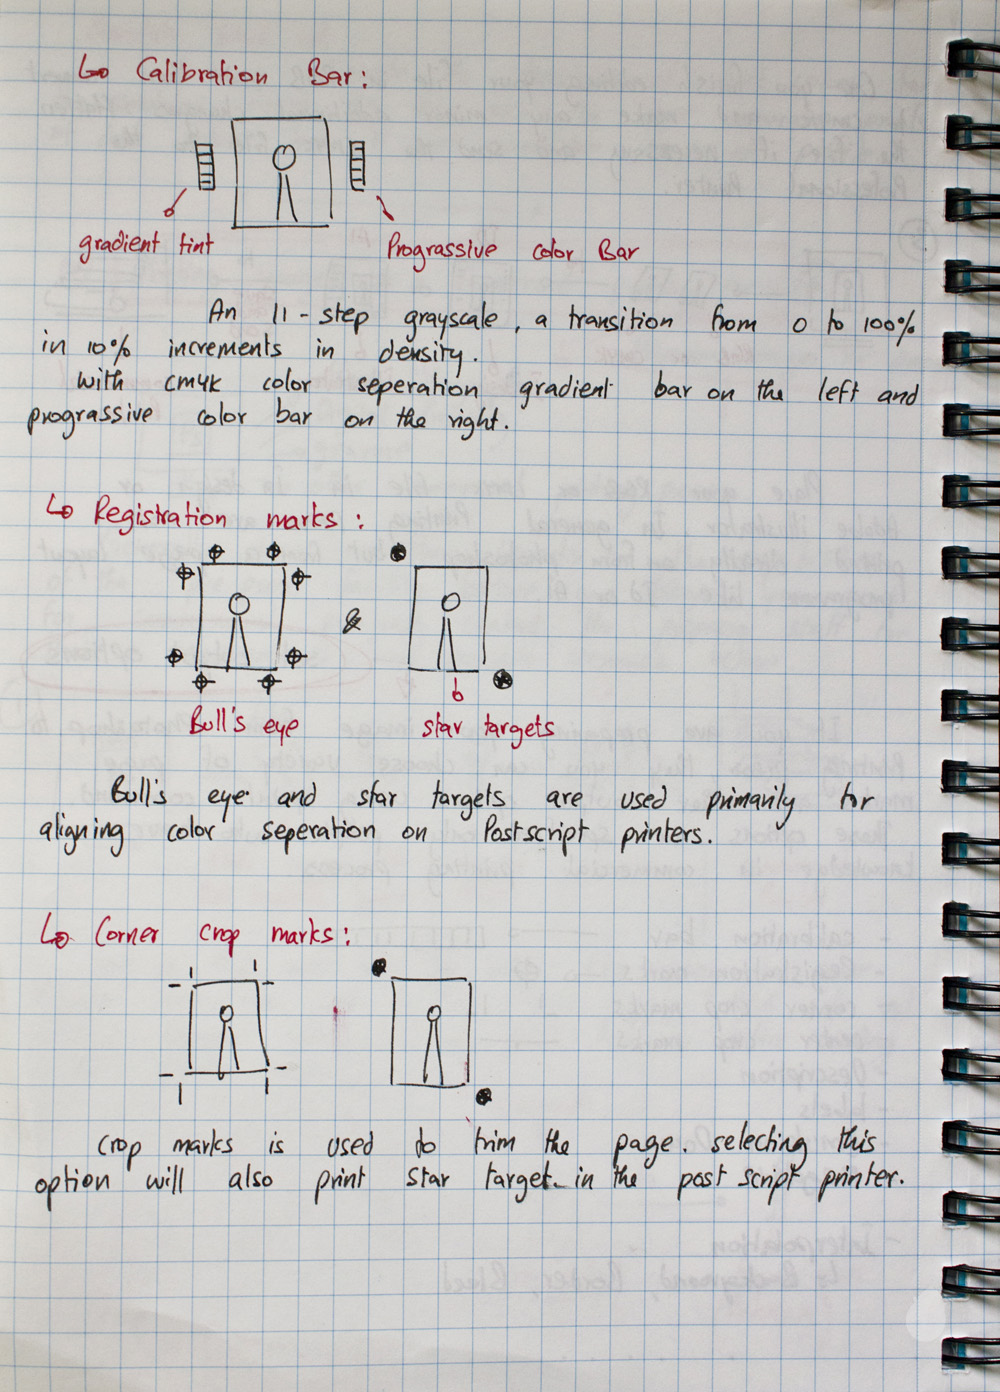
09. What is Calibration Bar?
Its a 11 steps thin gradient grayscale rectangle which appears on the left side of the image with 10% increment from 0 to 100% density. If you are going for CMYK color separation a gradient bar on the left and a progressive color bar (CMYK with spot or any other individual colors) on the right appears.
10. What are Registration marks, corner crop marks and center crop marks?
A registration marks appear on the four corner of the image along with the star target. These are used for alignments of color separation on post-scrip printers. A corner crop mark and center crop marks appears at the corner and center of the image is an information for trimming paper.
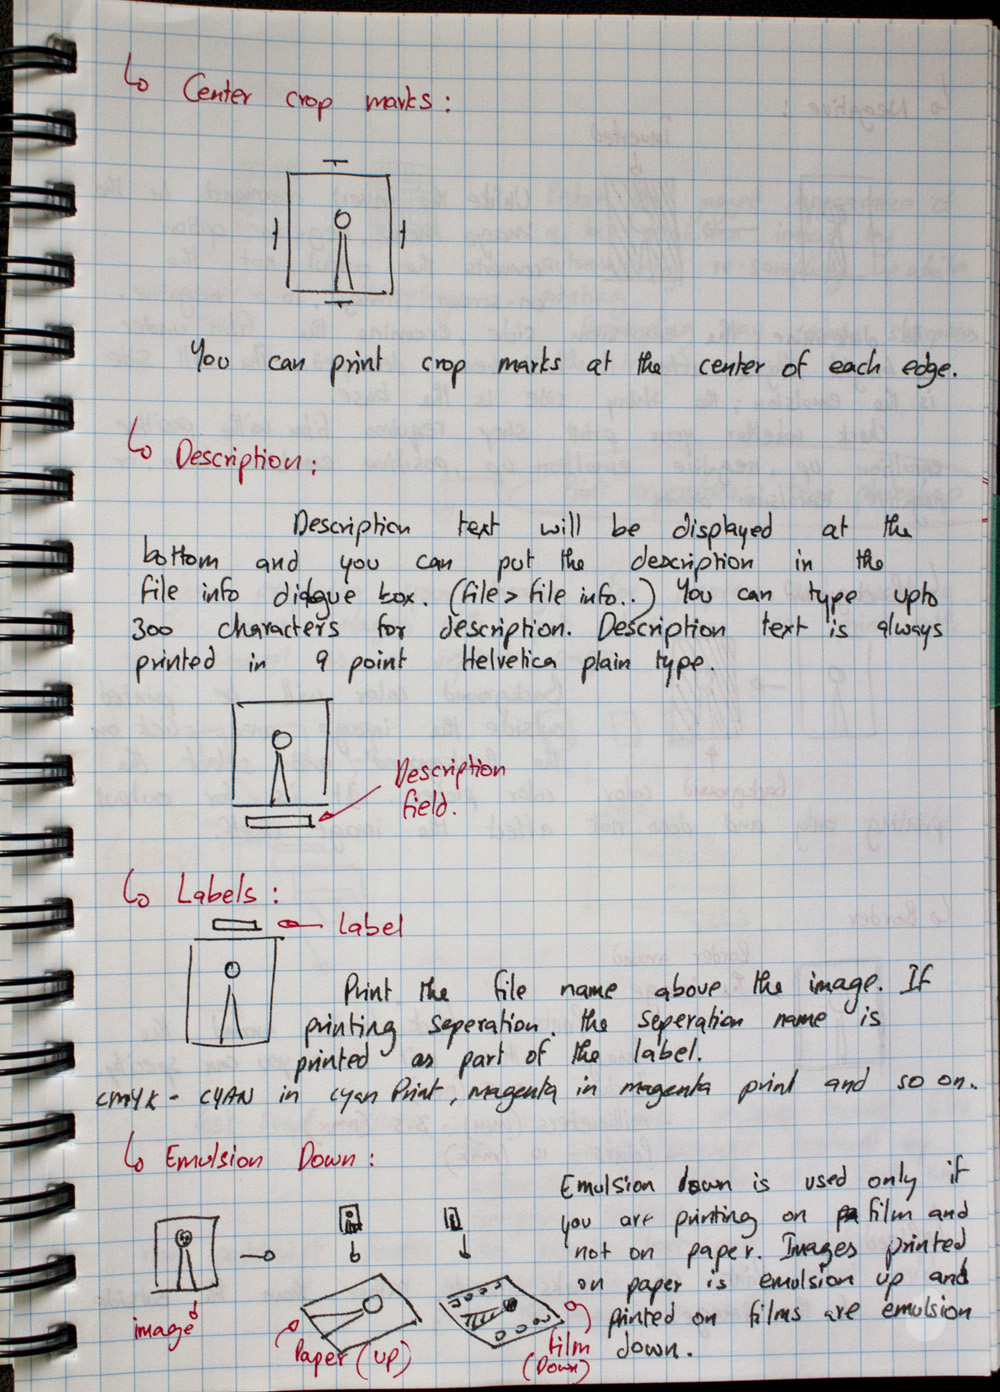
11. What is a Label and Description options and where can i add the description?
A label is the file name of your image which will be printed on top of the image. Description will appear below the image and you can add description in the File info dialog box (File > File Info...) (Alt + Ctrl + Shift + I) under description box. You can add upto 300 characters and its always printed in 9 point helvetica. If you don’t have any description to the image, the area will be empty and you won’t see any indication on the print dialog box once you check the description option.
12. What is Emulsion Down?
Images printed on paper are Emulsion Up with a readable type and if its printed on film the Emulsion is Down. If you select Emulsion Down in the print dialog box you will see your image flips horizontally.
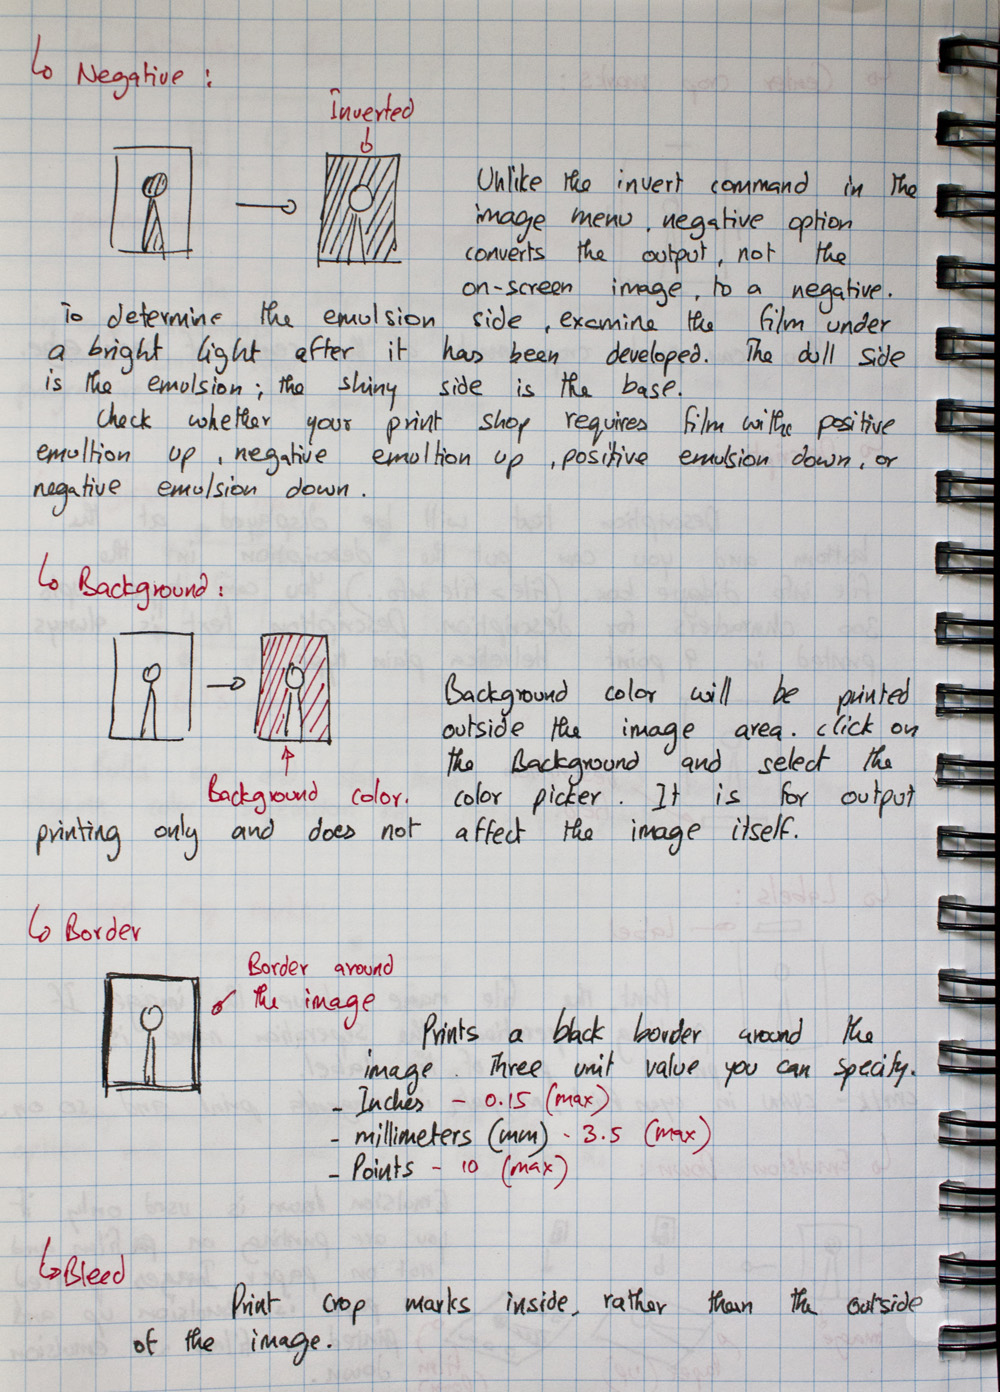
13. What is Negative?
It prints everything you see on the print preview dialog box in an inverted way. This invert is different from the Edit > Adjustment > Invert; the invert in the adjustment is only for display the image on the monitor and not for printing, the negative option in the print dialog box will print the image in inverted.
This options is good for printing separations directly to film, but its always ask your print shop before you select this option.
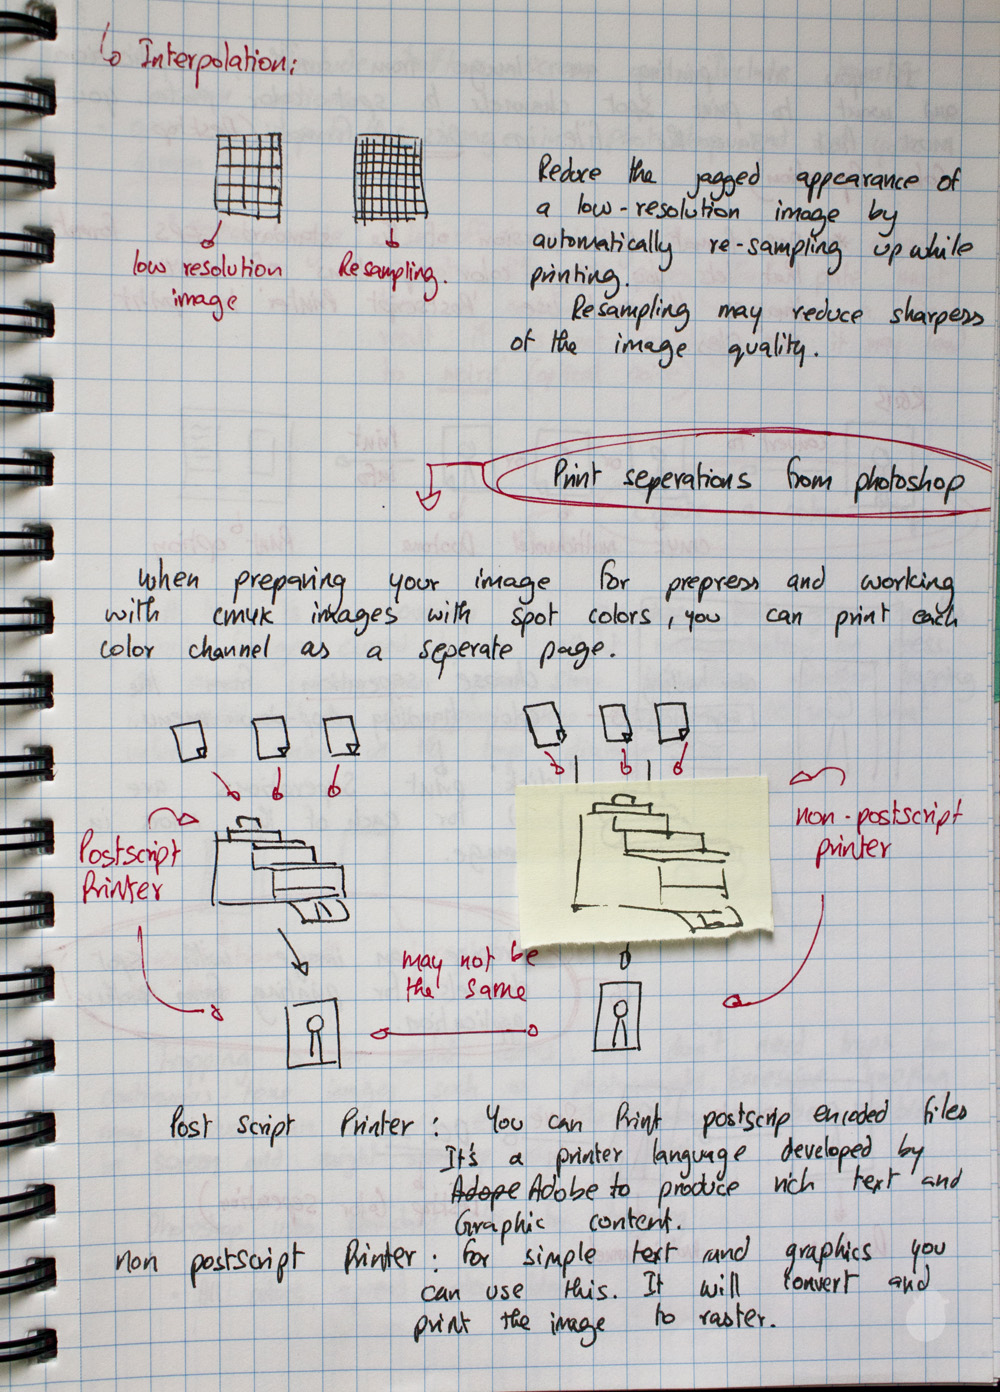
14. What is Interpolation and Include Vector data in the Functions sections?
Interpolation is useful if you have a low resolution image, it basically re-sample when you are printing on a post-script printer. But choosing this options is not good if you are looking for clarity, re-sampling is increasing more pixels and reduce the jagged appearance in an image.
Include vector data, if you have a vector elements on your image like shape or text it will include as a separate image for each vector or shape layer, and it will be printed on top of your image and clipped with vector outline. This will be printed at full resolution, even though you have limited resolution for your image.
15. What is Background, Border and Bleed?
If your image is smaller than the printing paper or you have a space above and below of your image, you will see a paper color outside the image after you printed. To fill the paper color with your own color, you can choose custom background color. When you click the Background, photoshop asks you to select a color from the color pop-up box to choose a custom color.
Border, adding a black border around your image from the border option. You can specify three unit values Inches, mm, and points.
Bleed, adding a crop mark inside the image. This option is good for trimming the image with a graphic. You can enter a values in a bleed pop-up box.
16. Why i cannot see some of the markups and other output options in the preview window?
Your image has to be on the center of the page or you should have some gap on all four sides to have the options visible, if you image fit perfectly on a paper then you might not see the markups and options.
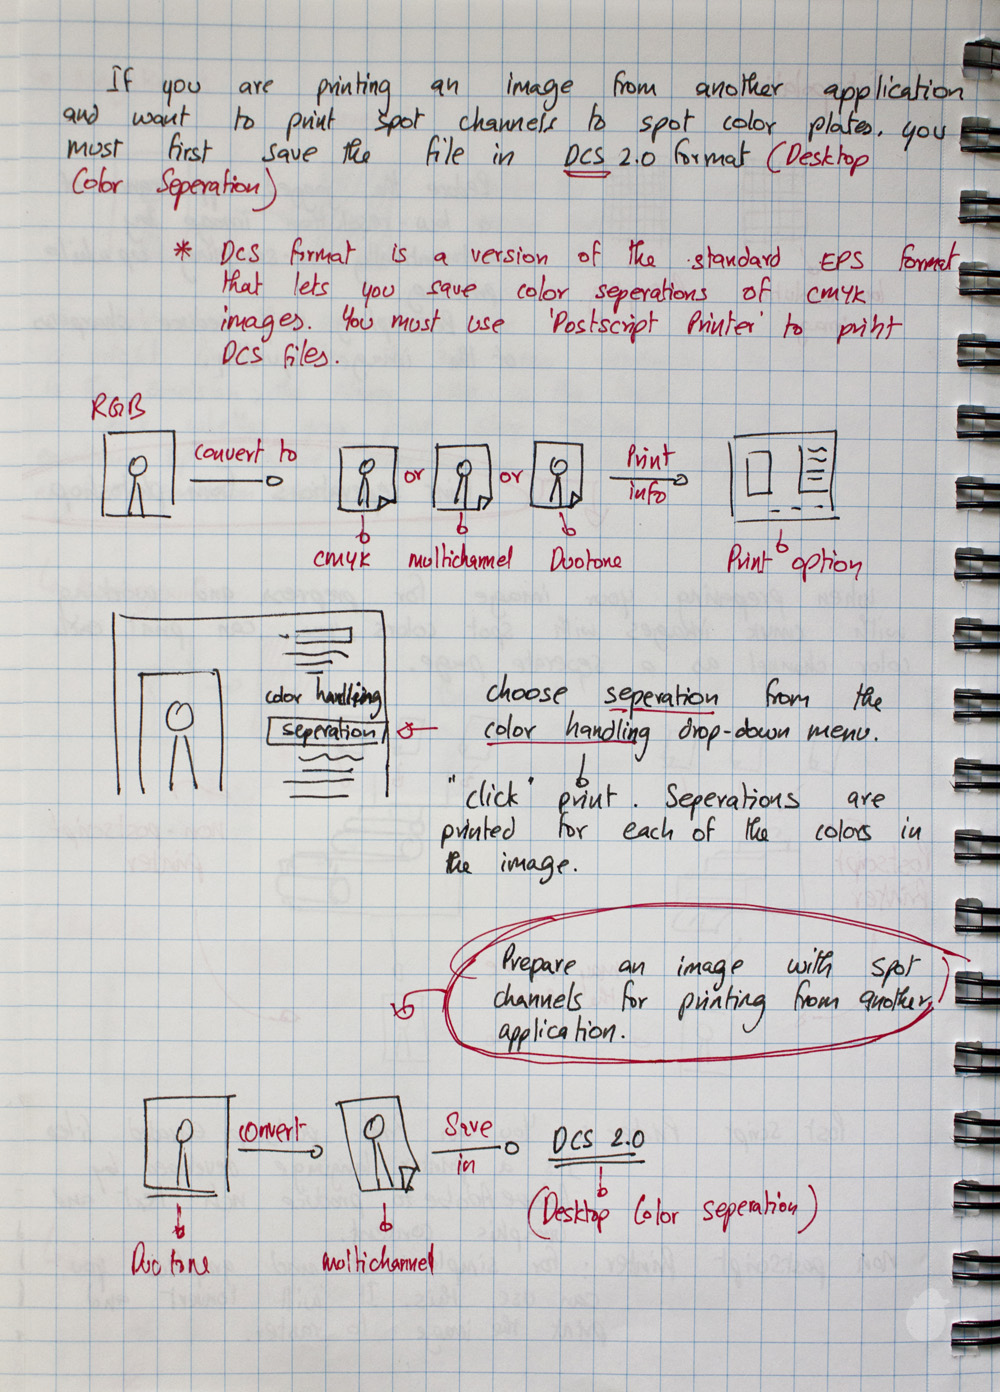
17. How to preserve a spot color?
You can save a file in DCS 2.0 to preserve a spot color channel. Applications such as Adobe InDesign and QuakeXPress supports this format.
18. How do i separate my image for commercial printing press?
You can do that in print option dialog box (File > Print... (Ctrl P)). On the right side under Color Handling drop-down menu select ‘Separations’, make sure you convert your image to CMYK, Multichannel or Duotone before you select Separations or else the option is grayed out. Once you have selected the separations and click ‘Print’.
19. How do i prepare an image to Spot channel for printing from another applications?
First convert your Duotone image to multichannel mode, because duotone doesn’t give you a different color channel by converting to multichannel, all the colors will appear in the channel box.
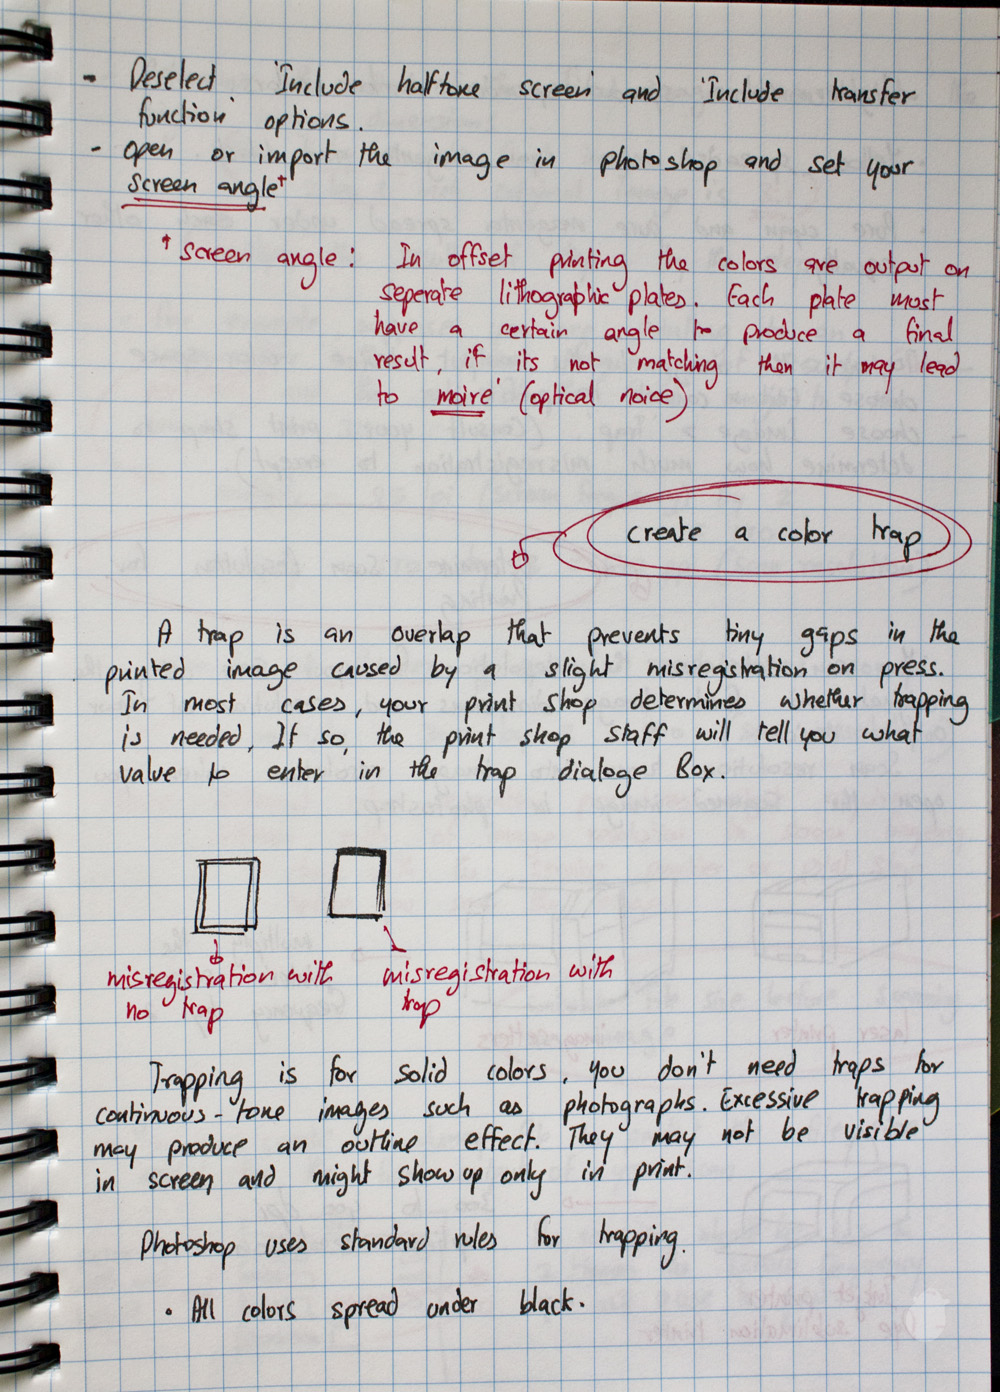
Then Save as to DSC 2.0 format and in the DSC 2.0 format dialog box, uncheck ‘Include Halftone Screen’ and ‘Include Transfer Function’. Import or open the image in photoshop and set your screen angle. Indesign and Illustrator takes spot color directly from PSD file.
20. What is a Color Trap?
A trap is a overlap that prevents tiny gap that caused by the misregistration on press. Most probably your print service provider will tell whether you need trapping or not. If there is going to be a trap then he will tell you how much its going to shift based on that he will tell you the value to enter in the trap dialog box.
Trapping is mostly visible on solid colors and not on a continuous tonal image and you might not see the gap on a monitor, but it will be visible on the print. Ink properties and paper texture is very importing too, too much trapping will leave a outline. Mostly the gap is visible when there is a knockout (the top color print and anything below does not print), overprinting color won’t be needing a trapping because the color is blended with the bottom color.
21. Is there any particular guidelines to follow?
Photoshop uses standard rules which will help you to solve the issue.
- All colors spread under black
- Lighter colors spread under darker colors.
- Yellow spreads under cyan, magenta, and black.
- Pure cyan and pure magenta spread under each other equally.
22. How to do the Trap in photoshop?
Go to Image > Trap, if you know the right value you can enter in the trap dialog box or else consult your service provider.
To see your image in a output device which you are going to print, go to Edit > Convert to Profile and select a profile from the list.
23. How to determine the scan resolution for printing?
There are various techniques to determine the resolution, but it is always best to scan the photograph with a scanners optical resolution and use photoshop to re-size the image. But if you are scanning and want to print the image and you know the exact size and resolution, you can feed that information on a scanner.
24. How do i calculate the scan resolution?
It is based on the final image dimensions and the resolution of your output device. Once you scanned the file and when it comes to photoshop it will be treated as image resolution and not scan resolution.
Laser printer and Image-setters, multiply the printer’s screen frequency by 2. Its best to ask your service provider about the details. Many Dye sublimation printers or if the image print directly onto a photographic paper have resolution of 300 to 400 dpi.
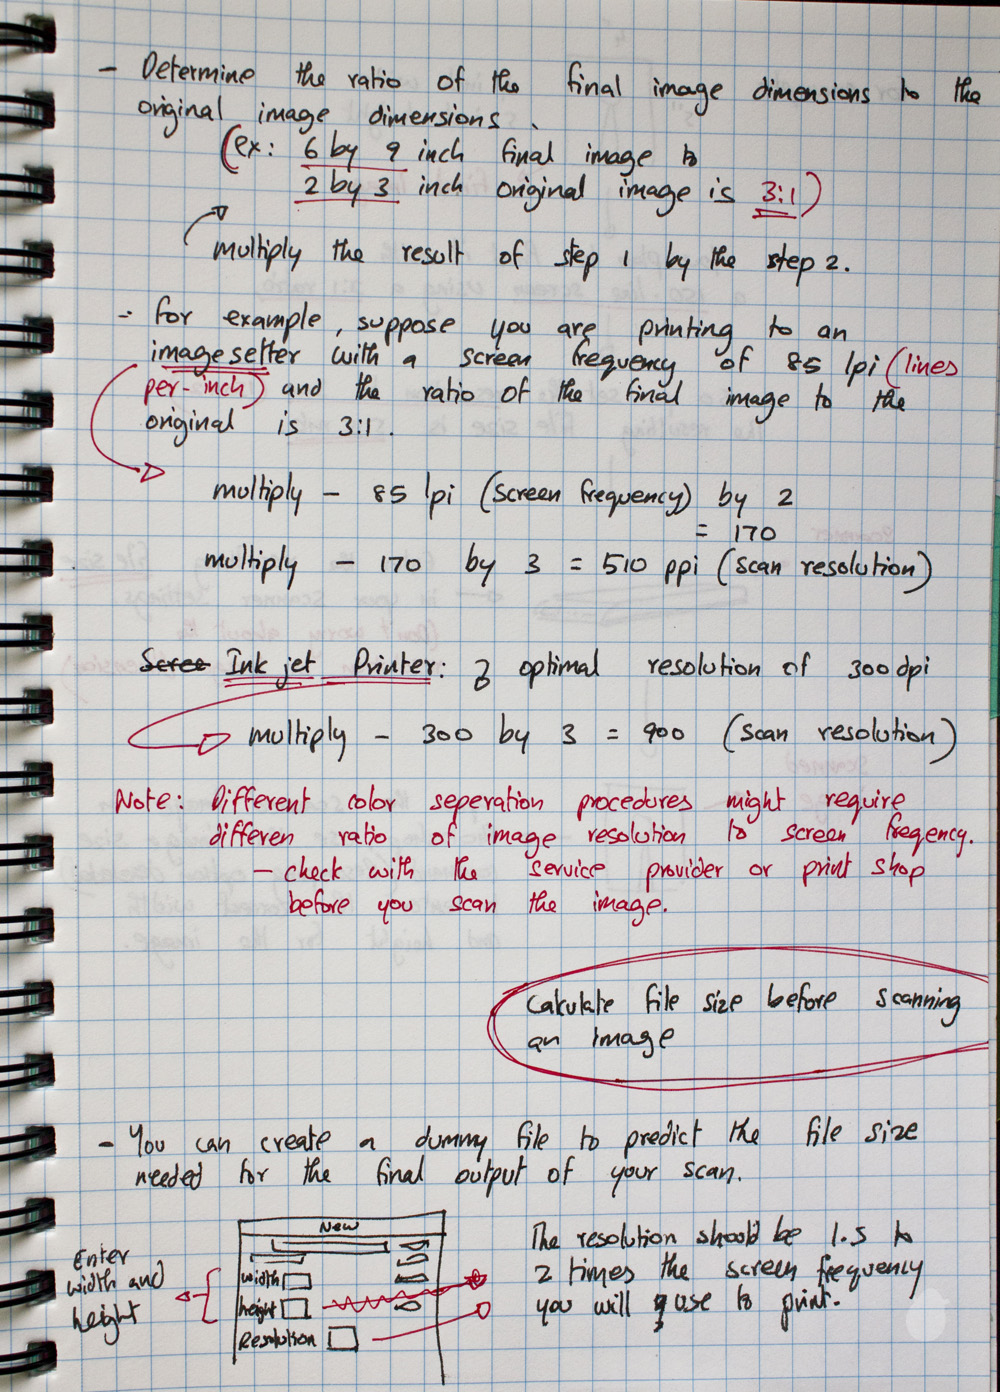
You can determine the ratio of the final image dimensions to the original image dimensions. For example, the ratio of a 6 by 9 inch final image to a 2 by 3 inch original image is 3:1 (Multiply the result of step 1 by the result of step 2).
For example: If the screen frequency is 85 lpi (lines per inch) and the ratio of the final image to the original is 3:1
Multiply – 85 lpi by 2 = 170,
Multiply – 170 by 3 = 510 ppi (pixels per inch)
Scan Resolution – 510 ppi
If you are printing to an inket printer with an optimal resolution of 300 dpi.
Multiply – 300 by 3 = 900 (Scan Resolution)
Different ratio of image resolution to screen frequency differs based on the color separation procedures and it is always good to check with your service provider.
25. How do i calculate the size before i scan an image?
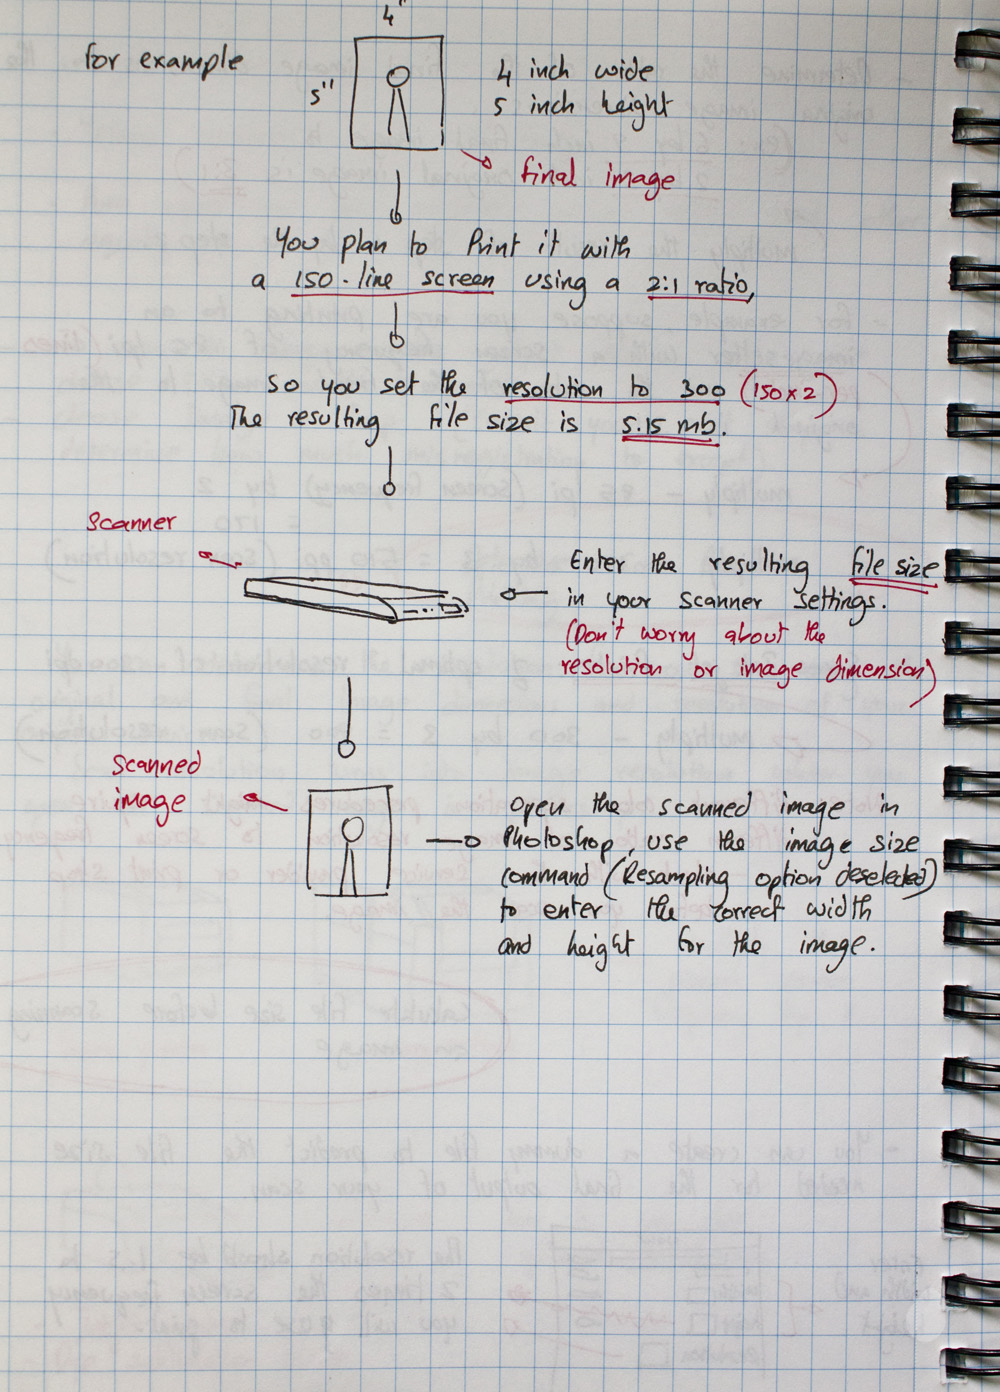
Based on your final output of your scan, create a dummy file from File > New. Fill in all the details like Width, Height and resolution based on your final printed image. The resolution should be 1.5 to 2 times the screen frequency you will use to print, and set the mode. The New dialog box displays the file size.
For example, if the final image is 4 inches wide and 5 inches height. You plan to print it with a 150 line screen using a 2:1 ratio, set the resolution to 300 and the resulting file size will be 5.15 MB. Enter the file size of 5.15 on your scanner setting to scan the image. Once the scan is done you can bring it to photoshop and enter the width and height for the final image.
No comments:
Post a Comment