

If you haven't seen the slice tool then you can go here >>
Essential for Slice Tool. Slice Select Tool will edit the slices which created with slice tool.
I assume you know the very basic understanding of these slice lines and its pattern. If you are not sure i suggest you look at part I >> Essential for Slice Select Tool 1
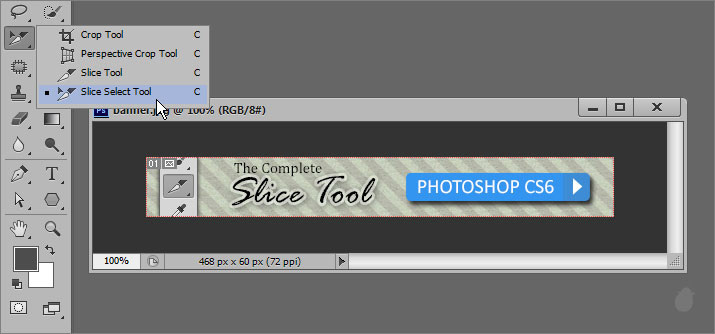
Slice Select Tool is under the Slice tool.
If you have made any slice in the image and you mouse-over inside the slice, the tool shifts to slice select tool with a small arrow
For proper editing you have to use the Slice Select Tool itself and its options. Press 'C' to get this tool.
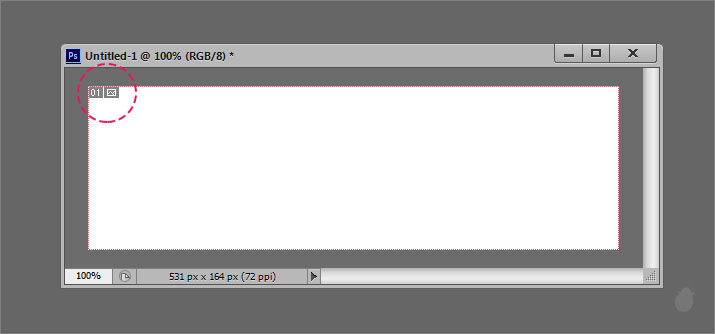
When you open any image or if you create any new document inside photoshop, you will see a default slice around the document.
You can hide the slice if you don't want to see, but you cannot delete it permanently. You can also promote this to user based slice, we'll come to that in a minute.
There are three types of slices you need to know. We have covered a basic from part 1 of this essentials (if you haven't seen then go here >> Essential for Slice Select Tool 1 or continue with me)
Layer Based Slice
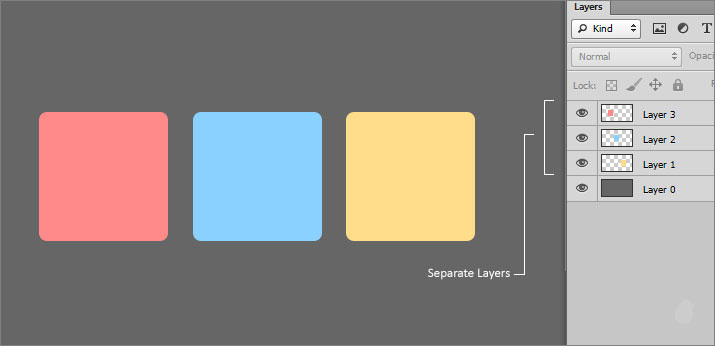
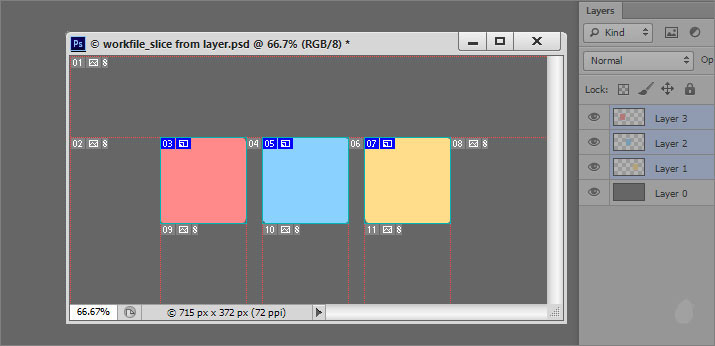
Lets look at Layer based slice first. The image below has three boxes in a three separate layers. Just to have different slice for all three boxes, we have separated the layers.
// Download the Exercise file to follow along with me >> layer based slice.zip
We are going to select all three boxes from the layer palette (assuming you have downloaded the exercise file) then go to Layer menu and select 'New Layer Based Slices'.

This will create a separate slice for each layer (fig 3.2). That's why we have kept all the boxes in separate layers. You can also select one layer and assign 'new layer based slice'.
The layer based slice have a box symbol next to the numbers (top left). Here we have layer based slice (blue color box) and auto slice (grey color box). If you remember part I of this essential, the auto slices are created by photoshop.
(the 'T' shaped joint in the corner of the each slices in part I is to illustrate how the slice are linked together, you don't see the joints here or in any of the other slices.)
Layer based slice are linked with layers. You cannot control the slice individually, if you want move the slice then you have to move the layer.
If you want to move the slices individually then you have to promote them to User based slice.
Because user based slice have more control when it comes to editing, whereas layer based slice have some restrictions. But, if you promote to user based slice then the slices are no long linked with layers (i'll tell you why, as we go along) and you cannot reverse the action. There is no de-promote button.
Lets Promote our slices (fig 4.0). Select all slices or any one of the slice with slice select tool. In the options bar click the 'Promote' button. Notice the box symbol (top left) is changed to mountain symbol (mountain means, its an image. See fig 7.0), indicating that this is promoted to User based slice.
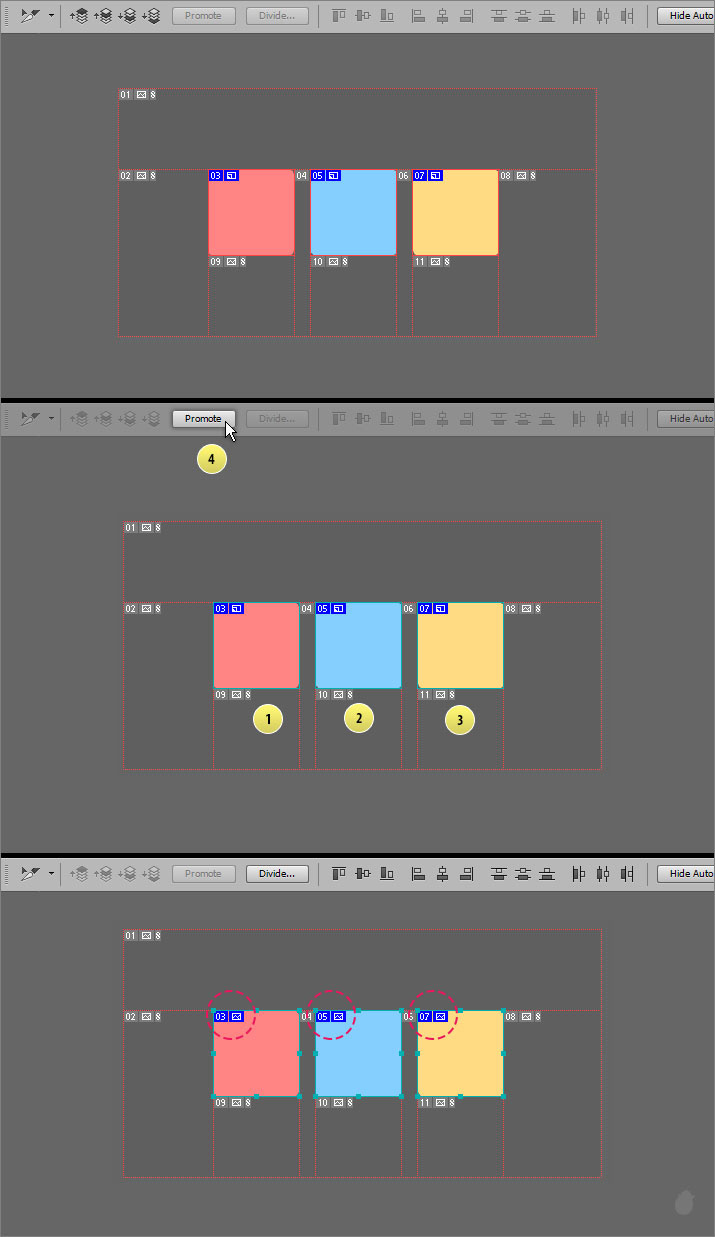
After you promoted the slices (fig 4.0) notice the corner handles around the box, now you can move the slice freely.
Layer Based Slice
User Based Slice
This is created with Slice Tool. You can see more about this tool here >> Essential for Slice Tool
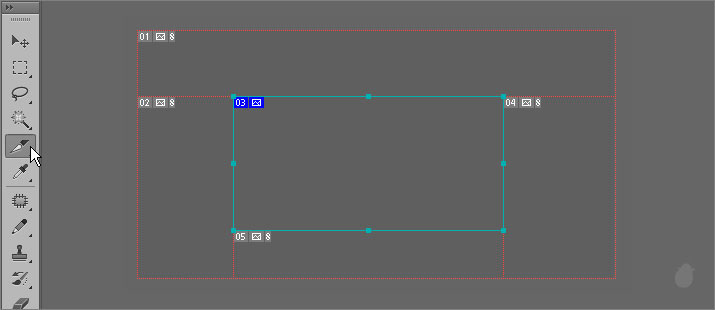
When you create a slice using Slice Tool the promote button is disabled because there is nothing to promote. With this slice you can adjust the slice by dragging the handles on any of the sides. The auto slice will adjust automatically.
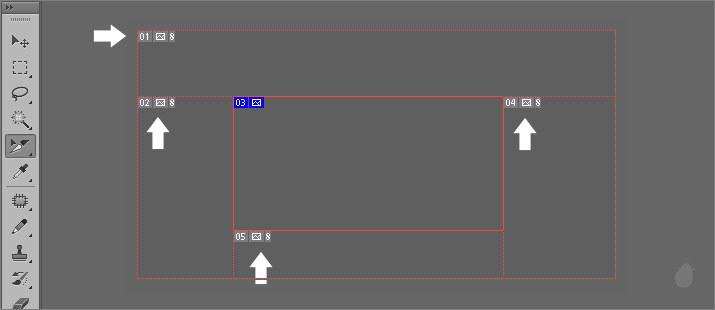
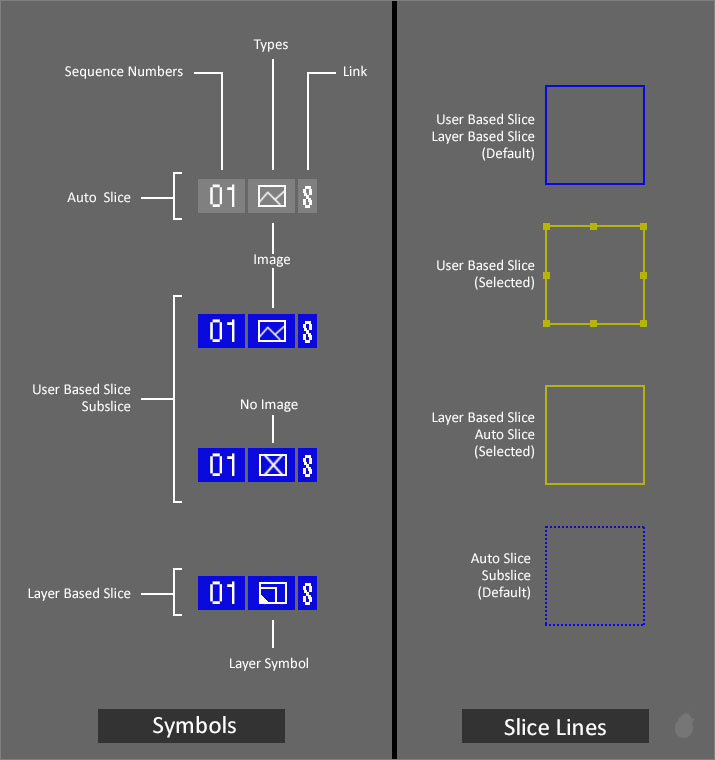
The difference between user based slice and auto slice is the lines, symbol colors and link. See fig 7.0
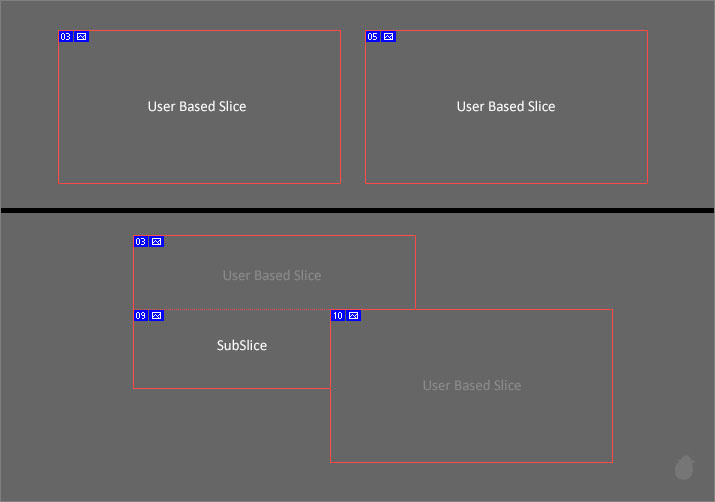
When two User based slice or Layer based slice overlaps; a new slice will create, called 'Subslice'. You cannot edit the subslice. When you select the subslice it selects the slice underneath it.
(fig 6.0) The second image has subslice as 09 (slice number). When you try to select 09 it selects 03.
Go here if you want a clear explanation >> Essential for Slice Select Tool 1
Understanding these symbols (fig 7.0) are very important.
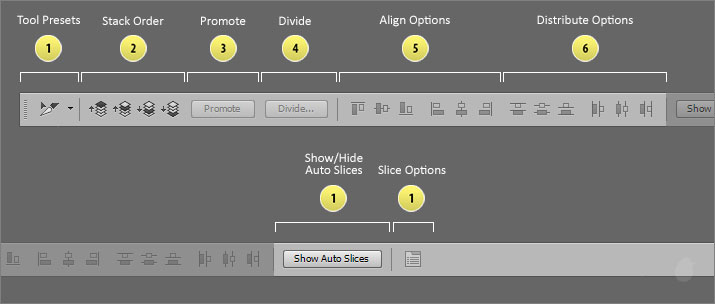
1. Tool Preset
Tool preset will help you to save your settings for later use. But iam not sure why we have tool preset for Slice select tool. There is nothing here to save as a preset to use later. If you know why, just drop it in a comment will appreciate that.
2. Stack Order
Which slice you want it to be on top and which has to go behind.
Stack order helps you to organize your slice order when overlap happens. Based on the order you arrange, subslice creates. If you are not sure then you can go here >> Essential of Slice Select Tool 1
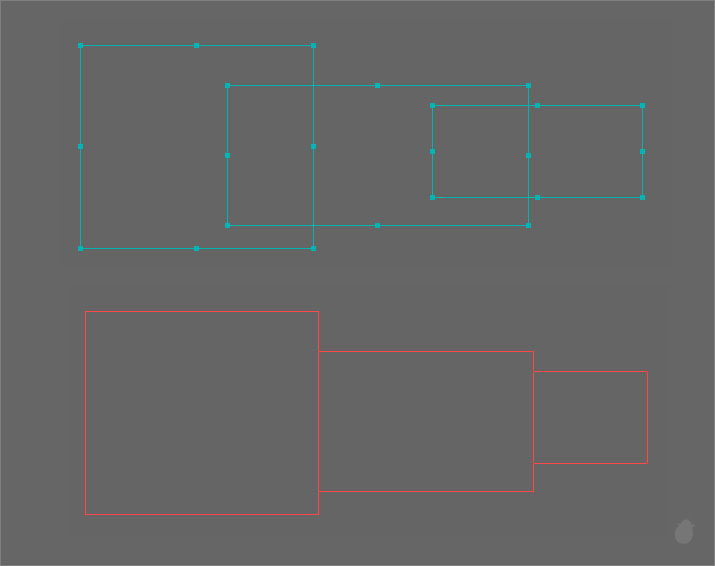
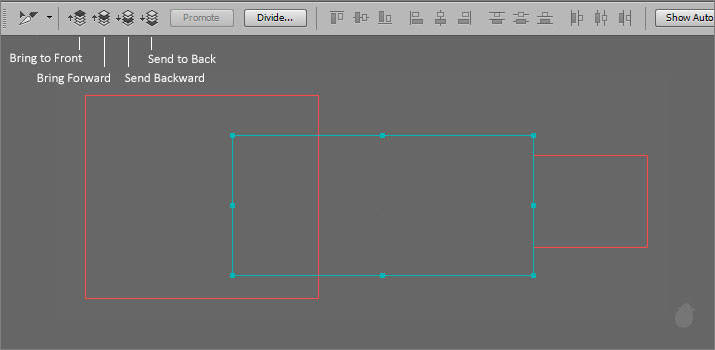
(fig 9.0) We have three slices that on top of each other. These are Used based slice. I've selected all the slices in the first image. The second image I've deselected them, just so you can see the stacking order.
Starts from left, the first big slice is on top followed by the second and third.
If we select the first slice (fig 9.1), you can see the available options in the options bar (Send Backward and Send to Back). We can send our slice to one step back (Send Backward) or send completely back (Send to Back).
If you have a slice that doesn't overlap any of the other slices, the stack order is still be active. But if you have only one slice in a whole document, then the stack order will is disabled.
The stack order automatically recognize the neighboring slice even though they don't interact with each other.

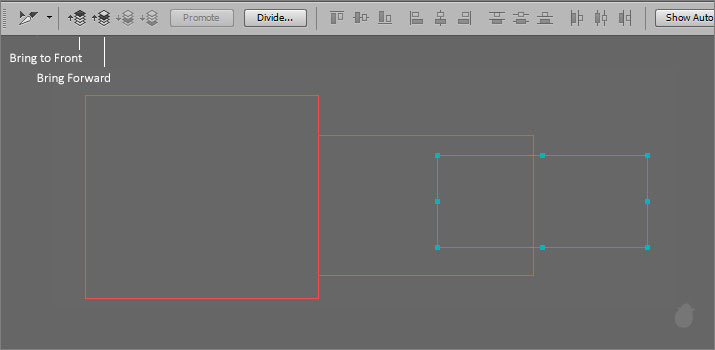
Here, i have selected the second slice and in the stack order i have an option to send the slice either front or back.
I assume you know the very basic understanding of these slice lines and its pattern. If you are not sure i suggest you look at part I >> Essential for Slice Select Tool 1
Slice Select Tool is under the Slice tool.
If you have made any slice in the image and you mouse-over inside the slice, the tool shifts to slice select tool with a small arrow
For proper editing you have to use the Slice Select Tool itself and its options. Press 'C' to get this tool.
(fig 1.0)
When you open any image or if you create any new document inside photoshop, you will see a default slice around the document.
You can hide the slice if you don't want to see, but you cannot delete it permanently. You can also promote this to user based slice, we'll come to that in a minute.
(fig 2.0)
There are three types of slices you need to know. We have covered a basic from part 1 of this essentials (if you haven't seen then go here >> Essential for Slice Select Tool 1 or continue with me)
- Layer Based Slice
- User Based Slice
- Auto Slice
Layer Based Slice
Lets look at Layer based slice first. The image below has three boxes in a three separate layers. Just to have different slice for all three boxes, we have separated the layers.
// Download the Exercise file to follow along with me >> layer based slice.zip
(fig 3.0)
We are going to select all three boxes from the layer palette (assuming you have downloaded the exercise file) then go to Layer menu and select 'New Layer Based Slices'.
(fig 3.1)
This will create a separate slice for each layer (fig 3.2). That's why we have kept all the boxes in separate layers. You can also select one layer and assign 'new layer based slice'.
The layer based slice have a box symbol next to the numbers (top left). Here we have layer based slice (blue color box) and auto slice (grey color box). If you remember part I of this essential, the auto slices are created by photoshop.
(the 'T' shaped joint in the corner of the each slices in part I is to illustrate how the slice are linked together, you don't see the joints here or in any of the other slices.)
(fig 3.2)
Layer based slice are linked with layers. You cannot control the slice individually, if you want move the slice then you have to move the layer.
If you want to move the slices individually then you have to promote them to User based slice.
Because user based slice have more control when it comes to editing, whereas layer based slice have some restrictions. But, if you promote to user based slice then the slices are no long linked with layers (i'll tell you why, as we go along) and you cannot reverse the action. There is no de-promote button.
Lets Promote our slices (fig 4.0). Select all slices or any one of the slice with slice select tool. In the options bar click the 'Promote' button. Notice the box symbol (top left) is changed to mountain symbol (mountain means, its an image. See fig 7.0), indicating that this is promoted to User based slice.
(fig 4.0)
After you promoted the slices (fig 4.0) notice the corner handles around the box, now you can move the slice freely.
Layer Based Slice
| Pros |
| The slice will automatically adjust when adding layer effects to the layer. |
| Will work on Smart Object |
| Merging two layers with layer based slice will make the slice into one. |
| Selecting multiple layers at once and applying will create slices on each and individual layer. |
| Also works on an single layer. |
| Works with Filters (Blur, polar coordinates, wave...) |
| Can delete the slice individually (make sure you are on Slice select tool, else you delete the layer |
| Cons |
| Merging one layer with slice and another one without will break the existing slice. |
| Unlike layer style you cannot create layer based slice to a group. |
| Cannot move the slice individually, no handles visible |
| Cannot 'Divide' the slice |
| Cannot 'Combine' the slices. |
| If you created a slice, then converting to smart object will break the slice. |
User Based Slice
This is created with Slice Tool. You can see more about this tool here >> Essential for Slice Tool
When you create a slice using Slice Tool the promote button is disabled because there is nothing to promote. With this slice you can adjust the slice by dragging the handles on any of the sides. The auto slice will adjust automatically.
(fig 5.0)
The difference between user based slice and auto slice is the lines, symbol colors and link. See fig 7.0
(fig 5.1)
When two User based slice or Layer based slice overlaps; a new slice will create, called 'Subslice'. You cannot edit the subslice. When you select the subslice it selects the slice underneath it.
(fig 6.0) The second image has subslice as 09 (slice number). When you try to select 09 it selects 03.
Go here if you want a clear explanation >> Essential for Slice Select Tool 1
(fig 6.0)
Understanding these symbols (fig 7.0) are very important.
(fig 7.0)
Slice Select Tool Options
(fig 8.0)
1. Tool Preset
Tool preset will help you to save your settings for later use. But iam not sure why we have tool preset for Slice select tool. There is nothing here to save as a preset to use later. If you know why, just drop it in a comment will appreciate that.
2. Stack Order
Which slice you want it to be on top and which has to go behind.
Stack order helps you to organize your slice order when overlap happens. Based on the order you arrange, subslice creates. If you are not sure then you can go here >> Essential of Slice Select Tool 1
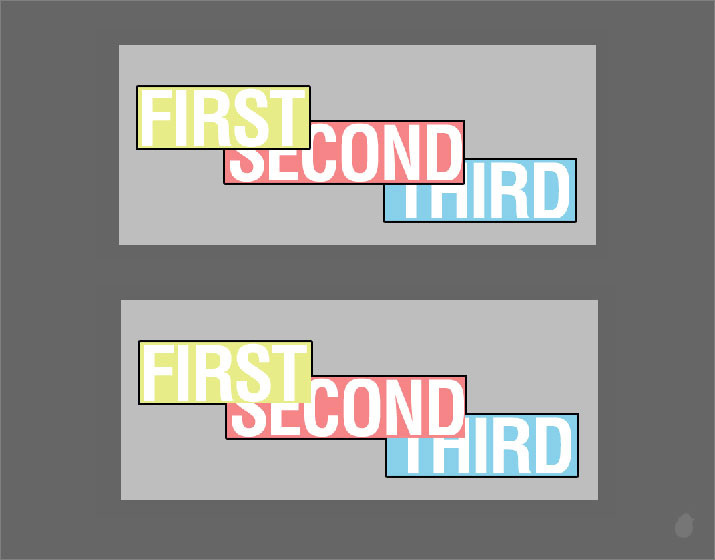
(fig 9.0) We have three slices that on top of each other. These are Used based slice. I've selected all the slices in the first image. The second image I've deselected them, just so you can see the stacking order.
Starts from left, the first big slice is on top followed by the second and third.
(fig 9.0)
If we select the first slice (fig 9.1), you can see the available options in the options bar (Send Backward and Send to Back). We can send our slice to one step back (Send Backward) or send completely back (Send to Back).
If you have a slice that doesn't overlap any of the other slices, the stack order is still be active. But if you have only one slice in a whole document, then the stack order will is disabled.
The stack order automatically recognize the neighboring slice even though they don't interact with each other.
(fig 9.1)
Here, i have selected the second slice and in the stack order i have an option to send the slice either front or back.
(fig 9.2)
And if i select the third slice the stack order showing me only the front options.
(fig 9.3)
You can also access these options from the context menu. This is helpful if you are working in a full screen mode.
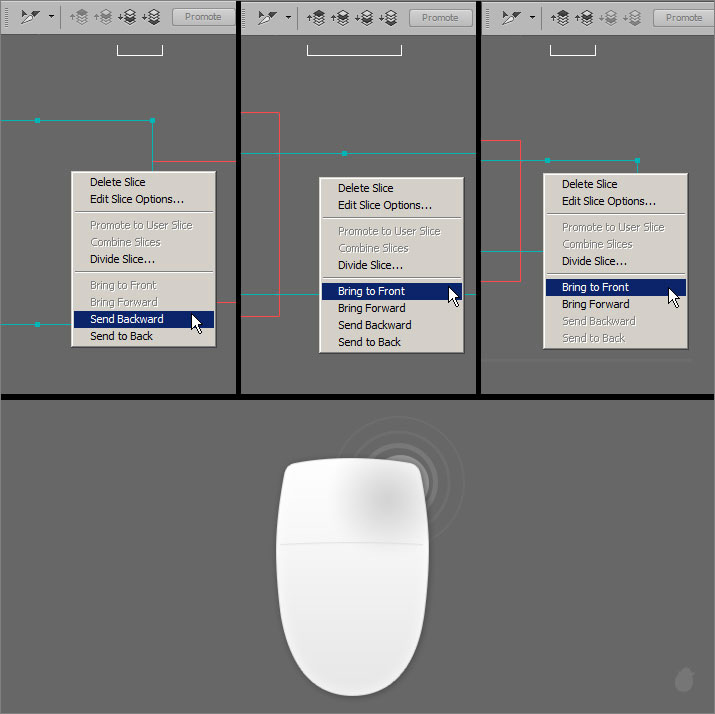
(fig 10.0)
Stacking order is good for subslice, it lets you see how it work with contents
(fig 11.0)// Download the Exercise file to follow along with me >> stack order with content.zip
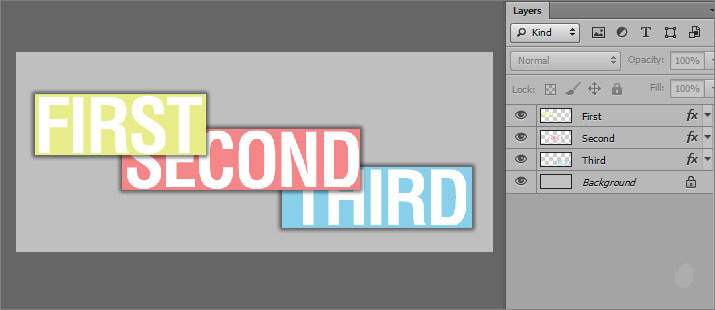
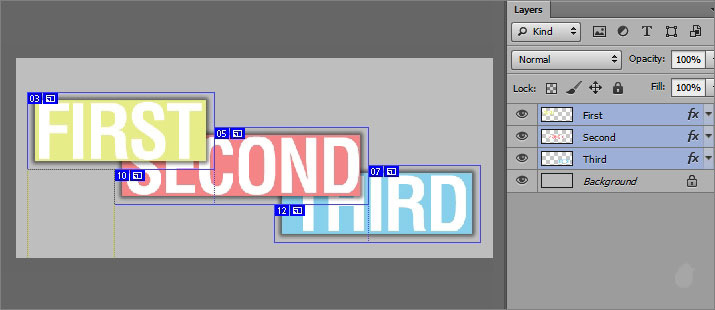
We have three images here in three different layers. The arrangement of the images and the layer palettes are the same, First is on top and followed by the other two.
I've added the drop shadow to illustrate this better.
(fig 11.0)
Lets select all three layers and go to Layer menu and select 'New Layer Based Slices'. This will create a slice around each of the layers. Remember, layer based slice are linked with layers, so whatever you do to that layer it will reflect in the slice.
See the pros and cons for layer based slice to understand this better
(fig 11.1)
Lets see the slice and see how they have arranged (fig 11.2). 03 (slice number) is on top of 05 and 05 is on top of 07. So the subslices are 10 and 12 (the missing numbers are auto slices, if you Turn ON auto slice you can see the sequence numbers)
(fig 11.2)
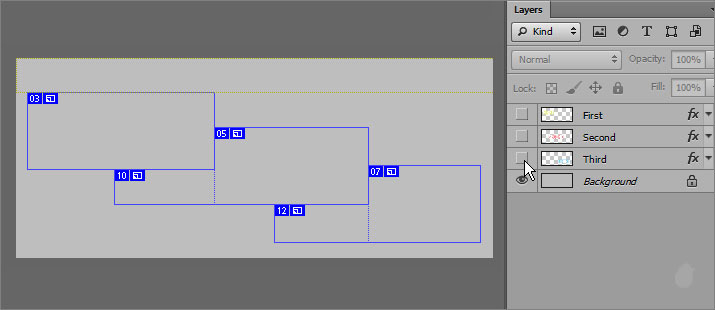
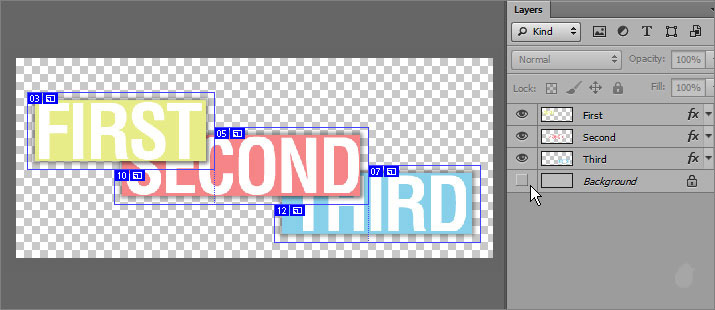
Because we need to export these in PNG format, lets hide the background layer
(fig 11.3)
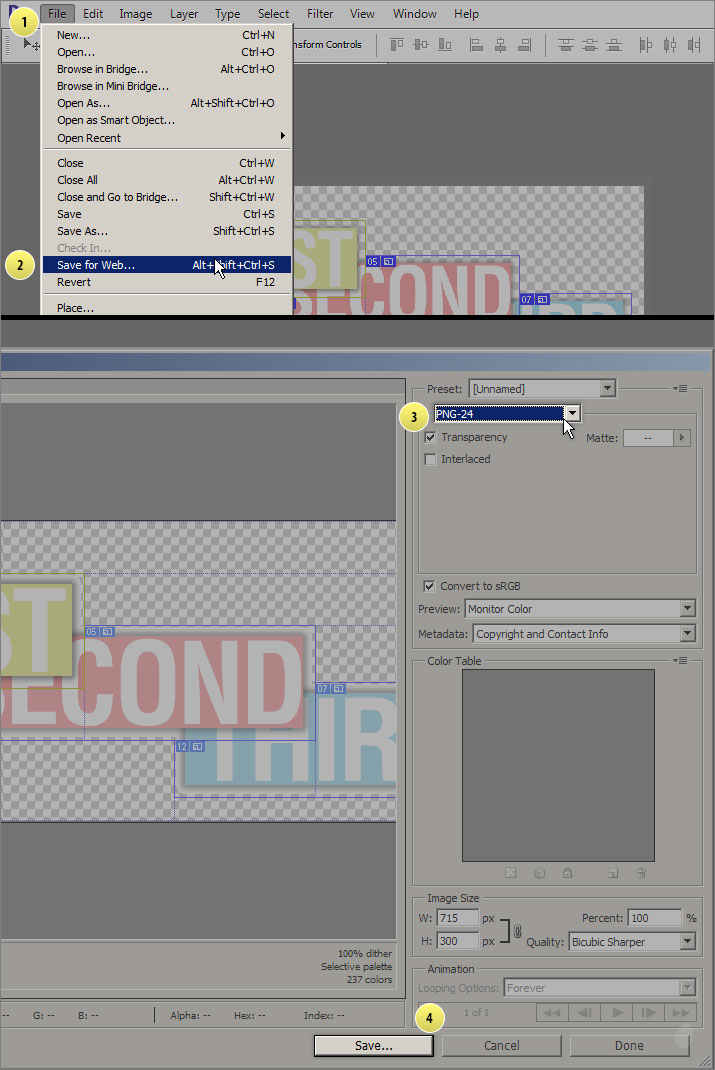
Go to File select 'Save for Web'. From the save for web window select PNG-24 from the dropdown window and click 'Save'.
(fig 11.4)
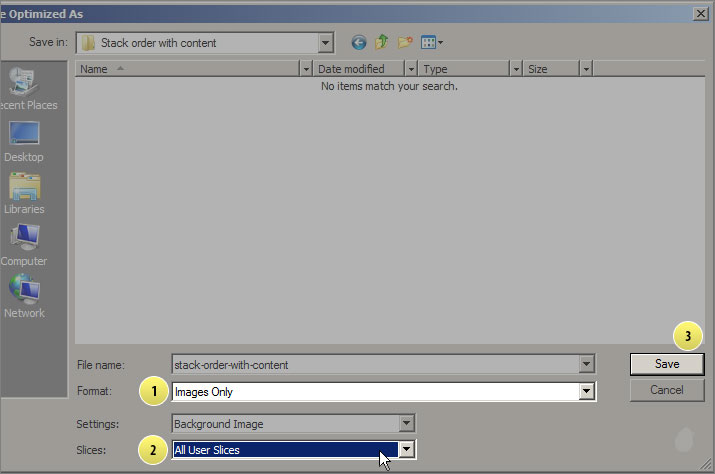
In the 'Save Optimized As' window (fig 11.5) make sure to select these
Format: Images Only
Slices: All User Slice (we have only layer based slice in our document, don't worry.)
(By setting this option (all user slice), the auto slice won't export along with this, for now we need only the contents (First, Second and Third)
(fig 11.5)
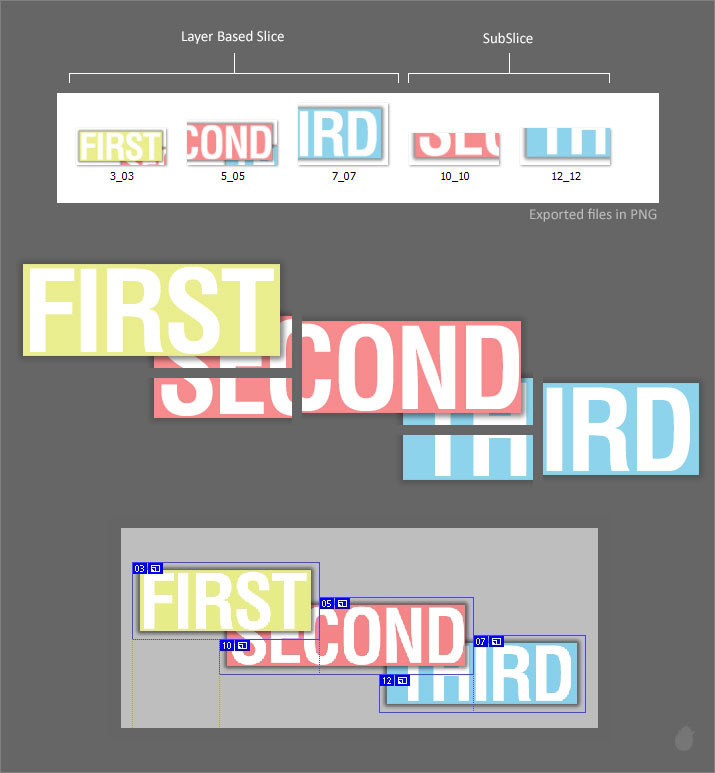
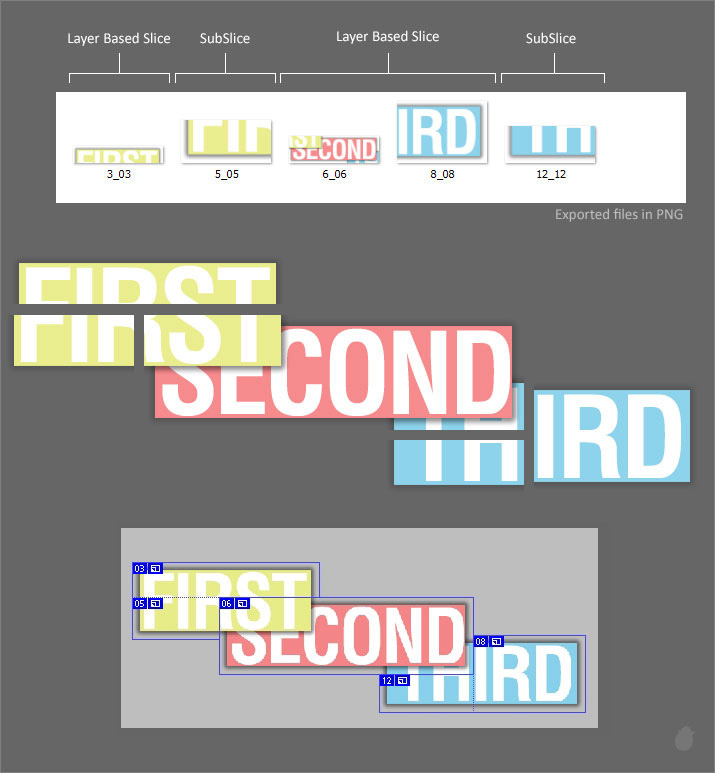
Once its done you should see something like this (fig 11.6) in the folder.
The first one is the sliced images from the folder, notice the slice number as file name.
The second image is how the output look if we arranged all the pieces together (i have left the gap to show you how it looks)
You can see the pattern of the slice we made in the third image.
It came out the same way we arranged the slices. Perfect.
(fig 11.6)
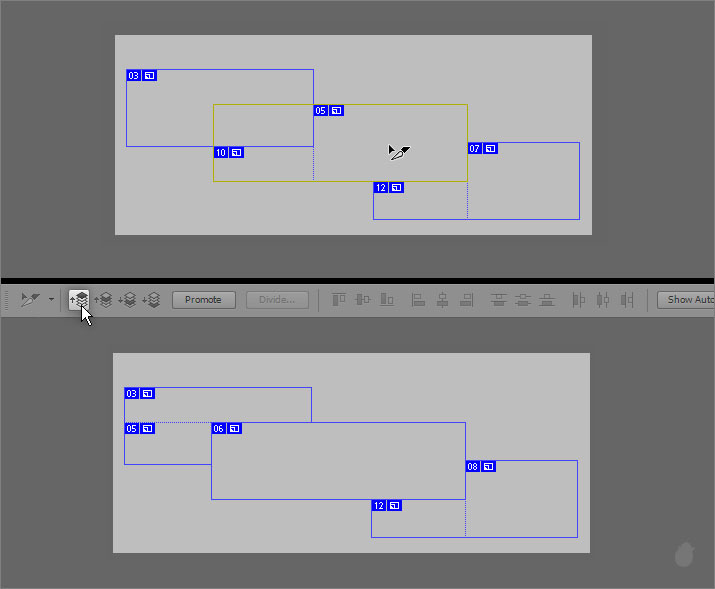
Lets bring the SECOND text to front.
Change the overlay of the slices. (fig 12.0) first image shows the selection of the middle slice (when you select layer based slice, you won't see the handles) and the second image is where we can change the stack order by selecting the first button (Bring to Front).
Notice the order of the slices now, subslice is on the first box and the third box. So now the middle box is on top.
(fig 12.0)
Now Save the image with Save for Web window (fig 11.4 / 11.5)
(fig 12.1)
Now notice the order of the slices, the slicing came out the same way we sliced the images, but the content is still the same. What we need is the SECOND box to come on top with the content.
(fig 12.2)
Remember this, whenever you adjust the overlays for any slices, you have to adjust the layer along with it. But the slices are already linked with our layer. So what happen?
The slices (layer based slice) will adjust only to the contents of that layer. When you save the slices, it sees as a whole image, it doesn't see the layer palette. Even if you have a slices linked with contents, you still need to adjust the it manually.
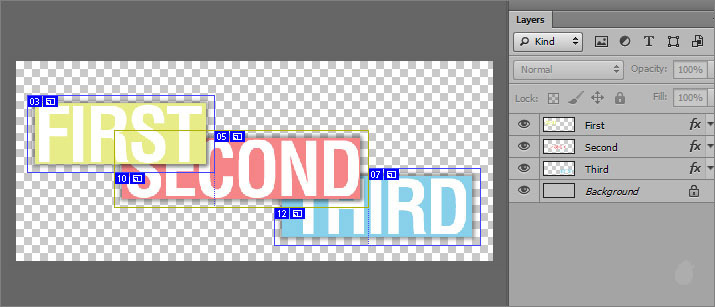
In this image (fig 13.0) the first is what we see or what the photoshop sees based on the layer palette, we have all three text in different layers. But when you take an output, the second image is what the slice sees. Same as you are taking an output for jpeg or png image.
(fig 13.0
We still have 'Divide', 'Show/Hide Auto Slice', 'Slice Options' and others, which we will cover in the next essential.
Next Essential Essential for Slice Select Tool 3
No comments:
Post a Comment