

In our previous essentials we have seen how to add text in a path and also inside the path. In this essential we will see how we can move the text without moving the path, adjust the flow of the text, understand the cursor, extending the text and adding multiple paths to an existing path.
Previous Essentials
Type on Path >> Essential for Type Tool 5 and Type inside Path >> Essential for Type Tool 6
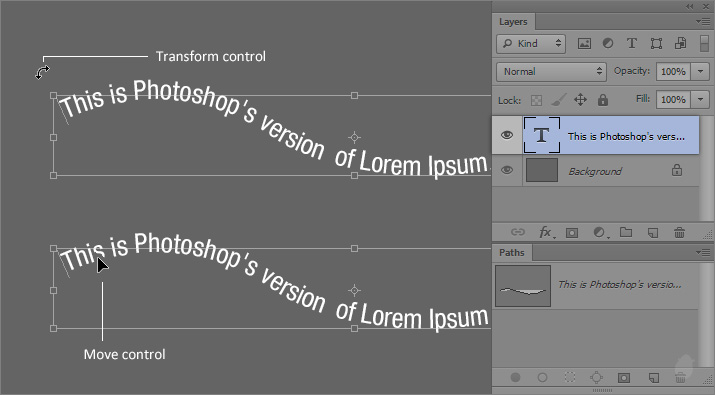
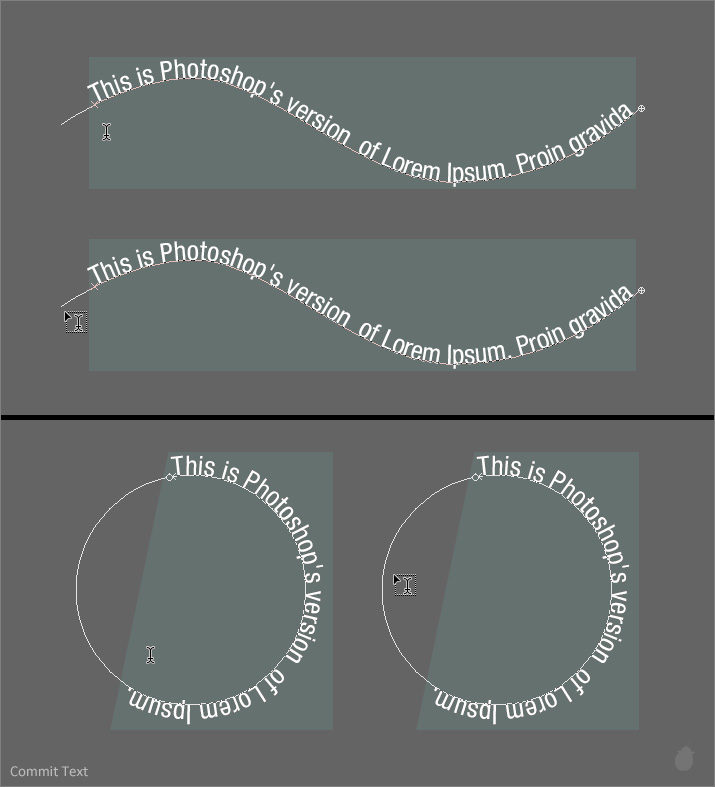
When you are in the edit mode for Type on path, moving the mouse-cursor outside the path and text area will toggle to move tool.
I have a simple text here (fig 1.0), the green box is just a reference to show you how far you have to move the cursor. When you are in move control you can move the text anywhere, the path follows along with it.
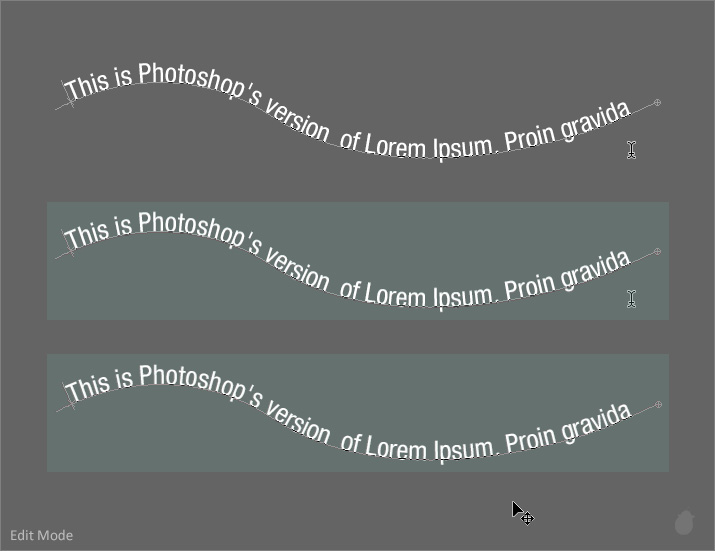
Just like Point type, holding Ctrl (Windows) Command (Mac OS) will display the transform box around the text. Notice the overflow icon in the transform box at the bottom right.
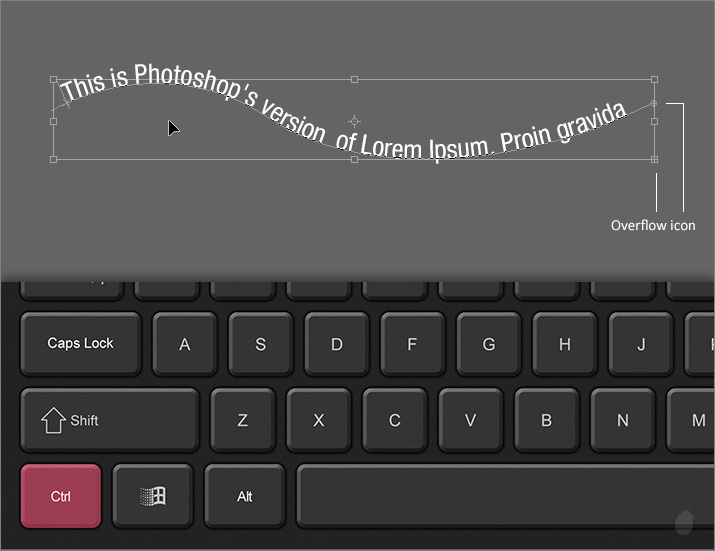
When you see the transform box, moving the mouse outside will display transform control and inside will display move control, this is same as the point type. But, if you keep the mouse-cursor on the path, it will display 'I-beam with an arrow'.
Type path has to be selected in the paths panel to display this cursor.
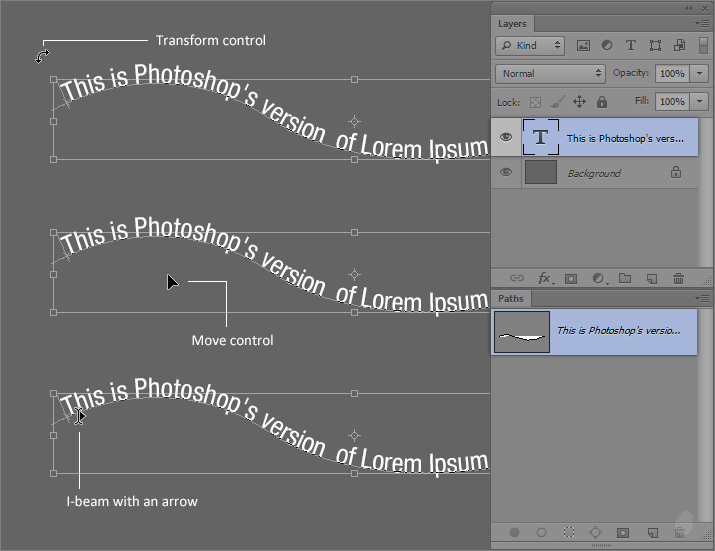
If the Type path is not selected in the Paths panel, only two controls are visible. Cursor inside the transform box is Move control and outside Transform control.
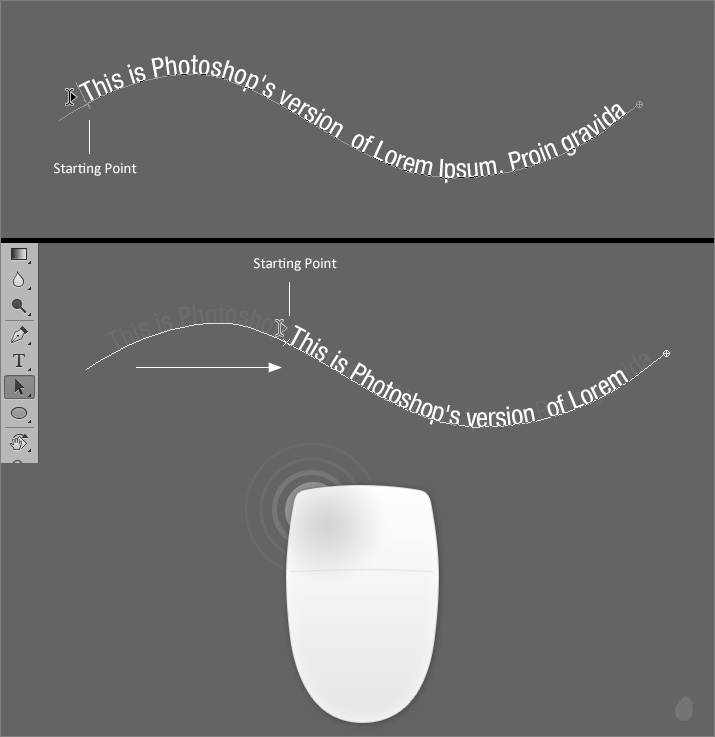
We just saw in (fig 2.1), if the path is visible when pressing the Ctrl (Windows) Command (Mac OS) and mouse-over on the path will display the I-beam with an arrow cursor.
You can also select Path selection or Direct selection tool from the tool bar and mouse over the Type path. This will display the same I-beam with an arrow cursor (fig 3.0).
If you mouse-over in the Starting point of the text, the arrow will be pointed towards the text direction, if the cursor is at the end of the path, the arrow will be in the opposite direction. If the text has center alignment, the cursor will change to two arrows facing in opposite direction if you place the cursor in the center.

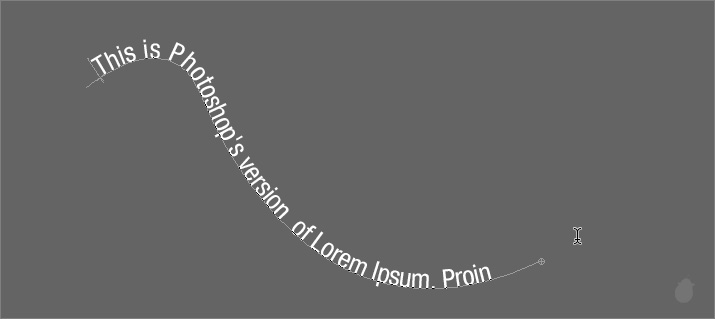
We have seen earlier, if the cursor is on I-beam and click and drag will highlight the text. But, with this tool (I-beam with an arrow) you can move the text without moving the path. This is helpful to adjust the Starting or the Ending point.
Just keep the cursor at the Starting point and click and drag along the path to move its position or you can directly place the cursor wherever you want in the path and click will shift all the text to that position.
You can also click and drag down, this will shift the entire text below the path, and also this will shift the Starting and Ending point. Notice the entire text is flipped.
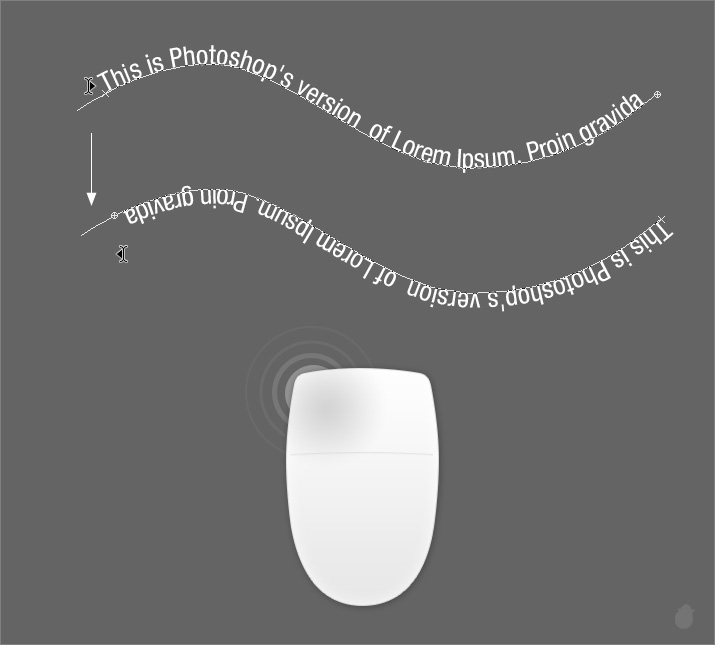
This will also work in closed path, keep the mouse-cursor at the Starting point of the text and drag inside.
After we commit the text, the I-beam cursor will display only if we mouse-over on the text area (green box). If the cursor is out of the text area, it will display Move control. Unlike edit mode we do not need to move the cursor outside the path area.
(the green box is just a reference to show you how far you can move the cursor)
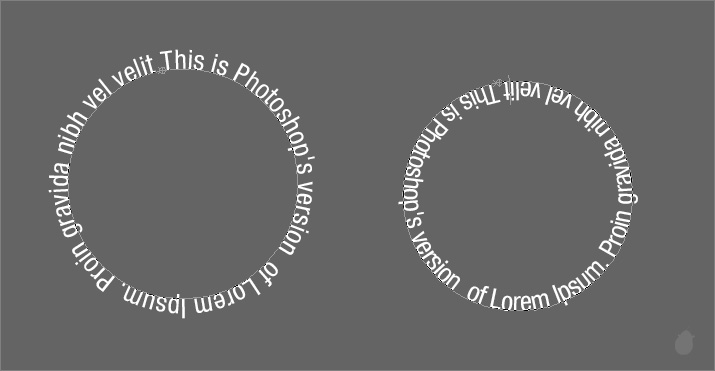
Same for closed path (fig 7.0).
You can also move the path with Path selection tool and the text follows automatically (fig 8.0 - 1).
If you want to move a selected anchor point, use Direct selection tool (fig 8.0 - 2). The flow of the text will automatically adjusted.
The Path selection tool or Direct selection tool has to be on a path; if you mouse-over on a text, it will display 'I-beam with an arrow'.

The curve here (fig 9.0) is stopped at the bottom, we can also extend the path and adjust the end point to see the rest of the text.
Select the pen tool from the toolbar and mouse-over on the end of the path, you will see a small circle next to the pen tool (fig 9.1 - 1), extend the path by adding more anchor points.
When you extend from a Type path, notice in the paths panel (fig 9.1 - 2). The extended path is directly added to the type path and not in the Work path. We are actually extending the baseline of the text.
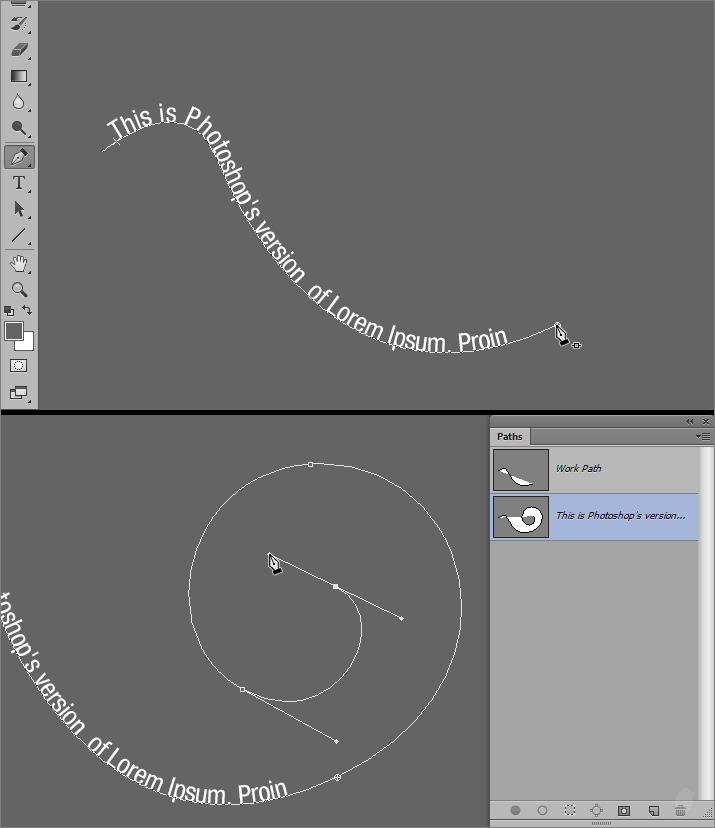
Once you have extended the path, select the path selection tool from the toolbar, and drag the ending point towards inside to extend the text.
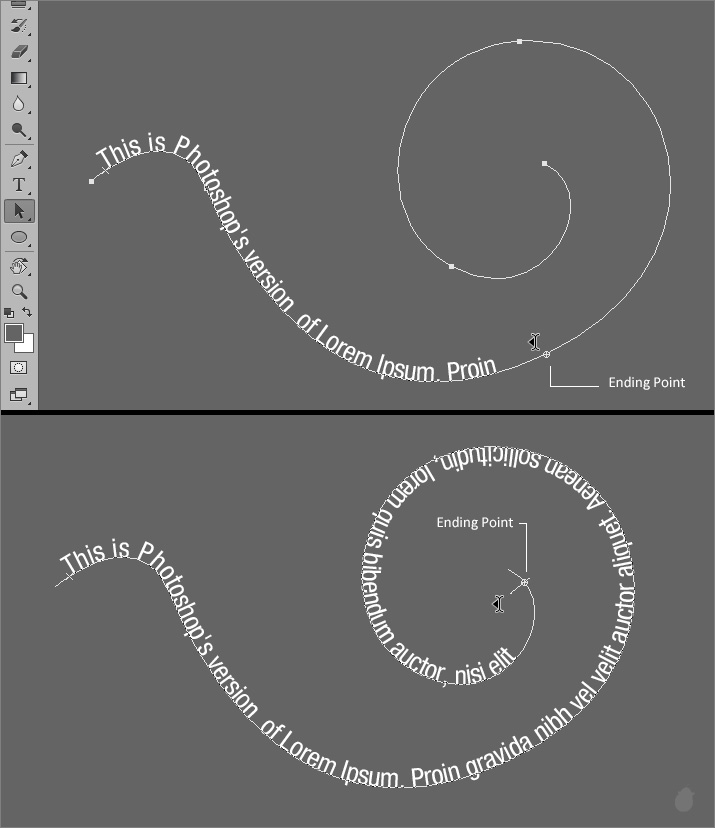
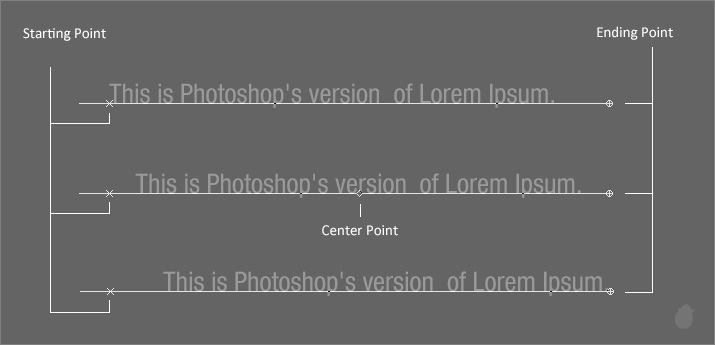
Starting point and Ending points are easily noticeable. Starting point will have a 'X' and the Ending point will have a small circle, if the text is longer than the path then a '+' (Plus sign) appears inside the circle.
If the text is aligned center, a small circle will display inbetween the Starting and the Ending point.
(We will learn more about alignments in the options bar essential)
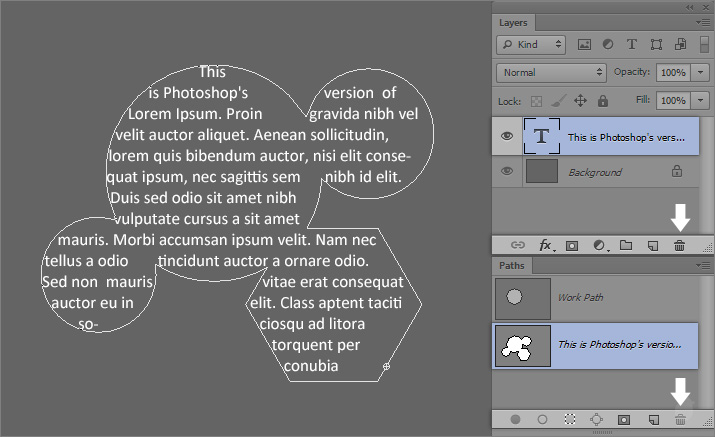
In a closed path, if you see the overflow icon. You can extend the bounding box, this will reveal all the text. To constrain the box, hold the Shift key.
If you mouse-over on a small circle for Type inside closed path, nothing will happen. We do not see the I-beam with an arrow cursor here. It is only for Type on path.
You can also extend the text by adding more path to an existing path.
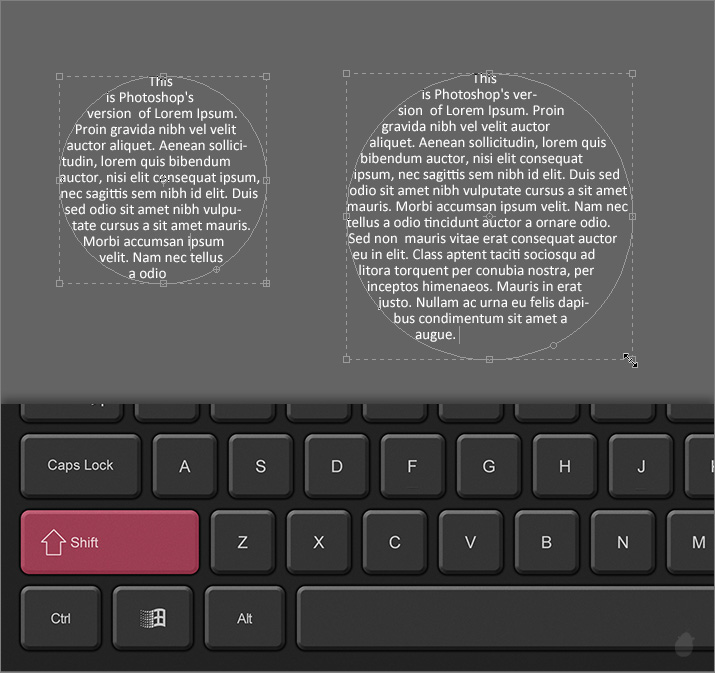
Select the Ellipse tool from the tool bar (make sure the option is set to 'Path' from the options bar) and select the Type path layer (if not selected) and hold the 'Shift' key (if you do not hold the shift key, Photoshop thinks you want to create a new path and it will move to Work path) and drag to create an another circle, remember the new path has to overlap the old one.
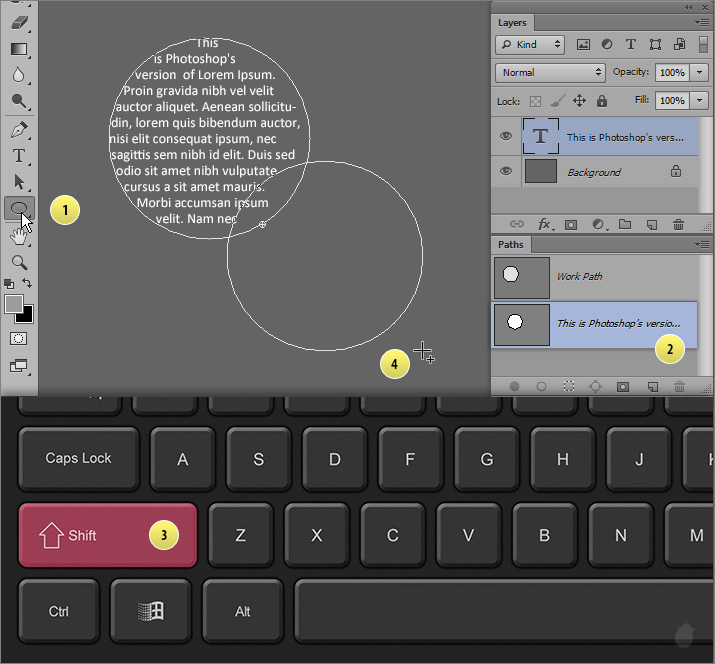
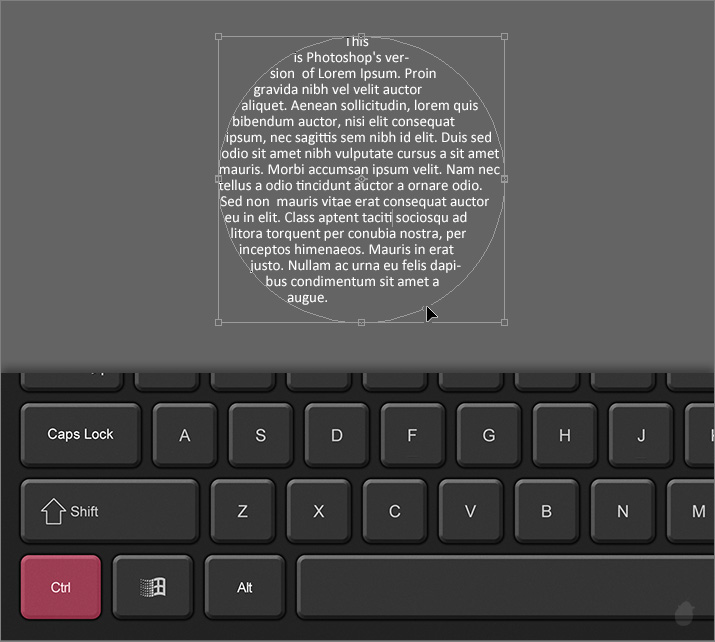
Once you release the mouse-cursor, the both path becomes one, and the text flow expands to the second path. Notice the new circle is added directly to the Type path.
When adding new shape to an existing Type path it should be fully closed, if you remember from our previous essential Type path will knocks out all the path operations like Subtract inside the path.
I have two star shapes here, this is taken from the Custom shape picker from the options bar. The first one is a Full shape closed path and the second one is also closed but with path operation (subtract). Let's try adding these to our existing path and see how it works.
Let's see the fully closed path first. Select the Type path in the paths panel and hold the shift key and click and drag to overlaps the first circle. After i release the mouse, the text flows to the second path just in the (fig 13.1).
We will try the same thing with the subtract path. I have selected the Type path in the paths panel and clicked and drag in the work area and make sure it covers the other path.
Once i released the mouse, the path is automatically moves and replaced the existing path in the Work path.
Whenever you are adding any new path with the existing path, make sure it's a one clean path.
Here's what you can use and what you cannot use.
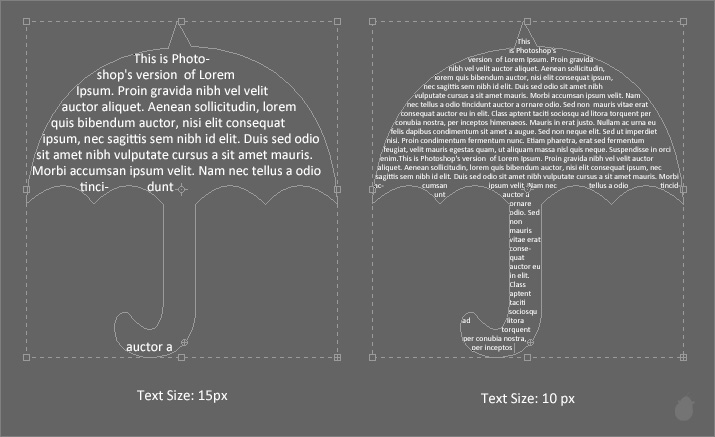
Sometimes when you are creating text and if the path is narrow, you might have noticed the broken text. This is because of the text size.
The left image (fig 16.0) is 15 px and the right image is 10px. If you want to spread the text evenly, you can use justification options from the paragraphs panel.
You cannot delete the Path type from the paths panel. Since it is linked with the Text layer, deleting the layer will deletes the path along with it. Notice the Delete icon is grayed out in the paths panel.
If you want to preserve the path, you can save it.
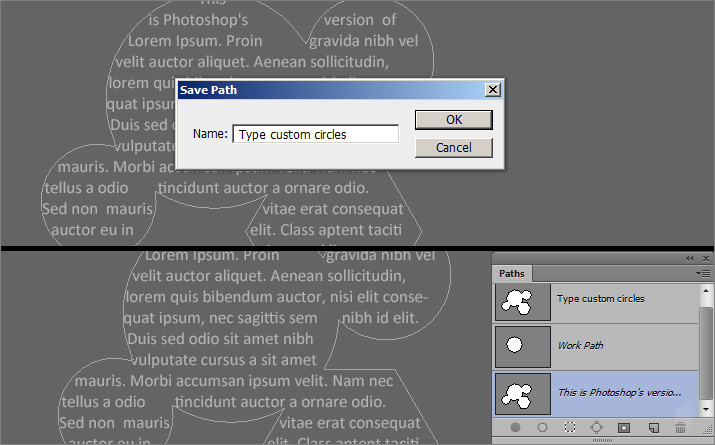
Go to 'Paths panel menu' and select 'Save Path..' (fig 17.1 - 1) or you can double-click in the paths layer name (fig 17.1 - 2).
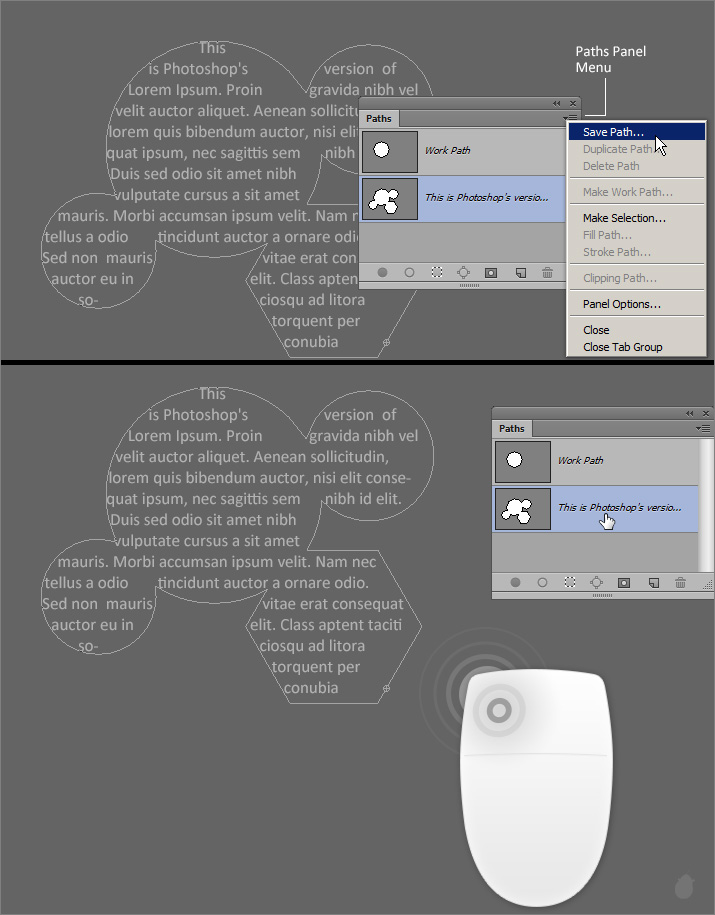
You can give it a name in the 'Save Path' dialog box and press 'OK'. Notice in the paths panel the same 'Path type' is duplicated and created on top. Now if you delete the text layer, only the path type deletes along with it.
Next Essential >> Essential for Type Tool 8
Previous Essentials
Type on Path >> Essential for Type Tool 5 and Type inside Path >> Essential for Type Tool 6
When you are in the edit mode for Type on path, moving the mouse-cursor outside the path and text area will toggle to move tool.
I have a simple text here (fig 1.0), the green box is just a reference to show you how far you have to move the cursor. When you are in move control you can move the text anywhere, the path follows along with it.
(fig 1.0)
Just like Point type, holding Ctrl (Windows) Command (Mac OS) will display the transform box around the text. Notice the overflow icon in the transform box at the bottom right.
(fig 2.0)
When you see the transform box, moving the mouse outside will display transform control and inside will display move control, this is same as the point type. But, if you keep the mouse-cursor on the path, it will display 'I-beam with an arrow'.
Type path has to be selected in the paths panel to display this cursor.
(fig 2.1)
If the Type path is not selected in the Paths panel, only two controls are visible. Cursor inside the transform box is Move control and outside Transform control.
(fig 2.2)
We just saw in (fig 2.1), if the path is visible when pressing the Ctrl (Windows) Command (Mac OS) and mouse-over on the path will display the I-beam with an arrow cursor.
You can also select Path selection or Direct selection tool from the tool bar and mouse over the Type path. This will display the same I-beam with an arrow cursor (fig 3.0).
If you mouse-over in the Starting point of the text, the arrow will be pointed towards the text direction, if the cursor is at the end of the path, the arrow will be in the opposite direction. If the text has center alignment, the cursor will change to two arrows facing in opposite direction if you place the cursor in the center.
(fig 3.0)
We have seen earlier, if the cursor is on I-beam and click and drag will highlight the text. But, with this tool (I-beam with an arrow) you can move the text without moving the path. This is helpful to adjust the Starting or the Ending point.
Just keep the cursor at the Starting point and click and drag along the path to move its position or you can directly place the cursor wherever you want in the path and click will shift all the text to that position.
(fig 4.0)
You can also click and drag down, this will shift the entire text below the path, and also this will shift the Starting and Ending point. Notice the entire text is flipped.
(fig 5.0)
This will also work in closed path, keep the mouse-cursor at the Starting point of the text and drag inside.
(fig 6.0)
After we commit the text, the I-beam cursor will display only if we mouse-over on the text area (green box). If the cursor is out of the text area, it will display Move control. Unlike edit mode we do not need to move the cursor outside the path area.
(the green box is just a reference to show you how far you can move the cursor)
(fig 7.0)
Same for closed path (fig 7.0).
You can also move the path with Path selection tool and the text follows automatically (fig 8.0 - 1).
If you want to move a selected anchor point, use Direct selection tool (fig 8.0 - 2). The flow of the text will automatically adjusted.
The Path selection tool or Direct selection tool has to be on a path; if you mouse-over on a text, it will display 'I-beam with an arrow'.
(fig 8.0)
The curve here (fig 9.0) is stopped at the bottom, we can also extend the path and adjust the end point to see the rest of the text.
(fig 9.0)
Select the pen tool from the toolbar and mouse-over on the end of the path, you will see a small circle next to the pen tool (fig 9.1 - 1), extend the path by adding more anchor points.
When you extend from a Type path, notice in the paths panel (fig 9.1 - 2). The extended path is directly added to the type path and not in the Work path. We are actually extending the baseline of the text.
(fig 9.1)
Once you have extended the path, select the path selection tool from the toolbar, and drag the ending point towards inside to extend the text.
(fig 9.2)
Starting point and Ending points are easily noticeable. Starting point will have a 'X' and the Ending point will have a small circle, if the text is longer than the path then a '+' (Plus sign) appears inside the circle.
If the text is aligned center, a small circle will display inbetween the Starting and the Ending point.
(We will learn more about alignments in the options bar essential)
(fig 10.0)
In a closed path, if you see the overflow icon. You can extend the bounding box, this will reveal all the text. To constrain the box, hold the Shift key.
(fig 11.0)
If you mouse-over on a small circle for Type inside closed path, nothing will happen. We do not see the I-beam with an arrow cursor here. It is only for Type on path.
(fig 12.0)
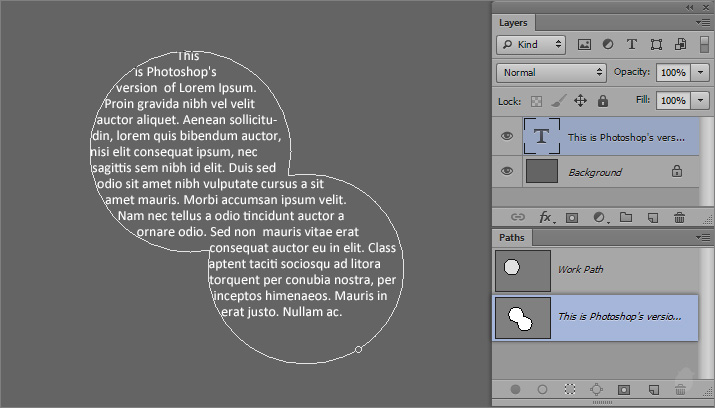
You can also extend the text by adding more path to an existing path.
Select the Ellipse tool from the tool bar (make sure the option is set to 'Path' from the options bar) and select the Type path layer (if not selected) and hold the 'Shift' key (if you do not hold the shift key, Photoshop thinks you want to create a new path and it will move to Work path) and drag to create an another circle, remember the new path has to overlap the old one.
(fig 13.0)
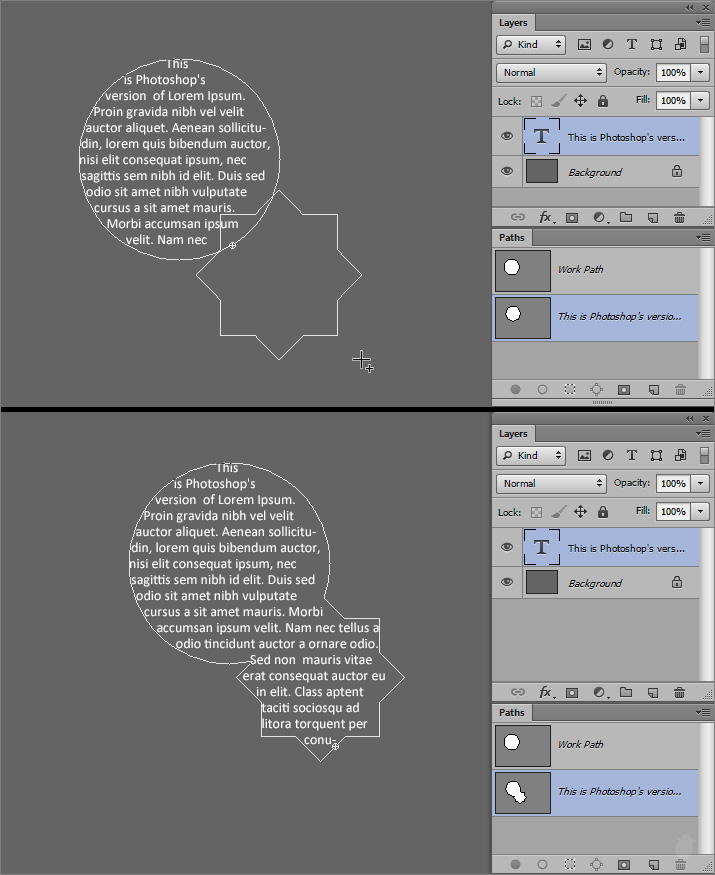
Once you release the mouse-cursor, the both path becomes one, and the text flow expands to the second path. Notice the new circle is added directly to the Type path.
(fig 13.1)
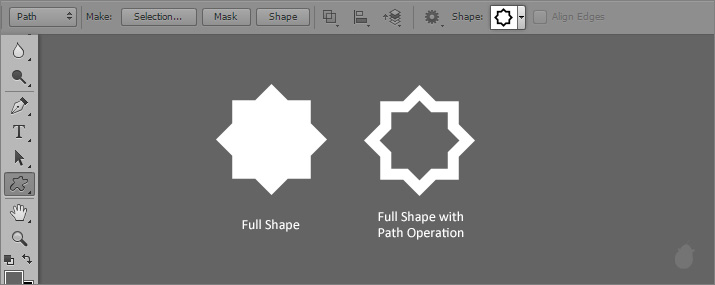
When adding new shape to an existing Type path it should be fully closed, if you remember from our previous essential Type path will knocks out all the path operations like Subtract inside the path.
I have two star shapes here, this is taken from the Custom shape picker from the options bar. The first one is a Full shape closed path and the second one is also closed but with path operation (subtract). Let's try adding these to our existing path and see how it works.
(fig 14.0)
Let's see the fully closed path first. Select the Type path in the paths panel and hold the shift key and click and drag to overlaps the first circle. After i release the mouse, the text flows to the second path just in the (fig 13.1).
(fig 14.1)
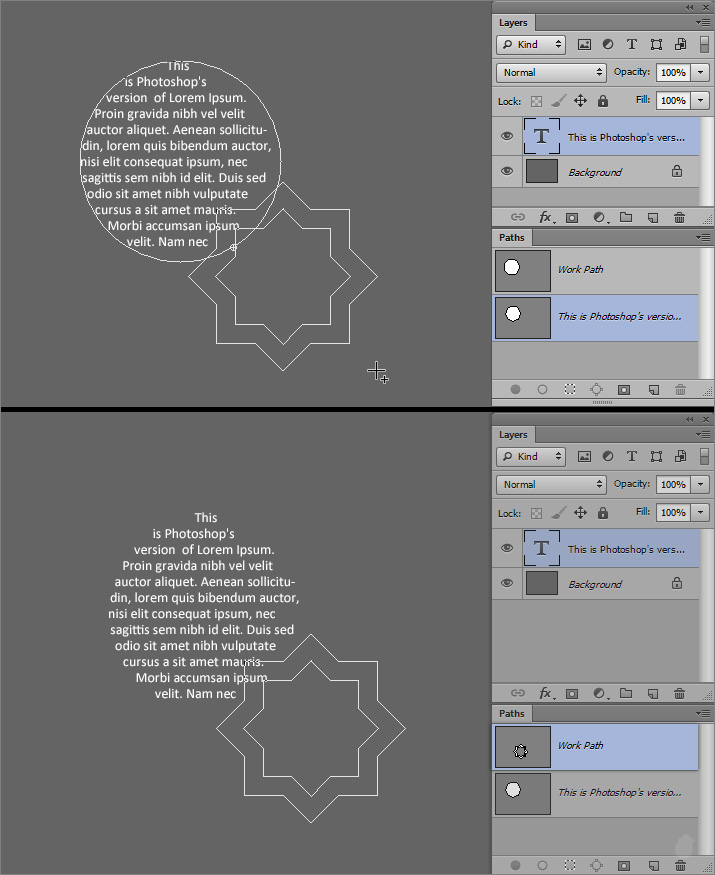
We will try the same thing with the subtract path. I have selected the Type path in the paths panel and clicked and drag in the work area and make sure it covers the other path.
Once i released the mouse, the path is automatically moves and replaced the existing path in the Work path.
Whenever you are adding any new path with the existing path, make sure it's a one clean path.
(fig 14.2)
Here's what you can use and what you cannot use.
(fig 15.0)
Sometimes when you are creating text and if the path is narrow, you might have noticed the broken text. This is because of the text size.
The left image (fig 16.0) is 15 px and the right image is 10px. If you want to spread the text evenly, you can use justification options from the paragraphs panel.
(fig 16.0)
You cannot delete the Path type from the paths panel. Since it is linked with the Text layer, deleting the layer will deletes the path along with it. Notice the Delete icon is grayed out in the paths panel.
If you want to preserve the path, you can save it.
(fig 17.0)
Go to 'Paths panel menu' and select 'Save Path..' (fig 17.1 - 1) or you can double-click in the paths layer name (fig 17.1 - 2).
(fig 17.1)
You can give it a name in the 'Save Path' dialog box and press 'OK'. Notice in the paths panel the same 'Path type' is duplicated and created on top. Now if you delete the text layer, only the path type deletes along with it.
(fig 17.2)
So far we have seen Point type, Edit Point type, Paragraph type, Edit Paragraph type, Type on path, Type inside path and Edit Type on path and Type inside path. And these are only for Horizontal Type tool.| > Horizontal Type Tool Essentials < |
| Point Type | Essential for Type Tool 1 |
| Edit Point Type | Essential for Type Tool 2 |
| Paragraph Type | Essential for Type Tool 3 |
| Edit Paragraph Type | Essential for Type Tool 4 |
| Type on Path | Essential for Type Tool 5 |
| Type inside Path | Essential for Type Tool 6 |
Next Essential >> Essential for Type Tool 8
No comments:
Post a Comment