

We are going to cover everything from Point type, Paragraph type, Type on Path and Type inside path.
Moving, Editing, Scaling Rotating, and other options are same as the horizontal type tool. Since the text orientation is different, some of the options have to match with the direction of the text.
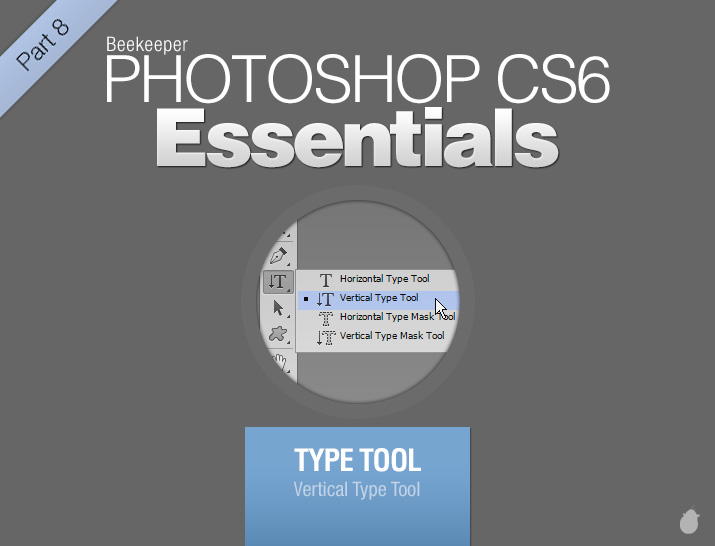
If you have any doubt i suggest you check the previous essentials before you check this. This is only for Vertical type tool.
Horizontal Type tool >> Essential for Type Tool 1
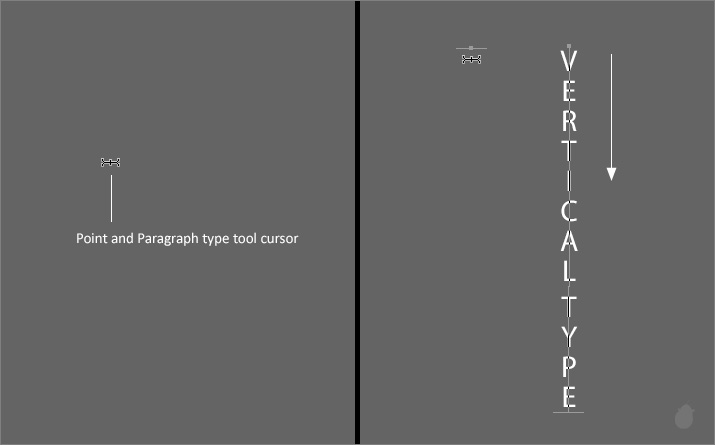
The cursor for vertical type tool is a horizontal I-beam. For Point type and Paragraph type its the same cursor, it doesn't have any dotted square with arrow around the I-beam like horizontal type tool.
When you click and started typing, the text will flow from top to bottom. The texts are parallel to the baseline.
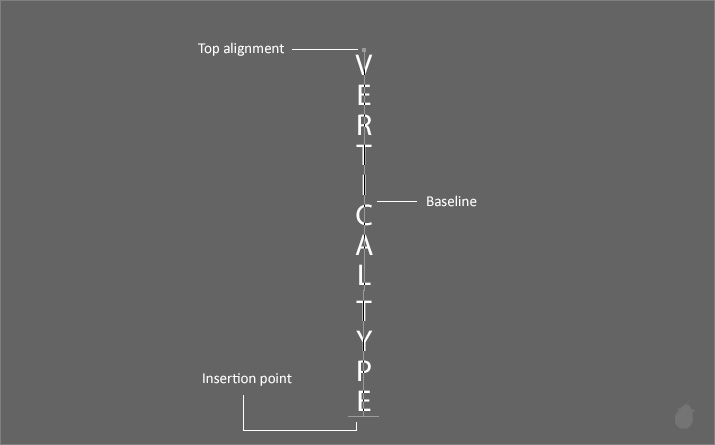
Wherever you click, it will be marked as a starting point for the text, i have 'Top align' here (fig 2.0), that is why the dot is on top of the baseline.
Longer text will go outside the screen. Just like Horizontal Point type you have to press Enter (Windows) Return (Mac OS) to move to next line.
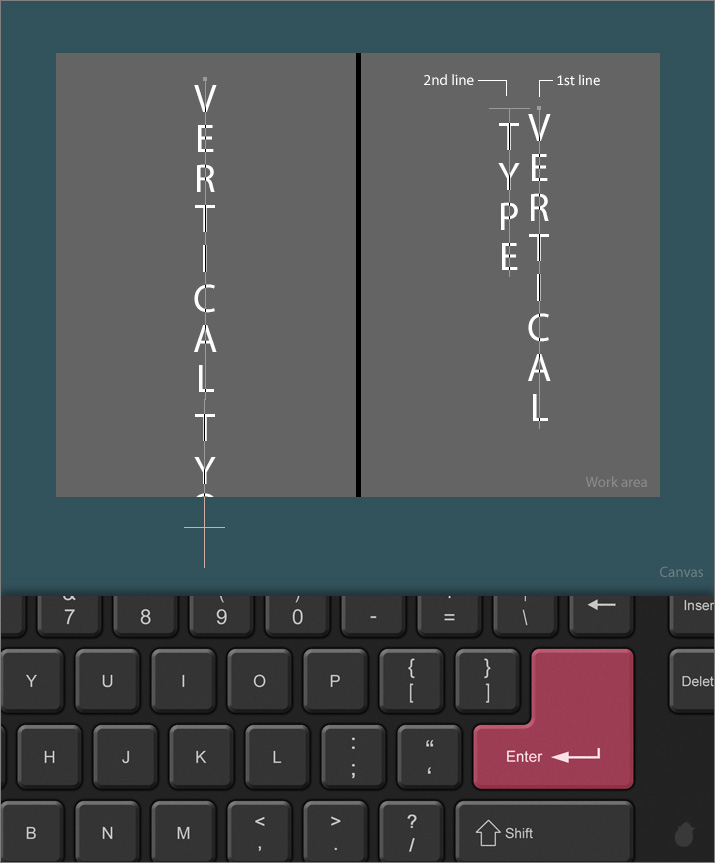
The next line will be before the first line. The order of the text for vertical type is right to left.
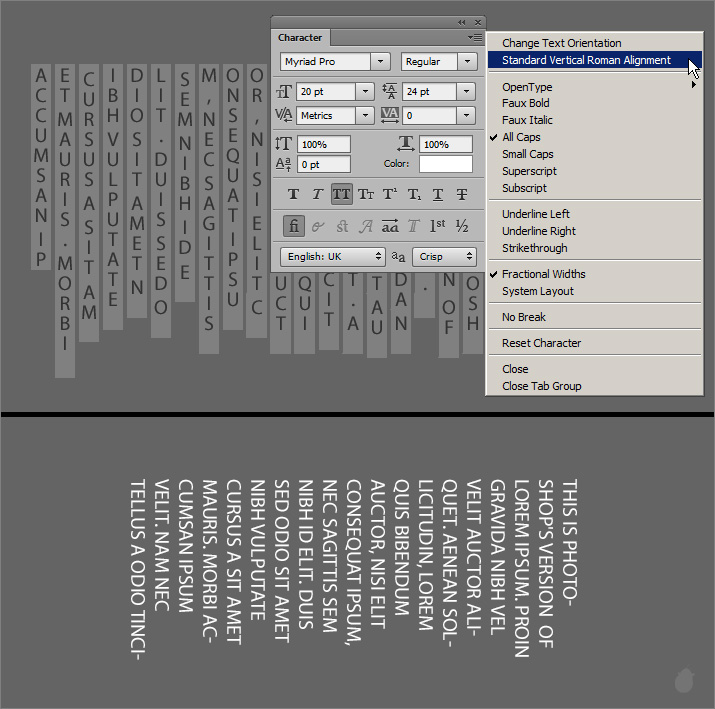
You can also rotate the text by 90°. Go to character panel and click on character panel menu and uncheck 'Standard Vertical Roman Alignment', this will be selected by default.
Uncheck this option will rotates the characters and it will appear perpendicular to the baseline.
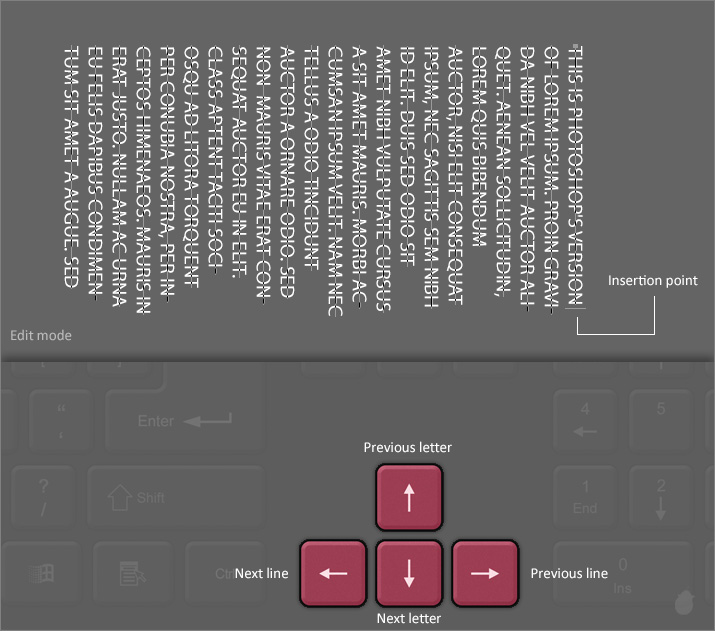
When moving Insertion point with keyboard arrow key, treat them in the same way how the texts are written.
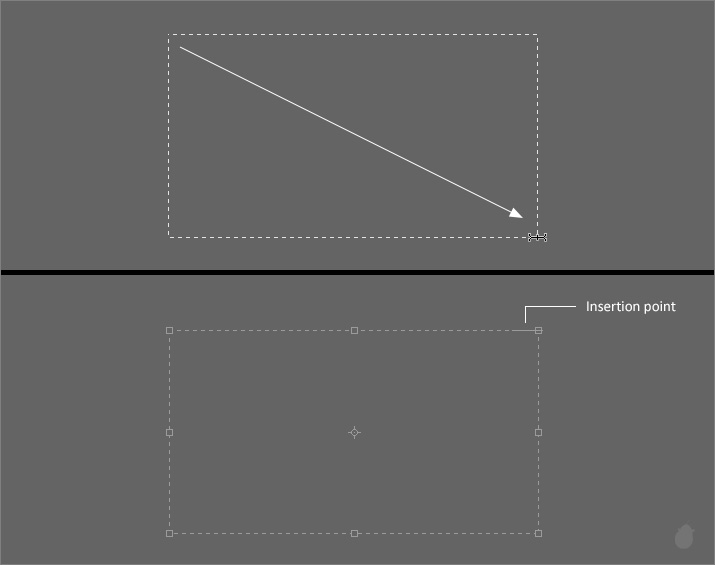
Drag with the same mouse-cursor to make a bounding box for paragraph type. The insertion point will goes to the top right (Top alignment).
Unlike point type the paragraph type covers all the empty places before goes to the next line.
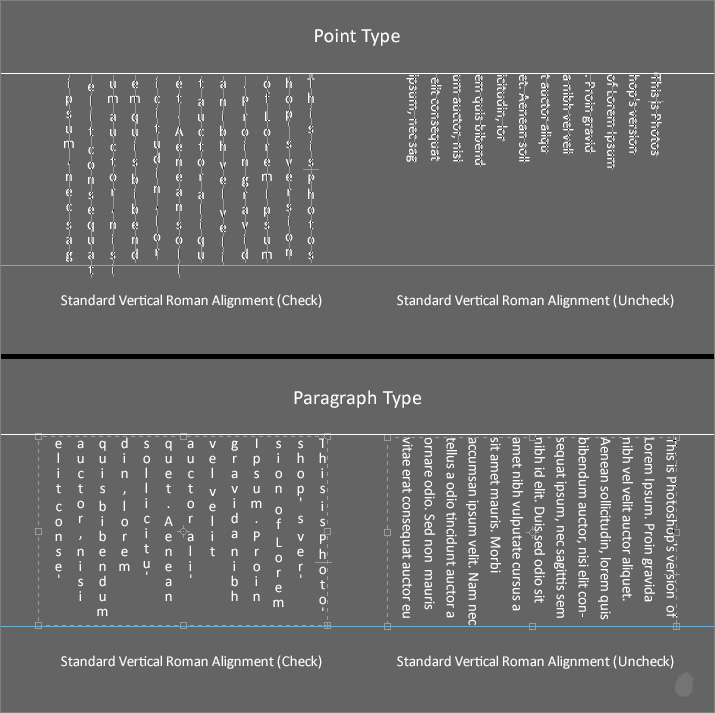
I have created the text with Point type (fig 7.0 - 1) and once the text reaches the blue line, i have pressed the Enter (Windows) Return (Mac OS) key to break the characters and send it to the next line.
And if i uncheck 'Standard Vertical Roman Alignment' from the characters panel menu, notice the space after each line and also it looks shorter. Because in Point type each line is independent.
For the paragraph type, the text distributes automatically with the remaining text (fig 7.0 - 2).
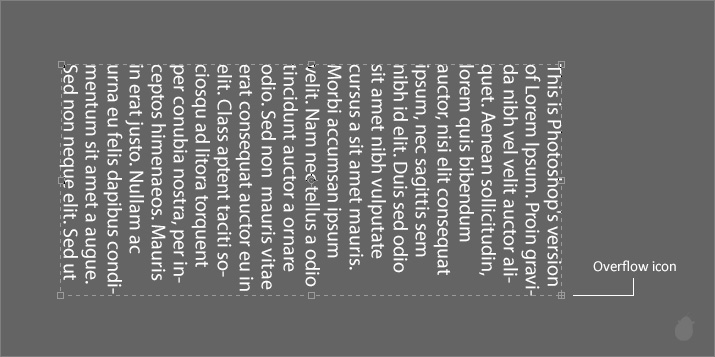
For horizontal paragraph type and vertical paragraph type the overflow icon is at the bottom right.
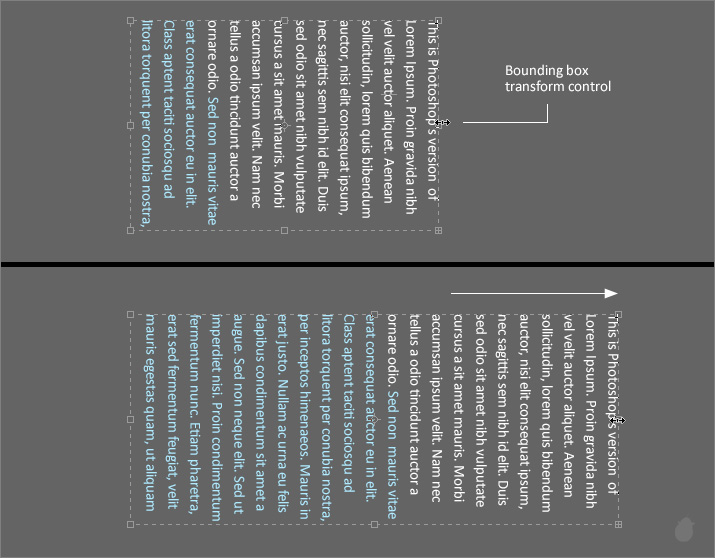
Just like the other paragraph type, you can pull the box in the opposite direction with the bounding box transform control and the text will automatically get adjusted.
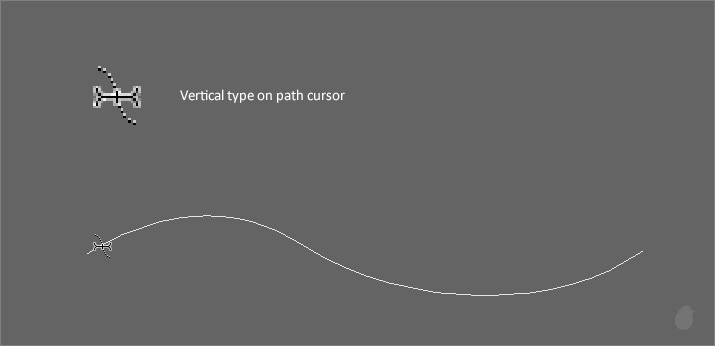
For vertical type on path cursor, the 'S' will be in the center of the I-beam when you mouse-over on a path.
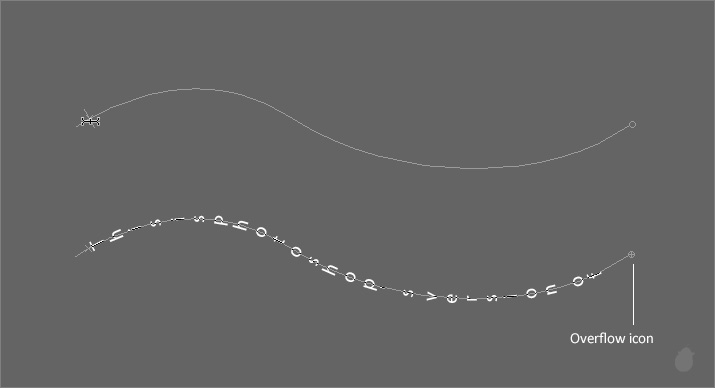
As you type the text flows in the path direction, notice the baseline is at the center and the overflow icon at the end.
Yes! i mean literally the text flows on the path. This will work if you want the text to flow on a piece of thread.
Uncheck Standard Vertical Roman Alignment will makes the text perpendicular to the baseline (path), just like horizontal type on path.
I-beam with an arrow is same as the horizontal type.
Because the type sits right in the center of the baseline, it's hard to notice the flipped text (fig 12.0 - 2)
Text inside path will have the Horizontal I-beam inside a dotted circle with an arrow on top left. The Insertion point will be on the right side of the path.
Notice the overflow icon (fig 13.0 - 2) the bounding box will have the Plus at the bottom right and the path will have bottom left. Either way if you extend the box in any direction the text will adjusts automatically.
Next essential >> Essential for Type Tool 9
Moving, Editing, Scaling Rotating, and other options are same as the horizontal type tool. Since the text orientation is different, some of the options have to match with the direction of the text.
If you have any doubt i suggest you check the previous essentials before you check this. This is only for Vertical type tool.
Horizontal Type tool >> Essential for Type Tool 1
The cursor for vertical type tool is a horizontal I-beam. For Point type and Paragraph type its the same cursor, it doesn't have any dotted square with arrow around the I-beam like horizontal type tool.
When you click and started typing, the text will flow from top to bottom. The texts are parallel to the baseline.
(fig 1.0)
Wherever you click, it will be marked as a starting point for the text, i have 'Top align' here (fig 2.0), that is why the dot is on top of the baseline.
(fig 2.0)
Longer text will go outside the screen. Just like Horizontal Point type you have to press Enter (Windows) Return (Mac OS) to move to next line.
(fig 3.0)
The next line will be before the first line. The order of the text for vertical type is right to left.
(fig 4.0)
You can also rotate the text by 90°. Go to character panel and click on character panel menu and uncheck 'Standard Vertical Roman Alignment', this will be selected by default.
Uncheck this option will rotates the characters and it will appear perpendicular to the baseline.
(fig 4.1)
When moving Insertion point with keyboard arrow key, treat them in the same way how the texts are written.
| Moving the Insertion point with Keyboard Arrow Key |
| Top arrow: | Previous letter |
| Down arrow: | Next letter |
| Left arrow: | Next line |
| Right arrow: | Previous line |
| Ctrl/Command + Top arrow: | Move to the Previous word |
| Ctrl/Command + Down arrow: | Move to Next word |
| Ctrl/Command + Left arrow: | End of the paragraph (Paragraph Type) Start of the Next Line (Point Type) |
| Ctrl/Command + Right arrow: | Start of the Paragraph (Paragraph Type) Start of the Previous Line (Point Type) |
| Shift + Top arrow: | Highlight the Previous letter |
| Shift + Down arrow: | Highlight the next letter |
| Shift + Left arrow: | Highlights the same/next line |
| Shift + Right arrow: | Highlights the previous line |
| Ctrl/Command + Shift + Top arrow: | Highlights the Previous word |
| Ctrl/Command + Shift + Down arrow: | Highlights the Next word |
| Ctrl/Command + Shift + Left arrow: | Highlights all the Next paragraph (Paragraph Type) Highlights the Next Line (Point Type) |
| Ctrl/Command + Shift + Right arrow: | Highlights all the Previous paragraph (Paragraph Type) Highlights the Previous Line (Point Type) |
(fig 5.0)
Drag with the same mouse-cursor to make a bounding box for paragraph type. The insertion point will goes to the top right (Top alignment).
(fig 6.0)
Unlike point type the paragraph type covers all the empty places before goes to the next line.
I have created the text with Point type (fig 7.0 - 1) and once the text reaches the blue line, i have pressed the Enter (Windows) Return (Mac OS) key to break the characters and send it to the next line.
And if i uncheck 'Standard Vertical Roman Alignment' from the characters panel menu, notice the space after each line and also it looks shorter. Because in Point type each line is independent.
For the paragraph type, the text distributes automatically with the remaining text (fig 7.0 - 2).
(fig 7.0)
For horizontal paragraph type and vertical paragraph type the overflow icon is at the bottom right.
(fig 8.0)
Just like the other paragraph type, you can pull the box in the opposite direction with the bounding box transform control and the text will automatically get adjusted.
(fig 8.1)
For vertical type on path cursor, the 'S' will be in the center of the I-beam when you mouse-over on a path.
(fig 9.0)
As you type the text flows in the path direction, notice the baseline is at the center and the overflow icon at the end.
(fig 9.1)
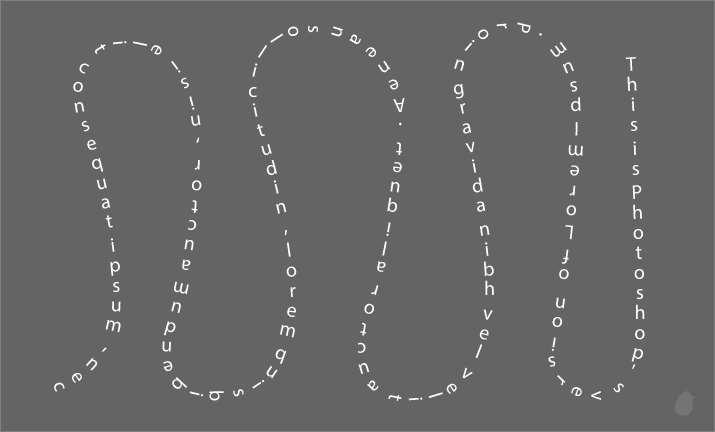
Yes! i mean literally the text flows on the path. This will work if you want the text to flow on a piece of thread.
(fig 10.0)
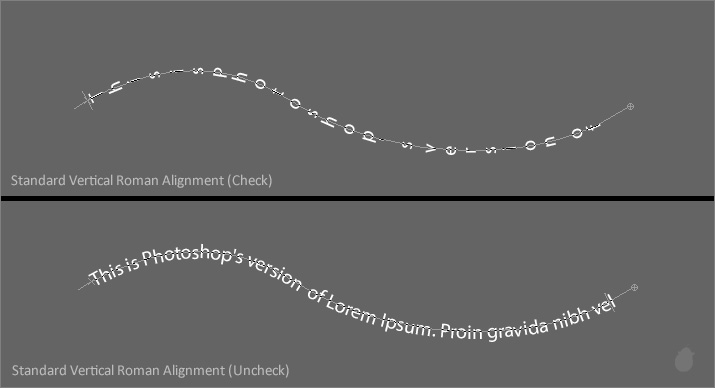
Uncheck Standard Vertical Roman Alignment will makes the text perpendicular to the baseline (path), just like horizontal type on path.
(fig 11.0)
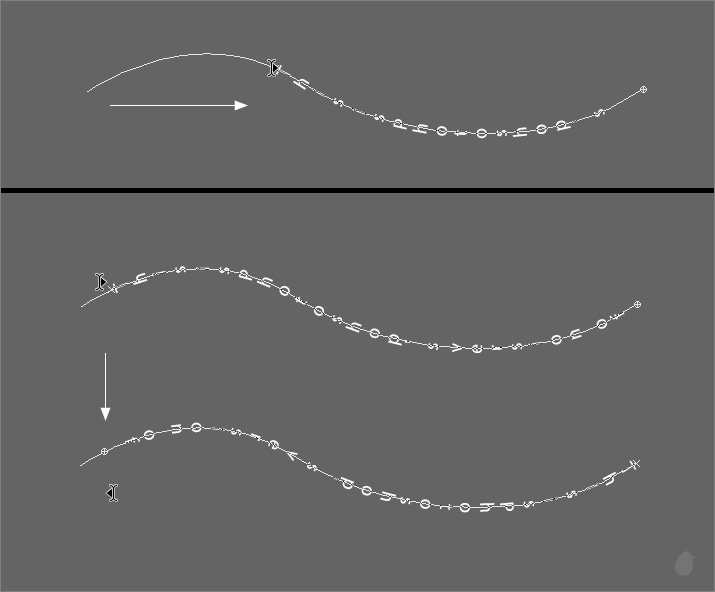
I-beam with an arrow is same as the horizontal type.
Because the type sits right in the center of the baseline, it's hard to notice the flipped text (fig 12.0 - 2)
(fig 12.0)
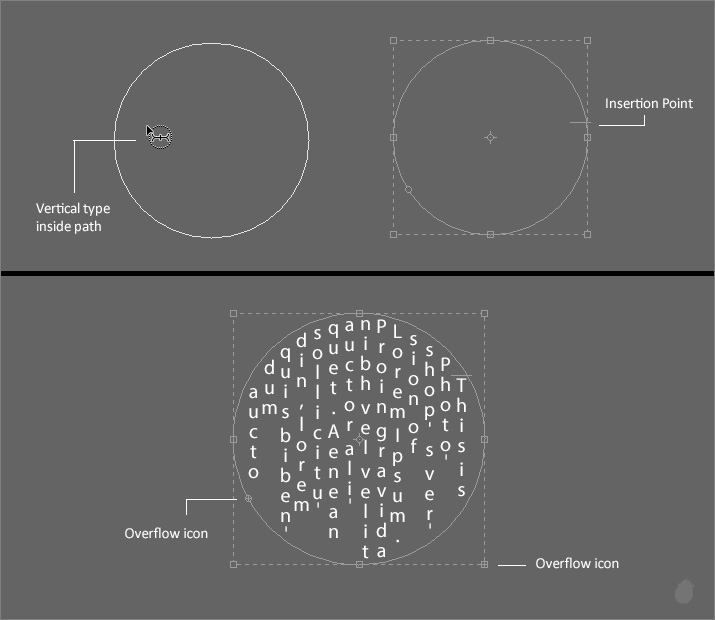
Text inside path will have the Horizontal I-beam inside a dotted circle with an arrow on top left. The Insertion point will be on the right side of the path.
Notice the overflow icon (fig 13.0 - 2) the bounding box will have the Plus at the bottom right and the path will have bottom left. Either way if you extend the box in any direction the text will adjusts automatically.
(fig 13.0)
Next essential >> Essential for Type Tool 9
1 comment:
THANKS VERY MUCH!
Post a Comment