


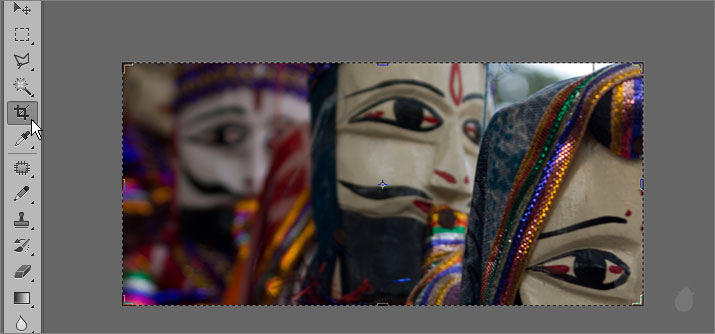
Cropping in Photoshop CS6 has improved drastically compared to CS5, at first its hard to control and might be little confusing, but once you get your hands on, its pretty easy and powerful.
Unlike the older version of photoshop, you don't need to draw a rectangle on the screen to display the cropping box. In CS6, when you select the cropping tool the cropping box appears immediately with cropping handles.
Crop Tool Options Bar
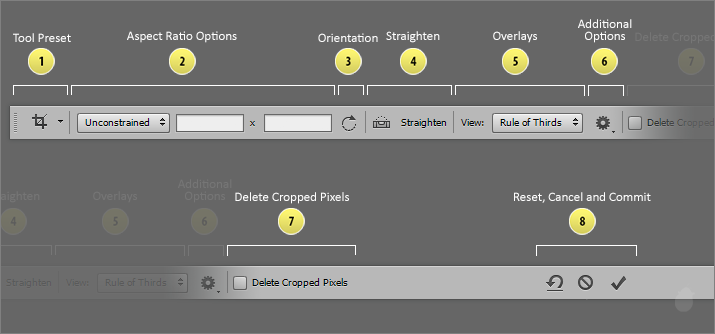
1. Tool Presets
Tool
Presets helps you to save your presets which you can use it for later use
or you can access even if other tools selected. You can also save
your presets in a folder and you can load them in the older version of photoshop
or even you can share it with your collaborators who are working on a
same project.
2. Aspect Ratio Options
Clicking the dropdown arrow will show you the presets and other options for the aspect ratio.
2. Aspect Ratio Options
Clicking the dropdown arrow will show you the presets and other options for the aspect ratio.
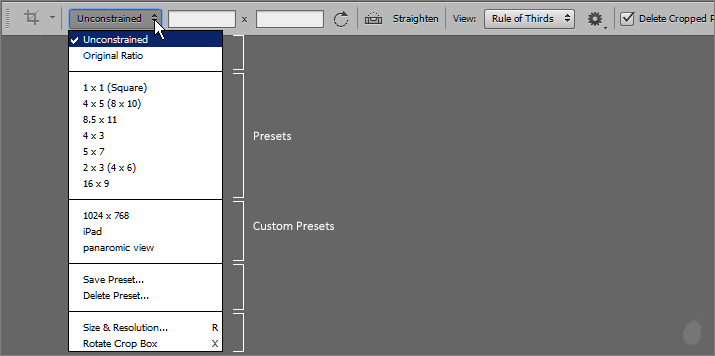
Unconstrained
This option will let you freely adjust any of the cropping handles without constraining to any aspect ratio.
Original Ratio
Will maintain the original aspect ratio of your image. Lets say you have a 16x9 aspect ratio of a frame and if you crop the image, the ratio is still maintains to 16x9.
Presets
1x1 (square)
4x5 (8x10)
8.5x11
4x3
5x7
2x3 (4x6)
16x9
are the presets which ships along with photoshop. You can use them if you want or you can create your own
Custom Presets
User presets are displayed below the photoshop presets.
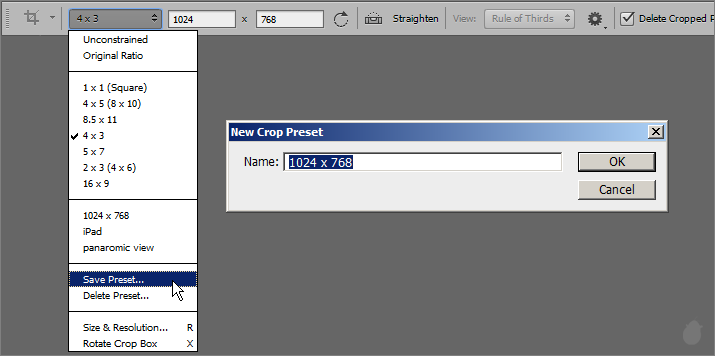
Save Presets
You specify the width and height in the options bar and click the Save Preset from the drop down menu, which will bring a pop-up window. You can give any name you want, and click 'OK' will add that to the preset list.
Delete Preset
This will delete the preset on the list, selecting this option from the drop-down will bring the pop-up box ‘Delete Crop Preset’ where you can see the available presets, select the one you want and click delete will remove that preset from the list.

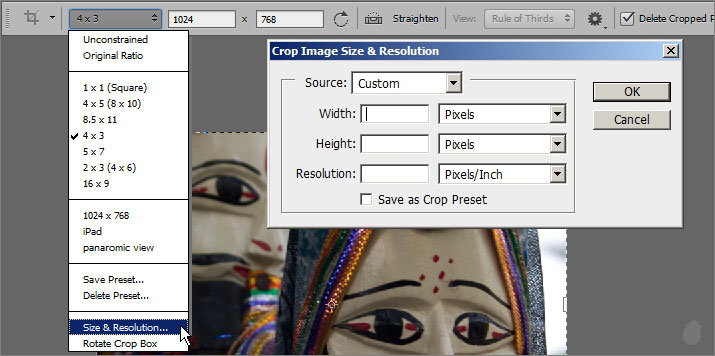
Crop Image Size & Resolution
You can use this option to save your presets with resolution. The width, height and resolution you add here will display on the current opened image. If you want this to be on your preset list, you can select 'Save as Crop Preset' at the bottom of this window and click 'OK' will display the 'New Crop Preset' box to confirm the name and it'll added on the list.
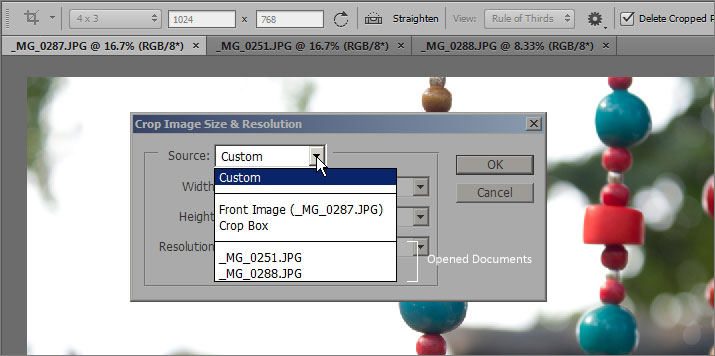
If you select the Source from the dropdown menu, you have an option to select Front Image, (current image aspect ratio and resolution) or Crop Box (crop region on the current image with resolution) and also you can select any opened documents, selecting any of these will automatically fill the width and height in the field box including the resolution.
You can see the image below, i have three documents opened 'Front Image (current document) and the others are at the end of the list.
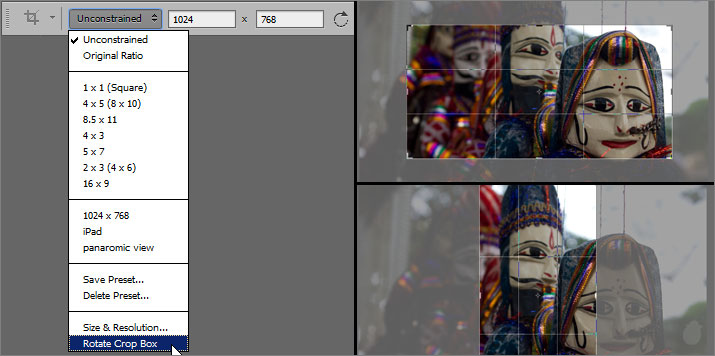
Rotate Crop Box
This will rotate the crop box in the image, you can also press 'X' on the keyboard for shortcut.
3. Orientation
Which is the same as the 'Rotate Crop Box' under the aspect ratio options. Also the same shortcut key 'X' on the keyboard.
4. Straighten
This will straighten the image. This tool acts much faster than the 'Ruler Tool' under eyedropper. 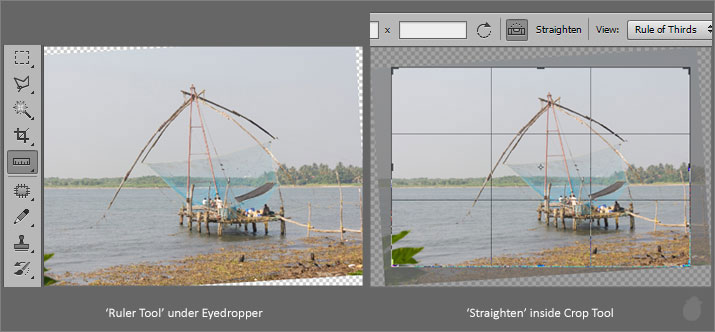
In Ruler Tool under eyedropper you have to draw a line on the image and click the 'Straighten Layer' button on the options menu to straighten the image. That leaves with empty pixels around the image and you have crop the image to remove those pixels.
But here in crop tool, you draw a line and you release the mouse, the image is cropped immediately. And you can still rotate or crop the image without committing. And if you want to cancel this operation just press the 'Esc' key. It is as simple as that.
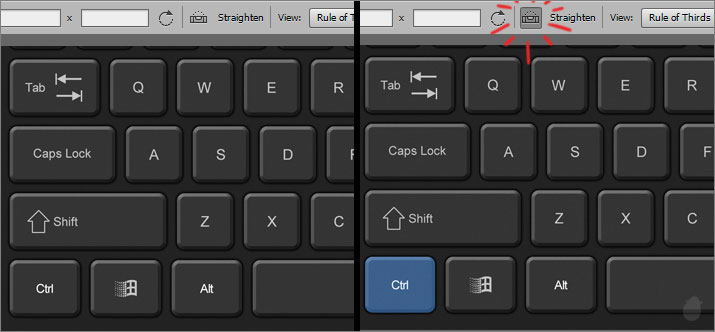
If you are in the crop tool, pressing the 'Ctrl' in the keyboard will toggle the tool to straighten.
5. Overlays
Overlay are the grids that appear inside the cropping box. You can turn them off or turn them on, and you can also rotate them.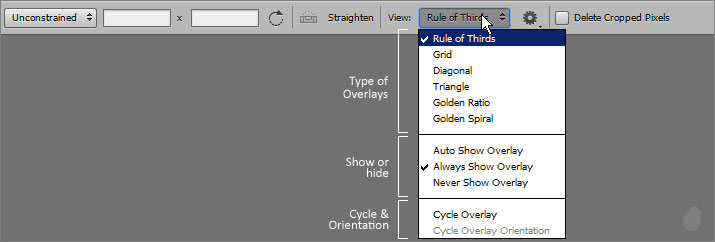
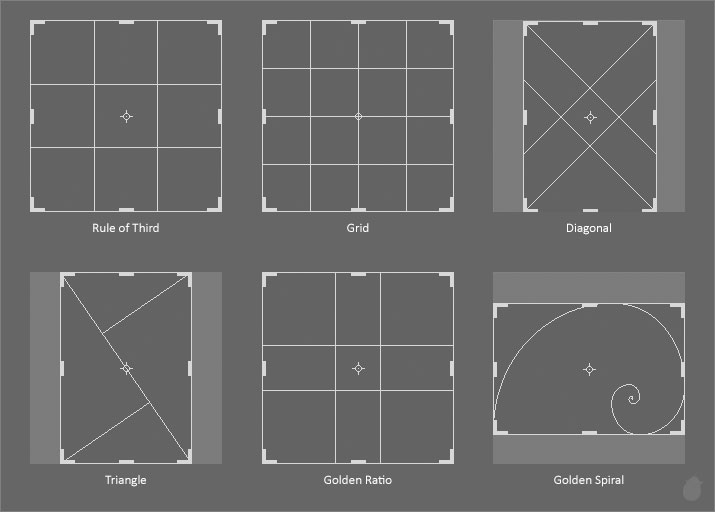
In the earlier version of Photoshop we have only two grid options, Rule of Thirds and Grid. But in CS6 we have six type of overlays to can choose from. Rule of Thirds, Grid, Diagonal, Triangle, Golden Ratio, and Golden Spiral.
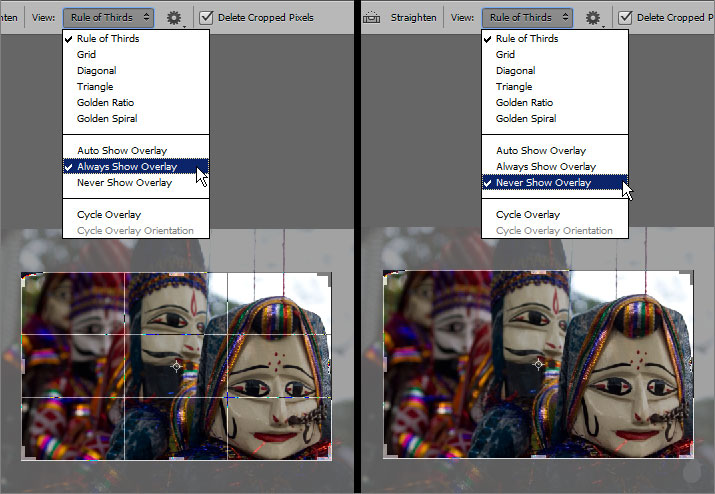
Three options for displaying overlay on your image, Auto Show Overlay, Always Show Overlay, and Never Show Overlay.
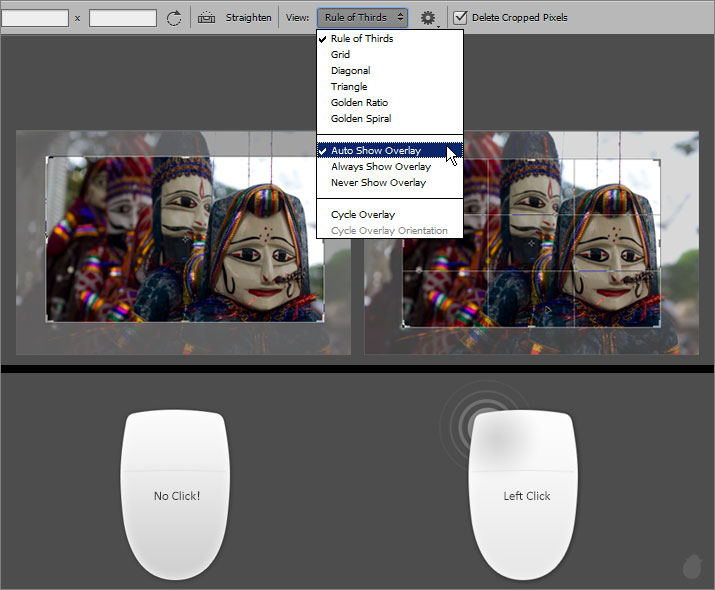
Auto Show Overlay
Will display only if you select the cropping box. You can see the image below, the first image has a bounding box but no overlay and the second one is the same, but with the mouse click you can see the overlay.
This will display the overlay always inside the crop box.
Never Show Overlay
Will never show the overlay, even if you click and drag the crop box. If you do not like overlay all together, then you can select this option.
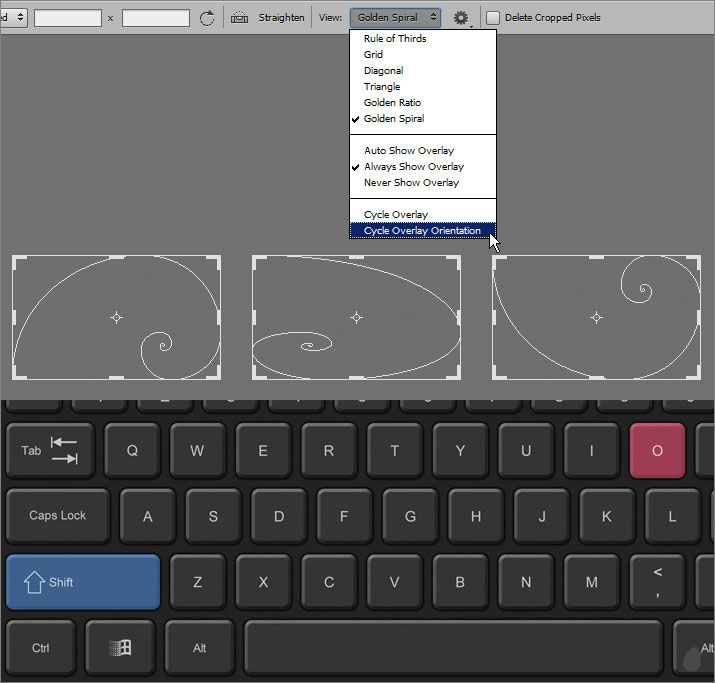
Cycle Overlay
This will cycle through all the six overlays, you can also use the keyboard shortcut 'O'.
Cycle Overlay Orientation
You can change the orientation of the overlays. And the shortcut is 'Shift + O' which rotate the overlay, this is best for Triangle, Diagonal, and Golden Spiral. Other overlays like Grid and Rule of thirds are not clearly visible, since both has an even pattern.
6. Additional Options
Additional options will give you more control on the crop tool.
Use Classic Mode
One of feature in the additional crop tool options is to turn off the new cropping features. Photoshop let you turn them off so you can use the crop box just like in the older version.
Use Classic Mode will disable the Auto Center Preview, Show Cropped Area and as well as Auto Adjust Opacity. You can also use the keyboard shortcut 'P' to toggle On or Off the use classic mode option.
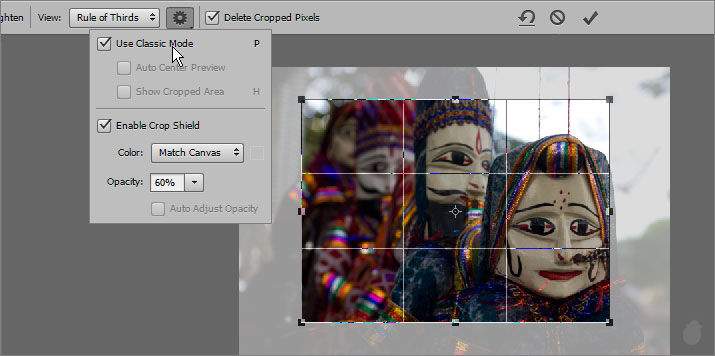
Remember, when you select the crop tool, make sure you select the crop box (in the image) to activate the cropping handles (or grids) then select 'P' to Turn Off or On to use the 'Use Classic Mode'. If the cropping box is not selected, pressing 'P' will switch your tool from crop to pen tool, which shares the same keyboard shortcut 'P'.
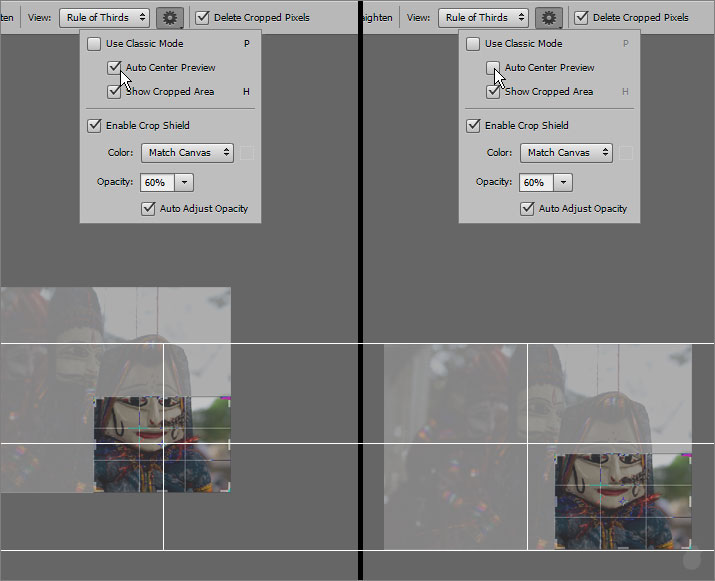
Auto Center Preview ('Use Classic Mode' should be Turned Off)
ON: This feature let you keep your crop box in the center of the screen, so if you move the crop handle the image moves and not the crop box.
OFF: Just like in the older version, when you move the crop handle the crop box moves and the image stays in the center of the screen.
In the example below, i have made a grid to illustrate this feature more clearly. I have moved the crop handle from top left to the bottom right.
The first image shows the crop box is in the center of the grid and it always stays in the center, and only the image moves. The second option is where the crop box moves and the image stays in the center.
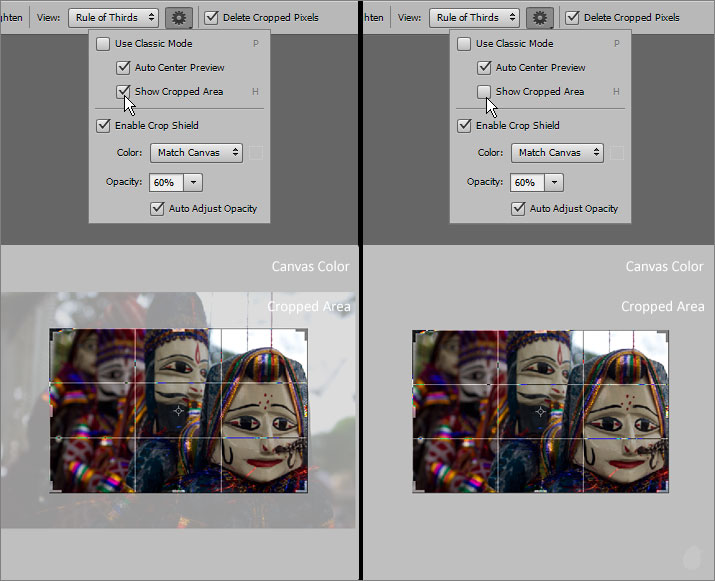
Show Cropped Area ('Use Classic Mode' should be Turned Off)
This feature let you hide the cropped area. It basically show the canvas color, if you are in the full screen mode with black as a canvas then this feature helps you to focus on the aspect ratio more clearly. The keyboard shortcut is 'H' on your keyboard.
Alternatively, you can also use the crop shield to set to 100% with the Match Canvas as a color, which gives the same result but you cannot turn off or on with keyboard shortcut.
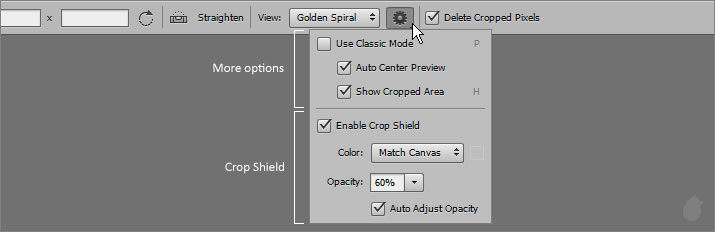
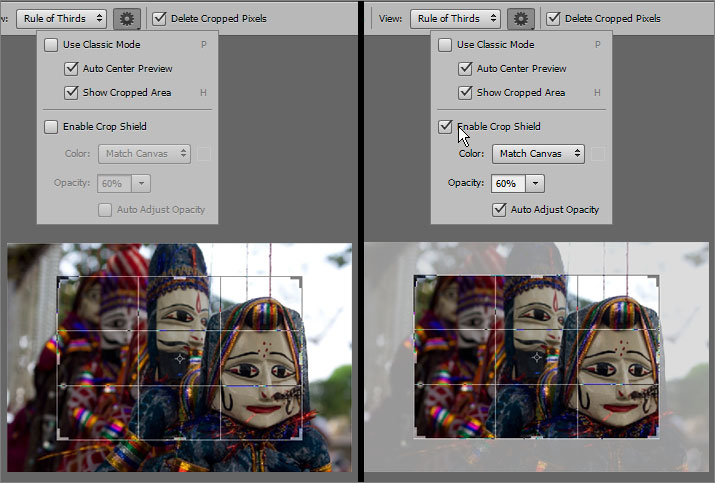
Enable Crop Shield
Enabling crop shield will turn on the cropped area color. This will help you to see how much the cropping is made.
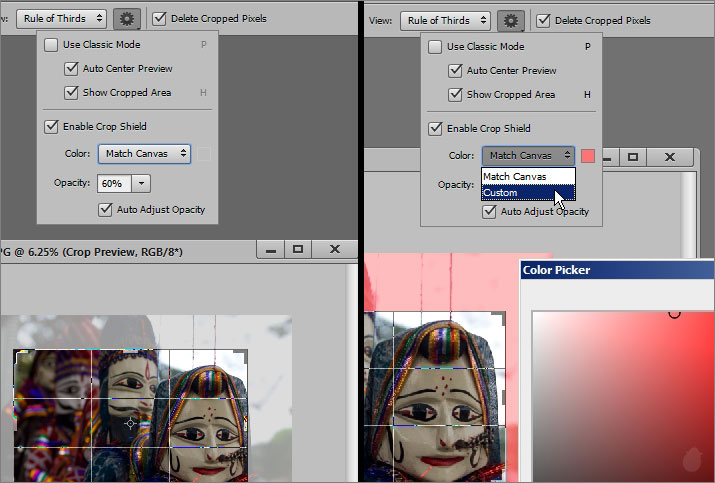
Color
Match Canvas: Will match the color with the canvas color
Custom: If you want a different shield color then you can use this option, which brings the color picker.
Opacity: Control the transparency for the shield color, it works both for match canvas and the custom color.
Auto Adjust Opacity
If you select, move or rotate the crop box, the opacity for the crop shield will dim down. This is helpful if you are on the full screen mode and you have the opacity between 90% to 100% . By clicking on the image will reveal other pixels more clearly.
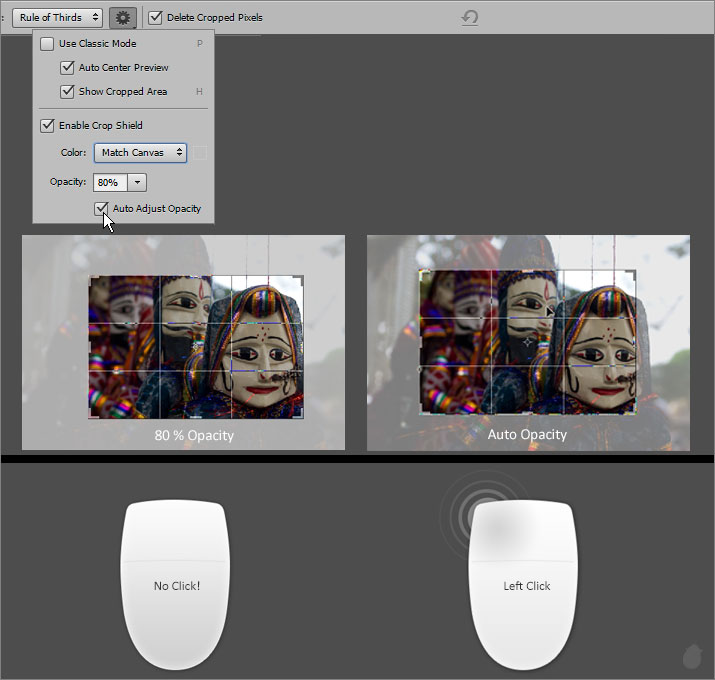
This will affect only the shield opacity and not the image. You can see above, on the left i have set the shield opacity to 80% and on the right when i select the image to move, opacity dims down from 80%.
If you Turn Off the shield this feature is disabled and also if you Turn On the 'Use Classic Mode' (older crop box) this option is not available.
7. Delete Cropped Pixels
One of the great new feature in CS6 for the crop tool is 'Delete Cropped Pixels' option. After you made the cropping, you can decide whether you want to keep the remaining image (cropped area) to be there or you want to delete them completely.
You can see the first image has a 'Delete Cropped Pixels' selected, and i have made a smaller crop box and committed which deletes the cropped pixels completely and you can see the file size has been reduced to half.
The second image with uncheck 'Delete Cropped Pixels', even-though it is committed to small size the file size remains the same.
Doc: 24.8M/51.3M
(24.8M - is the size of the cropped image and 51.3M - is the size of the original image)
The advantage of keeping the remaining pixels is, you can come back anytime and and get your full image back, all the pixels are preserved, even if you saved and closed the document.
8. Reset, Cancel, and Commit
These tools are available when you activate the crop box.
Reset will reset the commands. In the older version of photoshop it was called 'Clear'.
Cancel will cancel any operations on the screen and also deselects the cropping box selection (but the default cropping box display will be there) and Commit will accept any changed on the screen you made.
All three tools are activated only if the cropping box is selected in the image. If you select one of the preset from the 'Tool Preset' (not the aspect ratio preset) only the Reset Button is visible.

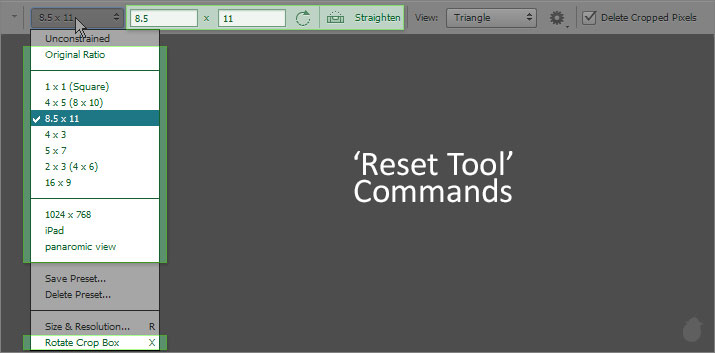
Reset:
When you make custom aspect ratio in the width and height box, you can reset to clear the box. If you have made any cropping in the image or if you have rotated the image, you can press reset to go back to where you have started. Reset will still keep the selection on the cropping box and you can still see the grid. it just resets your action back to 0.
But remember reset is not like a revert command under File menu, which takes you back to the start of the image.
Lets say you have an image with 500x500 px and you cropped to 250x250px and you have accepted the changes and committed, pressing reset after commited will not take you back to 500x500px. If you haven't committed but made some adjustments to the crop box, then using reset will clear the adjustments.
Reset tool will work only on these selected options and including the crop box adjustment on the image.
Cancel
Cancel will cancel the operation and deselects the crop box. You can also use the 'Esc' key on the keyboard to cancel the operation.
Commit
Accepting changes. You can also use the 'Enter' key on the keyboard to accept the changes.
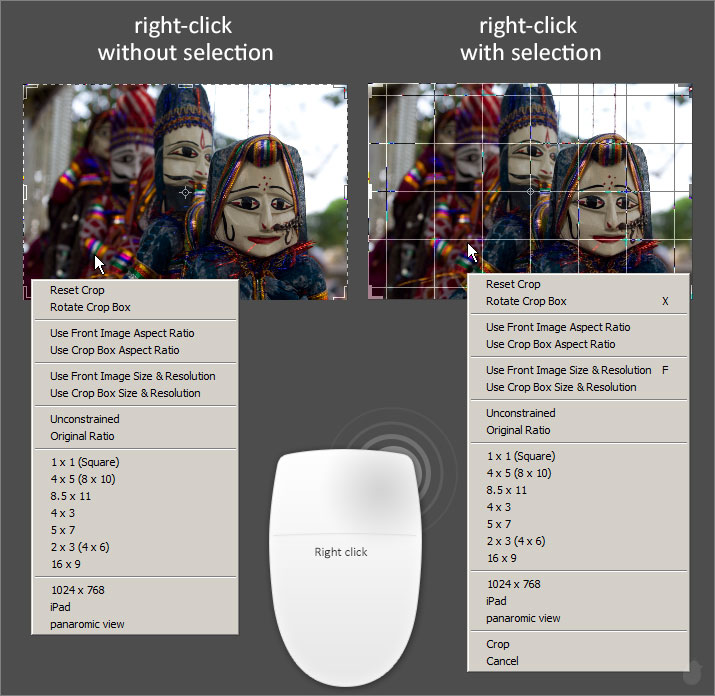
Right Click on the image
Almost all the presets and custom aspect ratio and other options you can access without selecting the crop box (first image). If you select the crop box you get extra two options, 'crop' and 'cancel' which is at the end of the pop-up menu.
Next Essential >> Essentials for Perspective Crop Tool
2 comments:
Your images and texts are really great! Thanks for sharing!
Question please: Is there a way to install or adapt such grids into CS5 environment?
Post a Comment